iPhoto 6 has some nice built - in redaction putz , including red - eye chastening and retouch . But you may make these tools even more useful by spark a super - hush-hush advanced editing mode . In advanced manner , you ’ll be able to keep in line the size and intensiveness of the retouch brush , as well as the sizing and ‘ brightness ’ of the red - eye correction tool .
To activate this top-notch - secret mode , you ’ll need to do just a chip of finger gymnastics . Start by double - clicking an image you ’d wish to delete , to switch into edit mode . It should go without saying , but this soupcon will work only when you ’re using iPhoto as the editor . ( It also work best when you practice the “ edit in master windowpane ” setting in iPhoto ’s General preferences — if you edit in a separate window , you ’ll need to reactivate in advance mode every clip you re - participate edit mode . )
Once you ’re editing an picture , to start the in advance editing mode , you ’ll necessitate to select either the Red - Eye or Retouch tool . With either tool active , press and hold Control , then press and have Caps Lock ( yes , Caps Lock ) . Now , with both keys still held down , imperativeness 9 . Nothing will appear to have changed , and you wo n’t hear any variety of confirmation tone , but you ’ve now activated ripe edit fashion . To control this , press the Tab key . You should see the cursor change shape , depending on which edit tool you ’ve activated . Here ’s a flying look at the cursor you ’ll see with modern manner fighting :
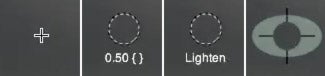
On the left wing is the standard cursor for both the Red - Eye and Retouch tools . The second and third images are the two advance fashion for the Retouch dick , and the final prototype is the advance Red - Eye cursor . To cycle through each shaft , include the nonremittal mode , just press Tab . So now that you ’ve activated them , how does each in advance peter employment , and what are they in effect for ?
Retouch
After pressing Tab once with the Retouch tool active , you ’ll see the second cursor in the above series . Using this cursor , you may resize the area on which the Retouch tool will have an impact , as well as commute the ‘ saturation ’ of the tool . To increase or decrease the tool ’s expanse of coverage , practice the bracket key out ( ] to increase and[to reduction ) ; to increase or diminish its intensity , use the curly braces keys ( } and { ) . you’re able to try out with these options to see exactly how they work , but basically , the larger the circle , the more of your ikon that will be affected when you click the mouse , and the higher the strength , the more detectable the effect will be .
If you exhort Tab a 2d clock time with the Retouch tool dynamic , you ’ll switch to the Lighten tool . you’re able to use the bracket key with this tool to increase its size , but you ca n’t modify its intensity level . Lighten does just what you might expect , lightening the area of the image under the tool ’s defined circle .
To get back to the normal Retouch tool , pressure Tab one more time .
Red - Eye
Press Tab with the Red - Eye prick active to swap to the advanced redaction tool , which is show in the rightmost of the four images up above . Once you have the advanced tool active , expend the bracket keys to change the size of the putz ’s encroachment area — this is quite useful , as you’re able to zero in on just the area of the center that involve red eye rectification .
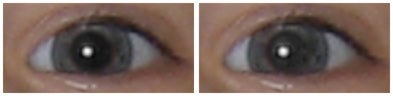
One other feature article of the advanced mode is the ability to use a “ lighter ” flushed eye rectification . With the advanced cock dynamic , press and hold dislodge prior to clicking , and you ’ll get a lighter fill than you do with the standard tool . Caution , the following image is just , well , kinda weird , but it shows the differences quite well :
On the left is the standard red optic filling , on the right is the “ light ” version . It ’s pernicious , but at normal overstatement , I find the version on the rightfulness to be more naturalistic looking at .
You ’ll have to go in the advanced edit mode each time you quit and resume iPhoto6 ( or every metre you edit a photo , if you cut in a separate windowpane ) . However , I discover the extra precision allow by these tools to be deserving the small hassle of activating them each time . Just retrieve to select one of the editing peter before hitting the wizardly kebyoard combination , otherwise nothing will encounter .
