A while back , I mention that I ’d be testing out a issue of possible rise for the MacBook Pro . One of those upgrades was Hitachi’sTravelstar 2.5″ Internal Hard Drive 2 - in-1 Notebook microcomputer Upgrade Kit($210 MSRP , although useable for around $ 200 at street prices ) , which I ’ve since installed and spent some time with . Here ’s a brief look at both the drive itself and the upgrade outgrowth . ( As I cite in that early clause , upgrading the hard drive in a MacBook Pro likely voids your warranty . )
Prep work
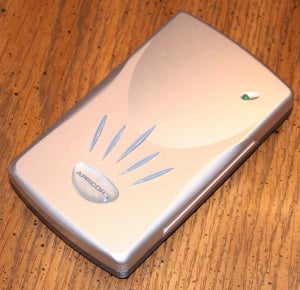
The Travelstar 5K160 Upgrade Kit is really Hitachi’sTravelstar 5K160 HTS541616J9SA002.5 - in SATA hard drive — which uses newerperpendicular magnetic recording(PMR ) technology — combine with a USB 2.0 drive enclosure and backup computer software . Although not the large laptop campaign out there — in the short time since I received this kit , Fujitsuand Western Digital have foretell 250 GB laptop drives compatible with the MacBook Pro — the 5K160 is a nice upgrade for those whose MacBook Pro ( or MacBook ) shipped with a much smaller drive .
Before you instal the drive , you ’ll necessitate to copy the data point from your original intemperate private road to the new one using the let in USB drive enclosure . Putting the new drive in the enclosure — it does n’t come pre - instal — is a simple process involve five Phillips screws , four to mount up the effort in the enclosure and one to secure the case . The crusade connect to your laptop using two USB cables , one for data and one for extra power . I ’m a big lover of grueling - parkway kits that admit such an enclosure , as it makes the cognitive process of re-create your data point before the swap much mere ( and faster)—otherwise , you ’d need to apply another Mac or a freestanding unvoiced drive to temporarily host your datum . And the enclosure rent you use your old hard crusade for accompaniment or other data store afterwards .
The Travelstar drive is ab initio initialise for Windows computers , so you require to use Disk Utility to initialize it as a “ Mac OS Extended ( Journaled ) ” volume . That labor out of the way of life , you ’ll want to make the novel drive aclone — a bootable , mirror - image written matter — of the honest-to-god one . Although you’re able to utilise Disk Utility ’s Restore blind to do this , I in person used SuperDuper , my favorite cloning utility . ( The 5K160 Upgrade Kit includes backup package for this purpose , but the software is Windows - only . ) In my example , cloning my MacBook Pro ’s build - in 100 GB drive took around an hr and a half .
Performing the surgery
The literal process of installing the new driving is the most difficult part of the upgrade . The MacBook Pro ’s hard drive is not auser - installablepart , so you wo n’t find instruction on Apple ’s support site . And Hitachi does n’t let in computer - specific installation instructions . So I turn toiFixIt ; specifically , the company’sprintable guideto upgrading the tough drive on a Core Duo MacBook Pro .
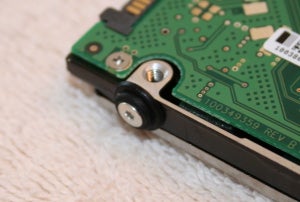
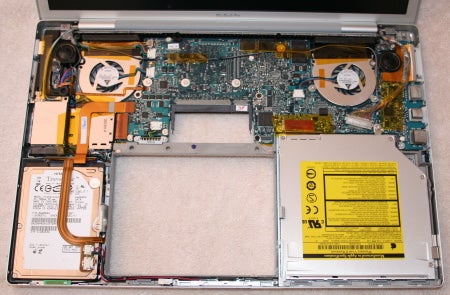
iFixIt ’s guides are broadly very good , explain — and exemplify with color photo — every stone’s throw down to the modest shtup . Well , almost : missing from this particular guidebook is any mention of two metal guides holding the MacBook Pro ’s strong drive in place , along with four rubber eraser - cover bolt on the driving force ( pictured at mightily ) that agree the drive in those guide . But it was easy enough to visualize out how to change over those bolt over to the new drive and fit the drive in the templet . In fact , thanks to the iFixIt guidebook , the entire process was fairly simple ; if you ’re comfortable with a screwdriver , you should be just fine . The scariest task — which occursafterremoving most of the screws — is lifting off the upper slip ( the piece containing the keyboard ) ; it feels like it might snap off in front , but some patient role jiggling eventually convert it to come off .
A couple tips before you start : First , iFixIt ’s guides tell you , right up front , what you ’ll need ( in this case , two screwdriver — a very small Phillips and a Torx 6 ) ; make certain you have those tools or else you ’ll ascertain yourself running to the store mid - disassembly . secondly , perhaps the most thought-provoking part of the summons is simply keeping track of all the screws ; swapping the drive on the MacBook Pro involve about 30 of them . I commend keeping a roll of office taping handy and using it to tape each shtup to the particular photo illustrate when to remove it ; when putting your MacBook Pro back together — you just accompany the instructions in reverse — this will make itmucheasier to work out out which screw goes where .
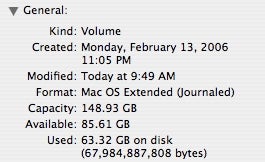
When you ’re finished , your MacBook Pro should boot up as if nothing has changed — except for the fact that its hard drive has quite a bit more virtual breathing elbow room . For example , here ’s the Finder ’s entropy for the Travelstar drive , which evidence that 160 GB equate to just under 149 GB of usable infinite :
( mark that if you ’ve got a MacBook , the process of swapping your hard movement is considerably easy . )
Performance and battery life
Although I did n’t put the fresh drive through a comprehensive set of bench mark , I did run some tryout to get a raspy idea of how it compared to my MacBook Pro ’s original crusade ( a 100 GB , 5400rpm Toshiba manakin installed when I buy the laptop directly from Apple in April 2006 ) . Before running any tests on the original effort , I backed it up , reformatted it , and restore it ; this was to ensure that the drive would be just as un - fragmented as the fresh drive . Each test was execute on both the original driving force before replacement and the raw effort after successor .
To get a basic approximation of each drive ’s functioning , I started with a booklet incorporate 545 minuscule image files , some 100 MB in total size . Using the Finder , I double that brochure , created a .zip archive containing both the original and the transcript ( 1090 files in all ) , and then un - archived the result archive . I timed this process three times and then averaged the times .
To get an idea of how the new drive impress my MacBook Pro ’s battery life , I make a Unix casing hand that double a large file ( 745 Mbit , in this case ) , deletes the duplicate , and then repeats the process ; the handwriting basically reads from and writes to the platter continually until the battery expire . I do this trial while booted up ordinarily ; however , for see to it that neither psychometric test would be affected by screen smartness or wireless bodily function , I set Energy Saver to never kip and never dim the screen , and I disabled AirPort and Bluetooth .
Relative drive performance
Finder test times in minutes : seconds , rounded to the near second . electric battery test times polish up to the nearest minute .
The newfangled drive was noticeably quicker , yet used less force than the factory - set up 100 GB modelling , which was itself supposed to be a bit quicker than the stock 80 GB drive included with most Core Duo MacBook Pros . The new Hitachi drive was also a bite quieter during use than the original drive .
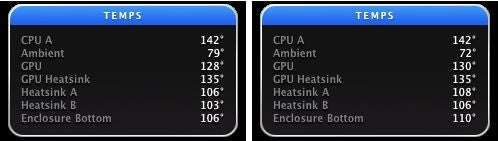
in the end , I also appraise the MacBook Pro ’s temperatures , using the excellentiStat nano , just after the shelling tryout finished — in other language , after the drive had been reading / writing continually , and the laptop had been pass off battery power , for over two hour . ( Note that the MacBook Pro in question was encased in a Speck SeeThru and sported a “ skin ” keyboard covering for both tests ; this likely increased temperature slightly , but it should have affect both drive equally . )
As you may see , the MacBook Pro ’s temperature readings with the new drive were almost the same as those take with the old one . The differences were small enough that they could have been due to factors other than the young drive ’s mathematical operation .
Space is good
Of course , the heavy benefit to upgrading to a drive such as this one is the extra storage space . Even my ancestry 100 GB , cavernous in content compared to the notebook computer drives of just a few geezerhood ago , was getting dangerously full before testing this upgrade . switch that old drive for a 160 GB model was almost luxurious — I could salt away much more medicine and video , and even had enough room left over to work with video from my DV camcorder in iMovie .
On the other hand , this special upgrade kit is relatively expensive . you could buy the drive itself as an OEM part for considerably less money ; for example , NewEggsells it for $ 115 . And you could find a like 2.5 - inch USB / SATA outside drive enclosure for $ 20 or less . Since the backup software included with the Upgrade Kit does n’t mold with Macs , going this route will economise you over $ 70 . The drawback is that the Upgrade Kit allow a three - year warranty on the drive as compared to the one - year coverage included with the OEM variation . Another option is Mac - well-disposed MCE Technologies , which sells a$139 rising slope kitthat includes the same Hitachi driving ( or a similar Samsung model ) , a USB drive enclosure , a one - year guarantee , peter , and notebook computer - specific installation instruction .
Regardless of which approaching you take , the Hitachi drive itself is a beneficial one for upgrading your MacBook Pro ( or MacBook , for that matter ) . If you ’re go low on storage quad , this drive offers telling capacity , as well as better carrying out and dispirited mogul use of goods and services than the stock cause .
( Stay tuned for more upgrade ; in future Mobile Mac installments , I ’ll be cover MCE’sOptiBay drive rising slope , Western Digital ’s 250 GB Scorpio hard crusade climb , and Toshiba ’s 200 GB portable external hard crusade . )
