To tote up extra optical interest to a picture , try using a fuzz filter to simulate move . Even though your matter is stationary in the photograph , the viewer ’s genius will go through the movement , which adds an component of hullabaloo . In fact , this proficiency is a bully way to call on a snapshot into something more artistic .
jubilantly , Photoshop and Photoshop Elements make the operation a piece of patty ( you may do it in Pixelmator , too ) . Read on to kick your subject into high-pitched gear !
Prepare your layers
In Photoshop , give an figure and trip the pertinent layer(s ) . If your document lie in of multiple layer ( say , you used another layer for coloration correction ) , trigger them and , in Photoshop CS3 or later , choose Filter > “ Convert for Smart Filters . ” This tell Photoshop to make a Smart Object from the active layers , which you’re able to reckon of as a protective wrapper . That means , the filter is applied to the wrapper instead of to its mental object .
or else , make a stump transcript for blurring by activating the topmost level and press Shift - pick - Command - E. When you do , Photoshop creates a new layer at the top of your layer mass that contains the subject matter of all seeable stratum . In your Layers panel , twice - click the new layer ’s name and come in “ blur . ”
The original layers ( give ) are sandwiched into a single smart object ( good ) . To edit your original layer(s ) , double - click the Smart Object ’s thumbnail and they open up in a temporary document . Make your changes , press Command - S to save , end the document , and your change appear in the original document .
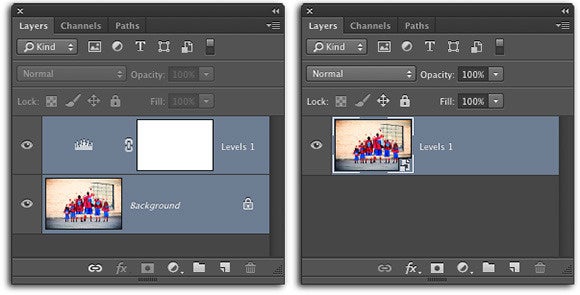
In Elements , dawn the Expert clit at the top of the workspace ( called Full Edit in vintage versions ) . If your document consists of a single layer , snap to activate it and then reduplicate it by pressing Command - J. If your document consists of multiple layers , create a “ stamped copy ” for slur as described in the previous paragraph .
Fire up the filter
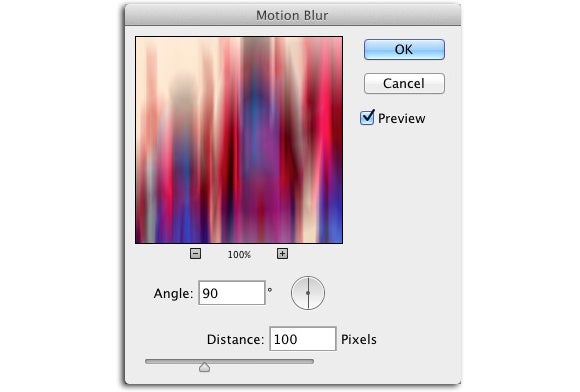
In either Photoshop or Elements , take Filter > Blur > Motion Blur . In the resulting dialogue box , adjust the Angle setting to make the blur go in the direction you require . For exemplar , to create a perfectly upright fuzz limit the angle to 90 degree . To align the strength of the blur , drag the Distance slipper right for more blurring or left for less ( a setting of 100 was used here ) . Click OK when you ’re end . Your whole simulacrum will be fuzzy ; but do n’t panic , we ’ll fix that in a moment .
To make your subjects skyrocket off a open , use the Motion Blur filter .
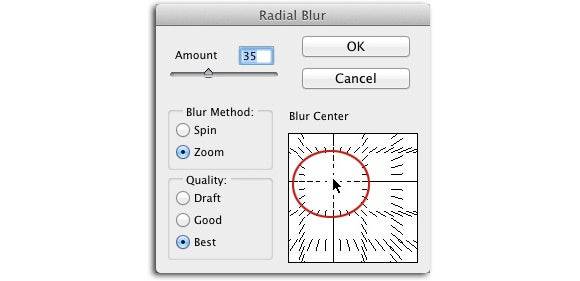
Another utile filter for motion is the Radial Blur filter , which you’re able to practice to make a foxy soar essence . In Elements 12 or later , click the Guided clitoris at the top of the Elements windowpane . In the techniques that come out at correct , scroll down until you see Zoom Burst Effect and give it a swift detent — just come after the onscreen instruction to create the effect .
In Elements 12 or later , you may make a rapid climb force using the guided edit shown here . guide modality is unique to Elements and is a great style to learn .
In Photoshop , or to create a zoom consequence from scratch in Elements , take Filter > Blur > Radial Blur . In the resulting dialogue box , ready the amount to 35 , the Blur Method to Zoom , and Quality to Best . snap and drag the filter ’s preview ( circled ) to dislodge the fuzz epicenter ( say , your subject ’s head ) and click OK . To tweak the blur’e epicentre in Photoshop , double - click the Radial Blur filter entry in your Layers venire to reopen its dialogue box , and then click another spot in the prevue area . In Elements , click the Undo push at the bottom of the window a few metre and then launch the filter again .
The line in this odd - look preview show the strength and epicentre of the zoom you ’re about to give .

Hide the motion with a layer mask
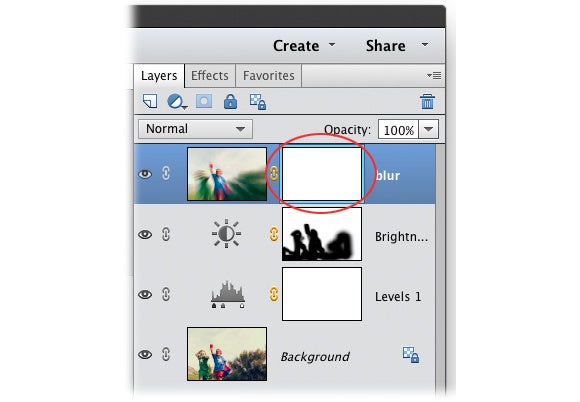
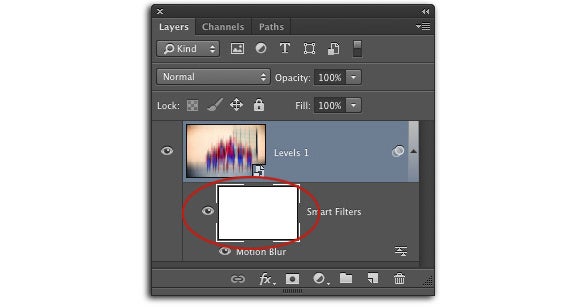
To hide out the movement from your subjects ’ point , habituate layer mask ( think of masks as digital masking tape ) . In Photoshop , mouse over to your Layers instrument panel and click to touch off the Smart Filter masque — the large white thumbnail beneath the Smart Object ( circle ) . Once dynamic , the masquerade party thumbnail sports a white outline .
One of the benefits of using Smart Filters is that you automatically get a mask that let you hide out the impression from part of your photo .
In Elements , add the masquerade manually by clicking the circle - within - a - substantial picture at the top of the Layers venire ( choose Window > Layers if you do n’t see that panel and ensure you ’re in Expert modality ) . When you do , Elements tot the mask ( circled ) next to the bed thumbnail and tacks on a blue outline to let you know it ’s active .
Here a stamped copy was created in Elements to merge the content of these layers onto a new one .
In material life , masking tapeline is beige or blue ; in Photoshop and Elements , it ’s black . A helpful way to think back what colour to paint with inside a mask is the rhyme , “ black conceals and white reveals . ” To conceal the fuzz , you ’ll paint with black inside the mask using the Brush tool ( you could also habituate the Gradient tool set to practice a black to white gradient ) .
constrict D to set the people of color chip at the bottom of your Tools panel to the default of smutty and white and then weigh X until black is on top . Press B to grab the Brush peter and in the Options stripe , choose a soft - border light touch and set the size to about 250 pixels . hint : you may tap the leftover wall bracket key ( [ ) to decrease brush sizing , or the right bracket headstone ( ] ) to increase brushing size in either political program . creep over to your image and paint across your subject ’s head . If you conceal too much of the fuzz , public press X to swap color chips so blanched is on top and then repaint that area to reveal it .
Save your document
The last step is to store your document by choose File > Save As . In the resulting dialog box , pick Photoshop from the Format menu and come home Save . This evasive action preserves your layers so you could go edit them subsequently . To make a version you could send elsewhere for printing , opt Indian file > Save As again and pick JPEG from the Format carte .
fall into place Save and in the leave JPEG Options dialog corner , drag the Quality slider all the way right for the gamy quality context of 12 . To create a reading you could send on on-line or email , take File > Save for Web . Choose JPEG High from the computer menu at upper - right field and , if necessary , resize the mental image using the New Size section at modest rightfield . Click Save and call it a day .
As you may see , adding motion can make a big impact . Until next time , may the originative force be with you all !