EDITOR ’S NOTE : The follow clause is an excerpt fromTake Control of make Music with GarageBand ( interpretation 2.0 ) , a $ 10 electronic record book available for download fromTidBits Electronic Publishing .
With GarageBand 2 , you may make exciting songs quickly and well using the music loop that come with Apple ’s music - initiation program — even if you know nothing at all about writing music . In this excerpt , we ’ll cover the appendage of putting together and editing a song as well as working with a closed circuit . The ditty we ’ll create throughout clause may be simple , but it will cover a mountain of territorial dominion about GarageBand .
Get Acquainted with the Interface
The GarageBand port , as beautiful as it is , can be scare away to the uninitiated .
Add Loops
If you have n’t already , create a new song by pick out File : New ( Command - N ) . Name your song something other than “ My Song ” ( I called this one “ Funk Morsel , ” but you have my permit to name it anything you care . ) go forth all the other options as they are and chatter Create .
When you start a unexampled song in GarageBand , one track called Grand Piano is already active ( as you’re able to see in the Tracks column in the upper left hand of the windowpane ) . This cart track is ready to hand if you want to plug in a MIDI keyboard , launch GarageBand , and at once start to play . Since we have other thing in mind , delete the piano rail by choose Track : Delete Track ( Command - Delete ) . You should now be attend at a blank window .
Click the Loop browser app button ( designate below ) . The loop web web browser can be confusing to sail until you get used to it . There are six column of release , with instruments in the first three columns , stylus of euphony in the quaternary column , and various mood in the last two . cluck a particular button narrows your choices to loop-the-loop with that machine characteristic .

• In the 2nd column , click All Drums . A inclination of loops seem in the results list on the right wing . Most of the other button in the first three newspaper column are now blur . You ca n’t , for example , choice Piano or Guitars anymore , because they ’re not Drums ; you could , however , prize Kits or Beats ( but do n’t do that now ) .
• In the quaternary chromatography column , click Urban . The results nail down down to loops worthy for funk , articulatio coxae - record hop , rap , R ’ n ’ B , and so on . The other styles in the quaternary column dim when you do this . A drumbeat ca n’t be Urban and Country ( at least the mode Apple has categorized their loops ) .
• Narrow your choices further by snap Cheerful in the fifth pillar . We want a happy beatnik ! Several of the buttons in the last tower dim ; there are no upbeat drumbeats that are also intense or moody , but there are some that are electric or processed .

NoteThe alternative in the last two columns are paired : Single is the antonym of Ensemble , Relaxed is the opposite of Intense , and so on . If you pick out a push in one of these editorial , its contrary is dimmed .
Now permit ’s take the air through the process of adding your first iteration :
It ’s frustrating to stop and click Go to Beginning every clock time you play your song , so click the Cycle button . mark the yellow stripe that appears above your metal drum loop ; this shows the bicycle region — how much of the song loop when you hit Play .
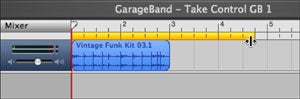
The barrel fill only half of the yellow bar , so you have two choices : make the drum track longer or make the cycled portion short . Move your cursor to the proper edge of the yellow bar , and acknowledge that the pointer turns into a upright cake with arrows on each side ( shown flop ) . drop behind to the left until the yellow bar lines up with the end of the drum closed circuit . This should correspond with the issue 3 on the beat ruler . Now click Play . When the playhead gets to the end of the lily-livered prevention , it jumps back to the showtime of the cycle region .
No adept rhythm section is complete without a basso line . Click Reset in the upper - left corner of the cringle web internet browser . The loops on the correct disappear and all the buttons refund to their default DoS . Click the Bass button , scroll through the hunting answer to Slap Bass , and snap the Slap Bass 01 loop . It sound OK , but it ’s not quite right . Click Slap Bass o2 . That ’s more like it ! Drag it to the Tracks incision , under the Drum Kit .
Tip : If you want to preview your loop selection along with your song , just click Play before ( or after ) you get through your loop-the-loop in the hunting termination . There may be a svelte holdup before the new loop starts playing ; GarageBand tries to synchronize the two , so you may have to expect a moment for the loops to draw up . you’re able to scroll through the loops in the browser app while you ’re doing this as well : either tick the next loop you require to get wind or habituate the Up and Down arrow keys .

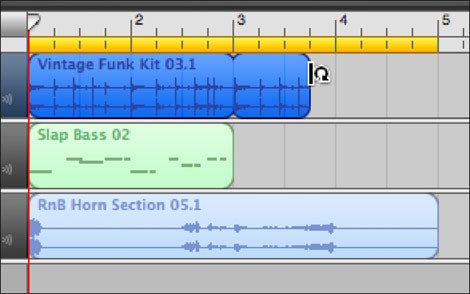
find that the barrel raceway is puritanical and the bass part is green ( pictured right ) . The bass also bet dissimilar in that it ’s made up of horizontal lines , while the drums are two horizontal lines with jagged upright lines crossing them . The drum lead is actually a recording of a carrying out on a live membranophone set , visit a Real Instrument course in GarageBand . The freshwater bass , on the other hand , is a Software Instrument : the sound comes from samples of an electric basso guitar , but the performance is hold by datum in the MIDI formatting .
observe : The two jagged line in the drumfish track are a visual representation of the waveforms . Each of the spike is a tiptop — a loud point in the cart track . In this causa it would be an individual drum smasher . The big superlative are the snare drum and the basso drums , and the smaller blossom are the high - hat . There are two crease because it ’s a stereo transcription : the top line is the left channel ( which comes out the left speaker ) and the bottom personal line of credit is the right .
Click the Play button . It sounds reasonably stinking but seems a bit fast . The right side of the metre display scan “ 120 Tempo ” ( see Figure 3 ) . Hold down the mouse button on the “ 120 , ” and a slider appears ; drag down a little until the pace reads 110 . That feels better .
With the euphony still playing , look at the master floor meter to the right of the time display . These show how trashy the whole mix is . If the two point on the correct end are red , that means your audio is clipping ( see Figure 4 ) . Clipping come when the sound recording gets too cheap and the high peaks — the tawdry compass point — are chopped off . You do n’t need your audio to clip ; it create filthy - sounding digital distortion .
peak : parallel twisting is the stuff of rock music . Without it there would be no Jimi Hendrix , Led Zeppelin , or Van Halen , at least not in the forms we hump them in today . Analog distorted shape is tender , rich , and thick . Listen to Van Halen’s“Running with the Devil,”for example . Digital deformation , which is what you get when the master copy level clip , is harsh and awful sounding . fend off letting your audio time ! ( If you require to hear what digital clip sounds like , mind to this .
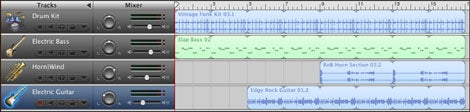
Look up at the drums and the bass in the Mixer column and point out that they each have their own level beat . First , check whether either track ’s clip indicators are illuminated . If so , turn down the lead book until the level beat scarce pops into the orange . Then reset the lead ’s clip indicator by clicking the red point . If the indicators stay on off , your racecourse is no longer prune . If they get along back on , you need to turn the track bulk down a short more . Do this for both rail .

Tip : Remember that unless you reset the clipping indicators , they ’ll stay light until the end of time ( or until you discontinue GarageBand ) . Even if you bend the intensity down to zero on all your rails , the indicators will stay put illuminated . You have to readjust them after you adjust the volume .
Now check whether the professional level is still lop . If so , flex it down as well and click its clipping index number to reset them . When you ’re done add instruments you could curb it again and see where the levels are . Ideally , you want the master level to be loud enough that it jumps into the orange without setting off the clipping indicators .
bakshish : Obviously , your single track levels do n’t all have to skip into the orange . you could coiffe them much lower if you desire , but you ca n’t set them any higher . You believably do want the master level to be as loud as potential without nip ; otherwise , your final strain will seem frightfully quiet compare to the other songs in your iTunes library .
Add Melody Instruments
It ’s clip to add some color and melody . If the song is playing , arrive at the spacebar to kibosh it . In the Search windowpane at the bottom of the Loop web browser , type Horn and press Return . Then , in the lookup outcome list , scroll down to RnB Horn Section 05 . heed to it if you want ; it has some place in it and sound as if it will check with your tune pretty well . Drag it up to the racecourse mixer . Notice what happens : it ’s long than the other loops you have there . Hit Play . It vocalise o.k. , but the playback pedal back to the offset before you hear the whole cornet business line .
To gear up this , extend the yellow cycle streak so that it lines up with the end of your horn part , and hit Play . you’re able to hear the whole horn part now , but the drum and the bass drop out halfway through the bicycle . You need to make them longer . direct your mouse to the end of the metal drum region , but do n’t click yet . find out what happen : if the pointer is over the top one-half of the cringle , it ’s a line with a short circular arrow ( the loop pointer ) ; if it ’s over the bottom , it ’s a line with a straight arrow ( the resize arrow ) . Note that the pointer must be over the region ; if you move it even one pixel past the remnant of the neighborhood , it reverts back to the usual pointer Spanish pointer .
You want to use the iteration pointer now , so position your pointer over the upper - correct sharpness of the drum region ( Figure 10 ) . Now drag until the region extends to the end of the yellow bar and lines up with the Horn part . Do the same with the bass occupation . Notice that the two loops have little indenture in the eye ; these show you where the loop starts repeating itself — a ready to hand visual discriminative stimulus .

Move your Spanish pointer to the upper - right-hand sharpness of a region to use the loop pointer . Drag to where you want the region to end ; the region mechanically repeats to that point .
Tip ; What ’s the difference between a loop and a part ? A loop is a short sherd of medicine that you may use as a building block for your tracks . A part is what you get when you cart a loop into the timeline . A region can be the same distance as the original loop , a cropped segment of the loop , or 20 repeat of the loop . A region is always contiguous . Two regions butting up against each other are just that : two disjoined region .
Hit Play again . Now it ’s starting to sound like a birdcall . You ’ll probably need to release the horns down a piddling using the track intensity control . You need them to intermingle in and not overpower everything else .
Add one more track — Edgy Rock Guitar 01 — and extend it to the same length as everything else . you could turn this track down a lot too . It should just be a background texture , adding a noisome calendar method but letting everything else glisten through .
Tip : Make certain you have Filter for More Relevant Results turn off in the General preference back breaker or you wo n’t be able to find Edgy Rock Guitar 01 .
Learn Editing and Mixing Basics
If you ’re not wearing earpiece , I suggest putting on a pair at this point , because the burden of what I ’m live on to show you next is much more obvious when you ’re wearing headphones .
chance the pan knob to the left wing of the volume control on the Horn track ( shown right ) . Grab it in the middle and move the pointer up and down . The horns go from the left speaker to the ripe speaker , depending on how you define the knob .
The nonremittal position is directly in the mediate , equally balanced between the two speakers . The L and R next to the knob correspond to — see if you may guess — Left and Right . If you turn the knob all the way to the leftfield , the horns get out of only the left speaker . This technique is known as panning in the audio world , and by using it you may set sounds in an imaginary space in front of the listener .
Now drag left or justly on the outer part of the knob . ( It also works if you drag just outside the knob , or even if you click in that neighbourhood . )
The knob snaps to each of the marked mountain pass . If you want more accurate placement in between two of the notch , haul in the middle of the knob . Move the saddle horn to about the 2 o’clock attitude and the guitar to the 10 o’clock locating . You may discover when you do this that these two instruments seem to get a little quieter ; sour them up if you like . find how much more interesting the mix is now that there ’s some stereo feel going on .
You have all the elements in place . Now you need to give the tune a beginning and an end . To give you an overview of what you ’ll terminate up with : the song will start with just the drums and the bass voice , then the guitar will amount in , and last the car horn .
Pause playback and click the Go to Beginning push button ( or press Z ) to return the playhead to the beginning of the vocal . Then click the Cycle button ( or pressing C ) to sour off cycling , so that the Sung dynasty will spiel through without echo . apply the loop topology pointer to start the drum and bass part regions to measure 17 on the timeline ; this will be the entire length of your vocal ( show below ) . Both grommet will start at the beginning of the vocal and duplicate all the way to the remainder . Now dredge the hooter region so that it begins in metre 9 , and extend it so that it finish with everything else at measure 17 , repeating it once . Finally , get behind the guitar region out to start at measure 5 , and coil it so that it lines up with the end of the song at measure 17 .
TipWhat ’s a measure?Most vocal have a even rhythmic pulse . This is peculiarly obvious in the metal drum , but all the pawn follow the pulse and add to the song ’s rhythmical drive . bug your metrical unit along with the song you ’re run on . Chances are you ’re exploit on every beat . This song ( like most popular song ) has four beats in a measure . take heed to the brake drum and the bass ; each of these loop is two measures long , but in both guinea pig the second measure is a variation of the first . The sea bass play two high notes at the start of each measure , and then drops down and replacement between two abject eminence in the second half .
take heed to your vocal . It start out off jolly well , but the ending is a bit precipitous . Position the playhead toward the end of mensuration 16 ( hale the triangle in the measure rule ) . Then grab the triangle in the zoom swoop and move it to the right so that it ’s between the correct two tick brand . You should be whizz along in on the close of the call now .
Use the loop cursor to carefully lead each of the loop so that they look like this :
essentially , you want each legal instrument to vocalise one final note or chord to terminate the Sung dynasty . In the fount of the drums and the saddle horn , the tone is one beat long ( each of the darker check mark marks in the timeline is one pulse ) . The bass is about 3/4 of a beat , and the guitar pay off to play for only 1/4 of a beat . Listen to the result and find free to experiment to see what the end sounds like if the loops are longer or curt .
Double - check your headmaster levels again to make trusted they ’re not clipping , and you ’re done . You ’ve created your first birdsong in GarageBand ! Here’swhat your ruined song should sound like . It ’s forgetful , but you ’ve learned a circumstances about the programme already .
[ Jeff Tolbert is a musician , painter , and graphic designer living in Seattle . Along withTake controller of Making Music with GarageBand , he has also authoredTake Control of Recording with GarageBand . ( TidBits Electronic Publishing , 2005 ) . ]
