Flatbed scanning is a band easy than it used to be . The combination of all - in - one hardware devices with wireless capability , and under - the - hood improvements in Mac OS X have simplified the scanning process . Here ’s how you’re able to use OS X ’s Preview software program to set up an prosperous wireless scanning workflow for your exposure or documents .
To test compatibility across brands , I added three dissimilar all - in - one devices to my Airport meshwork and scan a trial document using Preview . In ecumenical , the outgrowth remain the same disregarding of the hardware equipment . Some pocket-size differences in the duologue boxes can be attributed to their unique drivers . But for the most part , the follow workflow should apply to most Mac - friendly scanners / printers with wireless capability .
The devices I used were the Kodak ESP7 All - In - One Printer , HP ’s Photosmart C6380 All - In - One , and Lexmark ’s Interact S605 All - In - One . Each of these printers has built - in wireless networking , include Mac OS tenner number one wood , and can impress as well as scan .
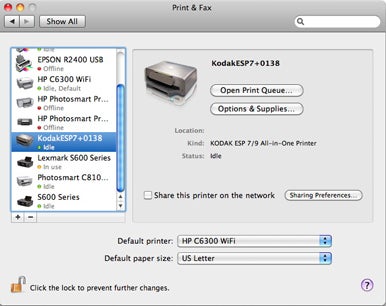
The Print & Fax System Preference in Mac OS X 10.6.4.
None of the devices were wired to my Mac — I accessed them all though the Wi - Fi internet . As an tote up fillip , once a gadget is fix up , you’re able to then access it from any computer that has approach to the internet via Preview or Image Capture .
Setup your tools
Getting set up is fundamentally the same process for all three scanners : Load up the ink cartridges , rick on the mogul , dilute the included drivers on to the Mac , and log on to your WiFi web directly from each machine ( ensure you ’re on the same electronic web as the Mac you ’re connecting to ) . Once you finish those tasks , open System Preferences , dawn on the Print & Fax icon , then add each printer using the plus sign ( + ) release in the lower left niche . When the equipment has been add to the system , it will appear in the “ Printers ” window on the left side of the dialogue . You ’re now ready to scan . The Print & Fax System Preference in Mac OS X 10.6.4 .
Access the scanner
Some equipment , such as the Lexmark Interact S605 will permit you pioneer a scan immediately from its System Preferences dialog boxful . dawn on the Scan tab and it get to the Import From Scanner dialogue box in a 2nd windowpane . you could configure the scan preferences , such as resolution and size , by clicking on the Show Details push button .
However , I favour to glance over with the Mac software Preview because I have allowance shaft aright there after the scan finishes . To use Preview to launch the same importee From Scanner dialogue box , first you have to tell it to appear for the scanners on your net . Go to File - > Import from Scanner - > let in Networked Devices . At first you might think that nothing happen , but if you go back to “ Import from Scanner ” menu , you should now see your networked equipment in the tilt .
you’re able to also initiate your scan through Image Capture . You ’ll be working in the same dialogue boxful disregarding of where you initiate the scan : Preview , System Preferences , or Image Capture . Once you say Preview to search for networked gimmick , it should find all of the WiFi scanners uncommitted .
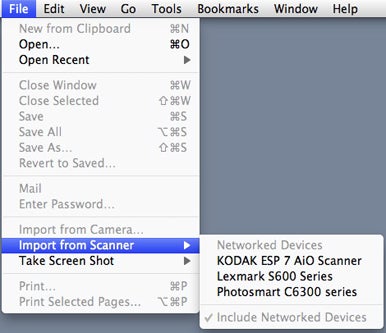
Once you tell Preview to look for networked devices, it should find all of the WiFi scanners available.
Scan the Document
Now it ’s time to start run down . set your papers face up down on the scanner ’s glass surface , then select the gadget from the list . If you do n’t get an image right away , clack on the Show Details clit . This provide you with more scanning options and initiates an overview image for you to look at . The options in the dialog boxwood are fairly straightforward :
Next , you have to severalize the electronic scanner where to save the CAT scan and in which format . For photograph , you’re able to choose JPEG , Tiff , or one of the other data format . For document you ’ll likely require to go with PDF .
ultimately , you have some image discipline control . If you choose “ Manual ” from the pop - up menu , you ’re greet with light , tincture , temperature , and saturation slider . These options can depart from scanner to digital scanner , however . For exercise , the HP C6300 also supply a Descreen choice ( for newspaper and magazine scan ) , Color Restoration ( for old photographs ) , Adaptive Lighting , and Sharpening . Again , using these selection can save you post - production time in an image editor by and by , or even extinguish it all together .
View and touch-up
Once you press the Scan button , your Mac will go to work scanning the complete document , exposure , or freestanding items . It will then give the scan in a Preview windowpane where you may view , crop , and even make edits if necessary . If you have a blemish on the scan , luck are it ’s just a speck on the glass surface . It ’s probably prosperous to make clean the chicken feed and rescan rather than opening the CAT scan in another range of a function editor program , such as Photoshop , for a ghost up .
Go forth and scan
Once you realise how easy wireless scanning can be , you ’ll credibly take advantage of this feature more often . you could restore old photographs , preserve newspaper cutting , and digitize paper documents . And of course , not have to have your Mac connected to the scanner via a telegram give you much greater tractability . you’re able to have your computer on your circle in the living room while the digital scanner work away in the home base office .
[ Senior Contributor Derrick Story learn iPhoto onLynda.comand die hard a virtual camera social club atthedigitalstory.com . ]
