Recently , Rob Griffiths proffer insight into how he produce his episode of the Macworld Video . This resulted in some confirmatory chromaticity and shout for data on how we produce the Macworld Podcast . As the podcast ’s host and producer I can extend some perceptiveness of my own on that subject .
Gear
I produce the podcast from my home base office . My microphone of choice is a vintageAKG C 414 EB . The mike is attached to a Mac Pro via CEntrance ’s $ 150MicPort Pro24bit/96kHz XLR - to - USB mic preamp . The microphone is mounted on aHeil PC-2 T godsend stand . With a boom stand you dispense with the kind of mesa and cable stochasticity you blame up when using a mike with a tabular array tie-up . I ’ve recently placed a $ 20Nady MPF-6 soda water filterin front of the mic to help oneself reduce plosives ( popped p ’s ) .
We occasionally read roundtable discussions at theMacworldoffices . For those recordings we use M - Audio ’s $ 450Fast tag UltraUSB 2.0 audio interface with four cheap Samson mike . The Fast Track Ultra is connected to an iMac and the transcription is conquer in GarageBand ’ 09 .
Remote recording
As our staff is scattered around the country , we conduct our interviews over Skype ’s free VOIP software . When recording withMacworldeditors , we ask that they charm their parts during the interview using the audio editing software of their choice and then upload their sides of the conversation to a transfer server , where I recover them and put together the theatrical role together in GarageBand . We do it this way because the transcription is much cleaner than if I enamor the Skype stream . Wonderful as Skype ’s audio character is , there are time when it can create ugly audio artifact .
It ’s a lot to call for of a non - staffer to go through the rigamarole of recording and upload their parts . So for guests who aren’tMacworldemployees I commemorate the Skype stream and trust for the best . To do that I expend two freestanding tools — Ecamm Networks ’ $ 20Call Recorderand Rogue Amoeba ’s $ 32Audio Hijack Pro . I use both tools so that should one fail , I have the other to provide the recording . ( It ’s very bad form to go back to a guest and take for a redo . Having a surplus setup helps avoid these state of affairs . ) I then use the audio tools include with Call Recorder to split the catch two-channel racecourse into freestanding mono files — one with just my voice and the other with the representative of the other participants .
Editing interviews
I prefer to edit our interviews in a GarageBand undertaking separate from the project I create to delete the full podcast . This direction I have to concern only about mixing those voices . I produce a GarageBand Voice project and drag the audio file into separate GarageBand lead . I choose a Voice project rather than a Podcast undertaking because I prefer to export these edited interview as uncompressed audio files . When you export a Podcast project , the files will be compressed . ( Unless you hide the Podcast track . In that face , you have the option to export the undertaking as an uncompressed Indian file . )
To give voices a fuller tone , I select each track and , in GarageBand ’s Browse tab , select the Podcasting entranceway and then the Male Radio or Female Radio preset , count on the gender of the speaker . I then snap on the Edit tab and start the Compressor effect . The compressor not only evens out the loudness of the speaker , but gives me the option to pump up that runway ’s loudness if I ’ve tapped out the bulk control condition in the racetrack sociable . As much as I can , I undertake to equilibrise the volume of the various speakers and bump off errant noises — cell earphone interference , table taps , coughs , and other unwanted sounds . To remove these occasional noises I ’ll either split the raceway and make out out the noise I do n’t desire to hear , or expose the mechanization ascendence and draw in a volume curvature that makes the noise inaudible .
If I ’m faced with a track that has a fairly constant rumpus in the background — such as an tune conditioner or traffic noise — I apply BIAS ’ $ 129SoundSoap 2 . It ’s a useful jade - in for sampling and removing these form of dissonance .
Volume curves drawn in for ducking and fading a music track.
Once I ’ve finished conflate an interview , I choose Share - > Export Song to Disk . In the sheet that come out , I leave the Compress selection unchecked for export the file in the AIFF format . I take AIFF rather than a compressed format such as MP3 or AAC because I not only want the cleanest version I can create , but also because I process these Indian file after the fact with The Conversations web ’s freeThe Levelator . This is a wonderful utility that attempts to equilibrate the volume across the file — increase the book in quiet parts without raise the ceiling on garish bits . It bring only with uncompressed file cabinet and performs at its best when only voice are present . Introduce euphony and the resulting filing cabinet can sound left over .
Editing the podcast
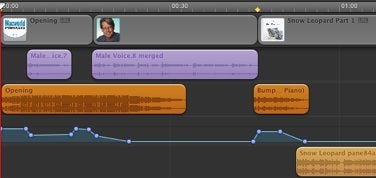
GarageBand put up automatic ducking — a feature of speech that reduces the volume of background rails ( music tracks , for example ) when a primary track ( my part , for instance ) play at the same sentence . Welcome as this feature is , it ’s not one I use as the ducks do n’t sound natural to me . Instead I take out the ducks manually .
To do so , I click the mechanization pointer in the music track , make certain that Track Volume appear in the automation area , and click points where I want a disappearance to get down and end . I by and large start a fade within a irregular of where the vocalization enters or leaves . A concluded fade out — when I desire to put down the music wholly so the voice can take over — hold out a couple of second .
Volume curves draw off in for ducking and fade a medicine track .
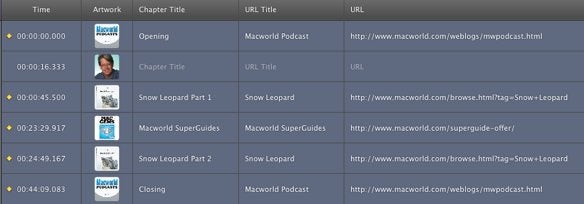
Chapters within a recent Macworld Podcast episode.
I examine to keep the length of the podcast to under an hour—40 to 50 minute is distinctive . That offer enough fabric to fill most commute yet does n’t go on so long that listeners become bored with the subject or the citizenry talk .
Enhancing the podcast
The advantage of an enhanced podcast is that the attender can easily pilot through parts of it . For example , if they ’re not interested in the subject of the first interview , they can quickly move to the 2nd consultation by opt a dissimilar chapter from iTunes ’ chapter menu ( if they ’re listening on their computing machine ) or skip through chapters on an iPod or iPhone . Our listeners seem to care these enhancement and it surprises me that more podcasts do n’t include them .
Chapters within a recent Macworld Podcast installment .
Adding chapters is but a matter of choose the Podcast track , click the Info button at the bottom right box of the GarageBand window , and tangle chapter art either from the Desktop or from within GarageBand ’s Media internet browser into the proper positioning in the Podcast track . For example , the Macworld Podcast logotype file survive at the beginning of every sequence . I then get behind in a picture of my font that aligns with where I introduce myself as the innkeeper . An image that mull the subject of an audience will set the beginning of that interview — a Snow Leopard loge shot , for example , if we ’re talk over OS X 10.6 .

Our music bits available from the Media Browser.
The Media browser app is really helpful for cloth we use routinely . I ’ve produce two booklet on my Mac — one that stop nontextual matter that appear in each podcast ( the Macworld logo , my icon , and an advertiser ’s graphic , for example ) and another that contains the music tidbits we employ for each sequence . By trail these folders into the appropriate tabs of the Media web browser , their contents are easy selected and get behind into the podcast .
Our medicine bits uncommitted from the Media browser app .
To complete the tagging I move to the information pane to the right wing of the GarageBand window and get in the podcast rubric , creative person , composer , and enter a verbal description . This information is then appended to the enhanced adaptation of the podcast .

Choose an export format and enter tags in the Share sheet.
Exporting the podcast
Because we make both MP3 and AAC versions of the podcast I export each instalment twice . Exporting the podcasts could n’t be easy . Just choose Share - > charge Podcast to iTunes and in the sheet that come along choose AAC Encoder from the Compress Using down - up menu and Spoken Podcast from the Audio options come out - up menu . Click the parcel button to commence the export . For the 2nd version , choose MP3 Encoder and Spoken Podcast . We use this Spoken Podcast set because it provide audio good enough for spokesperson and creates files that are n’t terribly turgid . Typically our podcasts weigh in at around 20 MB .
pick out an exportation format and put down tags in the part tack .
In this sheet you may also embark the name of the iTunes play list where the encoded episode will come out , its creative person ’s name , composer ’s name , and album name . It ’s worth your while to replete these fields in right as the entropy you let in will appear as ID3 tag for your podcast . Fail to do it and you ’ll have to do your tagging by and by in iTunes .
When GarageBand finishes exporting the episode , it appear in iTunes and starts playing . The enhanced version of the podcast is about a megabyte orotund than the MP3 version thanks to the embed nontextual matter . Once the two versions appear in iTunes I but drag them out and send them up the contrast where Curt Poff , our online handle editor , prepare them for our internet site and iTunes distribution .
[ Christopher Breen is a Macworld elderly editor . ]
