Here ’s a nightmare scenario for illustrators and photographer : you send your validation to a prospective client and never find out back : then , a few weeks later , you see your work on the guest ’s Website or in its advert . This is the reason so many creative professional choose to post out proofs with a text watermark . It discourages straight-out larceny of art and photo , and help quash agonizing ( and costly ) litigation . take note that textbook watermarking is only one way to digitally ID your work , but it is a very round-eyed and aesthetically acceptable elbow room to get the business done quickly .
Adding a text water line to individual paradigm is a simple process , but adding it to 100 of figure can be exhaustingly repetitive . I ’ll show you how to automatize the entire process using Photoshop CS3 , CS4 , or CS5 .
A water line overlays your simulacrum with large , transparent text edition .
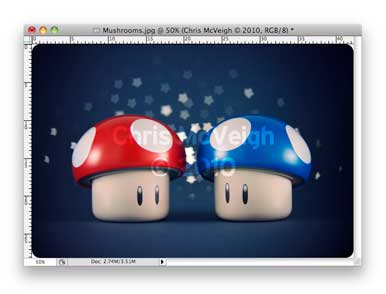
A watermark overlays your image with large, transparent text.
get together the images : The first task is to economize copies of your images to a new folder . Go to the Finder , click the Desktop and choose File->New Folder . Now give it an appropriate name , such as “ Proofs . ”
If you ’re develop to send photos to a client , subject iPhoto , Aperture , or Lightroom . Find the pic and export them as JPEGs to the brochure on your Desktop . As you export your pic , you ’ll want to scale them down to a more manageable size , particularly if you contrive to email the files . A maximum height or breadth of 800 picture element is a reasonable size for most proofs .
If you ’re develop to send non - photographic art ( perhaps in PSD format ) to a customer , launch the files in Photoshop , scale them down to email well-disposed dimensions ( Image->Image Size ) , and then take File->Save As . Choose JPEG from the formatting pop - up fare , check As a Copy , and then save to the folder on your Desktop . You ’ll need to repeat this operation for each of your paradigm , and call back that all ikon should have roughly the same pixel dimensions .
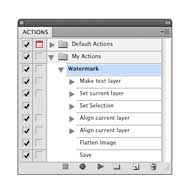
The Action window lists each step of your action; if one isn’t working right, delete it and re-record.
Resizing files separately can be inept ; to speed up the process , you could create a Photoshop action to do the problem for you ( see below ) or practice a shareware public-service corporation such asDownsize 2.7.2($20 ) , which was made for the specific labor of resizing and watermarking your image . The following procedure saves you $ 20 , and shows you how Photoshop ’s military action can be used for all sort of muckle processing .
establish an Action : Once you ’ve collected your in good order sized images into the Proofs booklet , create a Photoshop action at law to automate the software of a watermark . Select an simulacrum in your brochure to use as a dummy data file ; if your image are a mixture of both portrait ( marvellous ) and landscape painting ( encompassing ) orientations , choose one with a portrait preference . This lets you correct the breadth of the watermark text edition so that it fits on all images .
The Action window lists each pace of your action at law ; if one is n’t working mightily , delete it and re - record .
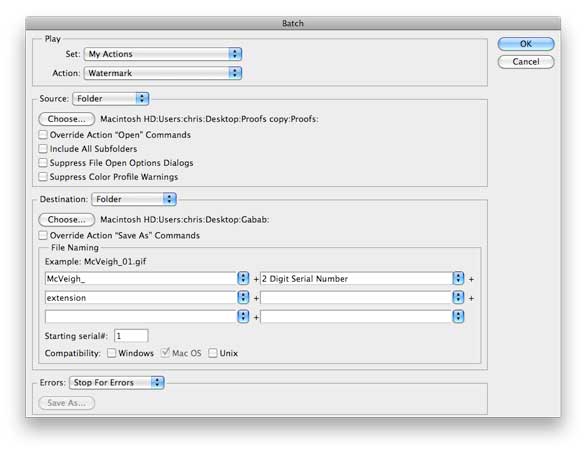
Choosing “Folder” as a destination allows you to set a custom naming scheme for your image files.
Now , with the app monitor your every move , perform these steps :
And that ’s it . turn back the recording by clicking the square button at the right of the Record button . If you ’ve made a mistake , select the step in question and then click the trash image to delete it . you’re able to then re - record the step by clicking the circle picture . If your image is still selected , you may deselect it by take Select->Deselect .
Choosing “ Folder ” as a destination allows you to set a usage assignment scheme for your image files .
Batch process : Now that the action has been defined , you’re able to employ it to batch water line your images . shut the current image and then choose File->Automate->Batch . Under Play , choose the stage set My Actions , and then choose your new activeness , Watermark . Under Source , select Folder and then click Choose . Find the Proofs folder on your Desktop and sink in Choose . Under name and address , you have two selection . Save and near saves over your existing files and is the mere choice , since they ’re already copies of your pilot . Folder , on the other paw , lets you save the revised images to another leaflet and also permit you set a Indian file - refer outline . Once you ’ve made your selections , dawn OK . Now watch as hours of manual undertaking are concentrate into a few transactions !
Watermarking in this fashion put up a mensuration of protection when deal with unfamiliar clients . And with a water line action mechanism in your digital utility belt , you ’ll make quick oeuvre of an otherwise grueling unconscious process .
[ Chris McVeighis an writer , illustrator , and toy dog photographer ground in Halifax , Nova Scotia . ]
