Expert’s Rating
Pros
Cons
Our Verdict
After a yr in public genus Beta , Adobe has releasedPhotoshop Lightroom 1.0 , a mark - newfangled workflow tool that merge range of a function editing and photo direction with the ability to produce lantern slide show , in high spirits - caliber prints , and Web portfolio . Like Apple ’s Aperture ( ) , against which it competes , Lightroom is designed as a professional - spirit level product that also invoke to serious amateur photographer . After a year in maturation , Lightroom is a feature - rich and powerful peter , even in its version-1.0 state . While I found a few bug and anomalies , they are mostly nonaged and do little to take away from Lightroom ’s impressive launching .
Five basic modules
The $ 299 Lightroom is build around five modules , each of which is specify for a particular point in the photographic workflow procedure . Two of them , Library and Develop , are where you will spend most of your time , while the Slideshow , Print , and World Wide Web modules are designed for their appropriately named output functions . The program consist of a suite of categorization , organizational , and redaction functions that help fine-tune your work flow and perform a variety of editing labor . Moving between the faculty is childlike : you select the mental faculty name , or , in some example , press a shortcut key that mechanically fill you to a faculty . Pressing the 500 key , for example , always takes you to the Develop module , while the gigabyte keystone takes you to the Library module ’s Grid scene .
Lightroom ’s contextual port places images at the center of the cover and shaft in panels around the edges . you could consider your exposure as a grouping in thumbnail form , as a small set of images in the Survey mode , or as a single ikon at various rapid growth levels . Panels that get you perform dissimilar module - base project are located on the remaining and right side of the screen . At the bottom of the covert is the Filmstrip , which displays the current image lot . Also at the bottom is the Toolbar , which permit you do editing tasks and select mental image ground on rating , color label , or Pick condition . The Toolbar also expose information about the picture . There ’s a plenty of information packed into Lightroom ’s port , and Adobe has mostly done a sound job of letting you show or conceal it when you want .
Lightroom ’s canonic user interface exhibit the image in the centre image well .
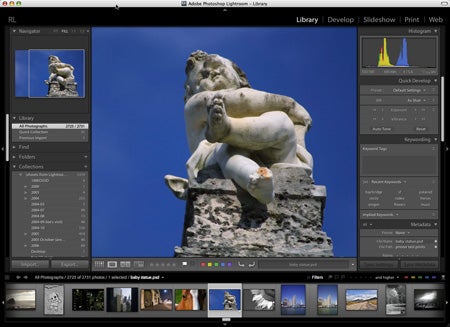
you may expend the side panels to take and edit images , put on presets and keywords , and more . you’re able to also display a grid of thumbnail in the center epitome well . The Filmstrip , at the bottom of the screen , is available in all Lightroom faculty , and countenance you see the current set of images you ’re working on .
Building your library
The depository library — your assembling of photos — is Lightroom ’s centerpiece : you could view all your photo on cover in the Library module or build subset of images ( like albums in iPhoto or projects in Aperture ) that let you home in on specific group of pictures for editing . From the minute you spell images into the computer programme , you could apply organizational data to them and select images based upon that data . Some of this data , such as keywords and file names , you apply yourself , and some of it is metadata that your camera store with an image .
The Import Image dialog corner lets you rename files with your own custom tags and television camera metadata . you may also bring keywords and apply preset editing task to a chemical group of photos , lineal where you want Lightroom to salt away them , and make a copy of the imported image in another position as a computer backup .
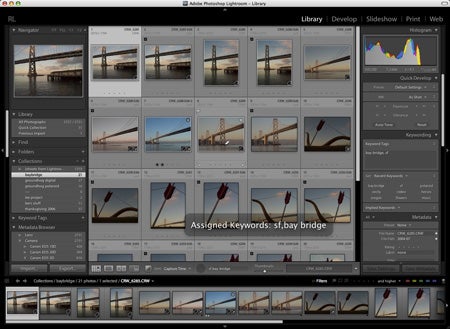
Lightroom gives you a telephone number of methods you may employ to tag or filter your image . you may rate them ( from one to five stars ) , set them as a Pick or a Reject , colour - codification them in one of five colors , apply keywords , or use a combination of these method acting . you’re able to apply most of these tags via keyboard shortcut to either one image or a group of figure . Lightroom ’s keyword lineament is quite extensive ; it rent you create keywords on - the - wing and apply them broadly speaking across your library . you’re able to sequester keywords to an image or set of images in many ways , including via the Keyword Stamper puppet , which lets you apply ( or remove ) keywords simply by clicking on an image .
you’re able to group images into a compendium , which makes it wanton to focus on a particular set of images based on your own style and criterion . A Quick Collection mode lets you swiftly add an image or a mathematical group of images to a temporary collection . This is especially helpful when you ’re going through a large group of images that you might need to add to an survive collection .
you could expend Lightroom ’s features to help you compare and sort photos . A Survey feature lets you exhibit multiple pictures on sieve , so you’re able to consider differences in firing or exposure , for example , when trying to choose which image best suits your motive . you could also aggroup related images into good deal , which reduces the radical to a single representative image . Stacks are represented by a number image in the corner of the look-alike in the Library mental faculty or in the Filmstrip ; tap the number automatically expands the push-down stack so you may view and edit any image in the stack .
As you ’re cataloging and organise your library , you could find subsets of your photograph base on the pamphlet or assemblage they ’re stored in , as well as by keyword or metadata information . Lightroom ’s Metadata web browser , for example , permit you find images base on the information embedded in an image at the sentence it was taken , including the camera good example or lens system used , the file case , the date , and various exposure details .
Once you ’ve selected a subset of your program library , you could then employ the Toolbar to filter your epitome further based upon their rating , Pick status , and semblance . Overall , Lightroom ’s fine multitiered approach to image organization and selection prepares you for the editing process .
Editing and enhancing
With Lightroom , you ’ll find that there ’s no exclusive way to make tonal adjustments to your range . Initially , this might seem confusing , but at last , the motley of method exempt you to deal with figure of speech in the direction that work best for your undertaking .
Lightroom ’s redaction functionality is extended and covers most of the basics , including complete tonic - range editing , people of colour and intensity adjustments , precise coloring material - to - gray scale of measurement image conversion ( with rent toning to make mahogany - style core ) , sharpening and disturbance - diminution instrument , and the ability to even off for chromatic lens system optical aberration and vignetting . you may also crop images and remove dust spots and other imperfections with the Spot Removal tool — this tool is very accurate and has been nicely integrated into the Develop module . There are no masking or survival of the fittest tools , however ; for that , you will need an picture editor like Adobe Photoshop ( ) . Lightroom works nicely in junction with Photoshop too , preserving image edits as you go back and forward between the programme .
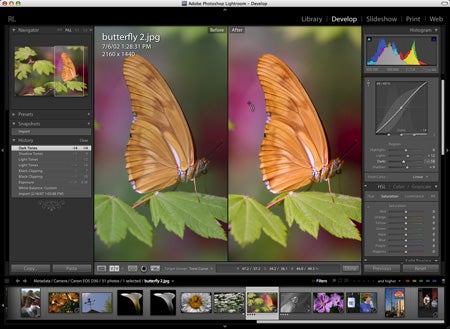
Lightroom ’s Tone Curve panel and histogram put up feedback about your image as you move your cursor over the panels ; this feedback is really useful in determine how much line of latitude you have in adjusting an image before you begin to generate unnatural - look images with mirky phantasm and pompous highlights . And , in the smell of allow you reach the same result with dissimilar methods , you may simply click and drag in the histogram to adjust the exposure , the Joseph Black , or the highlights ; or you may utilize the several sliders underneath the histogram . ( The same is dead on target for an image ’s quality bender . )
With the Targeted Adjustment tool , you place your cursor on the tonus in an mental image that you wish to adjust and then scuff up or down to apply the effect . While you have the tool selected , visual feedback is provide in the panel : in this case , I ’m using the tool with the Tone Curve venire ( middle left ) , and Lightroom is telling me that I will be adjusting the dark tincture in my ikon .
In addition to providing the traditional photographic shaft , Lightroom features a Targeted Adjustment putz , which let you click directly in your image to adjust the areas you want . No more perturbing about where a flavor is on the Tone Curve or in the histogram , or how much people of color you require to dispatch to desaturate a dower of an image . With the Targeted Adjustment tool , if you want to make the reds in an prototype less saturated , you just press the crimson component of your simulacrum and drag the pointer down until you get the burden you desire . It ’s that simpleton . The Targeted Adjustment tool is one of the in force image - adjustment tool I ’ve ever used . It wo n’t alone replace the need for curve , storey , and histograms , but it ’s more visceral .
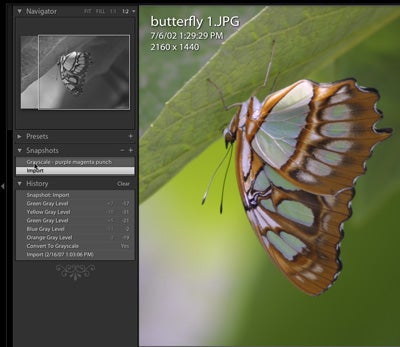
With Lightroom , you do n’t have to worry about making a mistake and falsify your original file , because , as you edit a photo , Lightroom keeps track of what you ’ve done and stores those edits in a separate file , leaving the original intact . Your edits appear seamless , but you could always get back to your original prototype . If you want to work on different versions of a file cabinet ( for a Web undertaking , or to show different options to a customer ) , you may expend Lightroom ’s Virtual Copies or Snapshots sport to make unlike versions , with different redaction states , without significantly increase the size of your picture library . ( Note that while Lightroom has a feature article to automatically back up its program library file , it will not back up your item-by-item image : you ’ll still involve to make certain you ’re doing that as part of your workflow . )
Lightroom ’s History and Snapshots characteristic let you revert to your original figure , or to any detail in the editing process . When you roll your cursor over a Snapshot or an item in the History list , Lightroom ’s Navigator panel expose a preview of the image at that state .
Any editing changes you make to an image , from cultivate to pic adjustment , you’re able to imitate and apply to another image , or even a group of images . A cleverly project Copy preferences dialog box exhibit 27 pick ; you press the mapping you want to put on , and then glue those scope onto any image in your library . A similar command work when you have a group of select double . When you have the image the way you like it , you press the Sync configurations release and the same duologue box pops up , permit you apply only the changes that you want to make . This is great for a set of underexposed images , images that have a dust berth from the television camera sensor in the same locating , or for applying the same crop preferences to a set of photos .
Lightroom can scan five photographic file case : JPEG , TIFF , Photoshop ( PSD ) , Digital Negative ( DNG ) , and Raw . influence with any of these figure of speech types is seamless , but you ’ll discover that Lightroom is most powerful when you ’re using Raw icon from your television camera . Lightroom has the most late version of Adobe Camera Raw built in ; it supports more than 150 digital tv camera , but you wo n’t even notice it , because you swear out in the raw images the same way you march any other image . You still get all the capabilities of stark naked processing — especially the expanded exposure latitude and improved detail and highlight recovery — without having to go through the Camera Raw dialog box . And you wo n’t remark a swiftness hit when Lightroom is build preview from in the buff figure .
Getting photos out of Lightroom
Library and Develop are Lightroom ’s deepest modules ; by contrast , the Slideshow , Print , and vane faculty are much more aerodynamic and structure . They ’re design to forge with small groups of images , and you ’ll find out that the best proficiency is to apply Lightroom ’s Collections boast to build curing , particularly for the Slideshow and vane modules .
Of these three modules , Slideshow is the simplest , if even a moment underwhelming : you could take a group of effigy and easily produce sliding board shows , with euphony , against a background . you’re able to add text and metadata to swoop , as well as music from your iTunes depository library , but you ’re limited to a exclusive transition panache , and the only export option is PDF , which mean that you ’ll lose your transitions and your medicine . Overall , this mental faculty feel like it need a bit more work .
On the other hand , publish from Lightroom is a dream . The redaction panels in the Print mental faculty are plain , but they allow you create usage Thomas Nelson Page grids for anything from a single image on a custom layout to contact sheet with metadata entropy ( such as file name , tv camera type , aperture , and focal duration ) and textual matter overlays . you may preserve your templates as presets and employ them at will . When you impress , you could apply one of three levels of sharpening , and the color - direction options are aboveboard and uncluttered .
In the vane mental faculty , Adobe ’s skill of Macromedia pay off handsomely . In addition to a practiced selection of HTML template , Lightroom features a few customizable Flash guide that have you make portfolios with some oomph . As is the guinea pig with the Print faculty , you have some layout tractableness — you could adjust the colour pallette , the act of cell on an index page , the metadata you admit with your Web pages , and so forth . you could even contribute a water line to Web images , although watermarks are school text - only , and the location , sizing , and color of the text are fixed . I base this restriction unmated , given the flexibility and customization throughout the residue of Lightroom .
Performance
I tested Lightroom with a library of more than 3,000 images on a variety of Macs , include Intel MacBooks and MacBook Pros , a Power Mac G5 Dual , a PowerBook G4 , and even an iBook G4 . In most photo - blue-pencil operation , Lightroom ’s carrying out was pretty quick , even when handling large files . Operations slowed down as I added large numbers of Raw or fuss images to the library , especially while viewing them in Grid modality as Lightroom construct ( or rebuilt ) figure of speech trailer . Both a 1.67GHz PowerBook G4 and a 2GHz Core Duo MacBook were able-bodied to keep up with a 3,000 - image library , easy build Web galleries and use synchronize edits to large groups of prototype .
On slower Macs , like the PowerBook G4 , however , Lightroom was poky when yield preview or locomote from an image in Grid view to cut it full - screen in the Develop module . Not amazingly , I get the best performance from systems with faster central processor , but RAM was an even self-aggrandising factor : the more RAM a Mac had , the better Lightroom do .
Some downsides
Lightroom is a deep and fairly accomplished product , although there are still a few lieu where it involve employment . There are trivial details : some keyboard cutoff having unlike meanings in the Develop and Library modules ; you’re able to rename an image only in the Library faculty ; there is no Secure FTP option for upload galleries to the WWW ; and the jolting behaviour of the Filmstrip window , which , when hidden , often pops up suddenly when you ’re trying to access a tool on the Toolbar . I also detect the certification to be a piece too abbreviated : Exploreseems to be Adobe ’s mantra here , and while it ’s fine to discover things on your own — like the fact that the Remove Spots tool size can be change via the ringlet wheel — a complex $ 300 plan should have a more thorough manual . ( However , Adobe does have somevery good video recording tutorialsthat proffer insight into Lightroom on its situation , and they ’re worth ascertain . )
And while it ’s not a fault per se , some people will be put off by Lightroom ’s overly modal user interface — one in which you must move from one faculty to another before you could perform a specific task . This is in unadulterated contrast toApple ’s Aperture , whose more free - form approach permit you redact an image no matter where you might be in your workflow . I do n’t guess Lightroom ’s technique is sound or sorry than Aperture ’s , but I do retrieve that people who are serious about using a workflow - centrical editor should look at both to determine which become them well .
Macworld’s buying advice
For years , the first political platform serious digital photographer bought and aspired to memorize was Photoshop . That ’s still true , but many people soon realized that Photoshop ’s power may be overkill for most editing need , and that image management and workflow are often more all important tasks when working with large numbers of images . With Photoshop Lightroom 1.0 , Adobe has recognized this need and responded by building a secure work flow foundation for serious shooters .
Lightroom has fresh redaction features , and , because it seamlessly incorporates Adobe Camera Raw , you ’ll get the most out of your photo with a lower limit of crusade . And with Lightroom ’s extensive cataloging and tagging tools , Adobe has made it soft to get at your photos quickly and painlessly . There are in spades home where Lightroom can meliorate , but , even as it is now , it can help you gain ascendence over your ever - exposit photo depository library .
[ Rick LePage isMacworld ’s editor program at large . ]
