Our Verdict
Photo Ninja , a new unsanded - image converter and exposure - processing app by PictureCode , make a very adept first imprint . Used alone or in concurrence with other popular photo - management and photo - editing tools , it ’s a capable syllabus , and serious photographers should take notice .
Photo Ninja can handle JPEGs and TIFFs , but like most stark naked convertor , it is really contrive to make the most of your in the altogether files . JPEGs are ( so to speak ) misrepresent and ready to deplete — that is , quick to upload to Flickr or Google+ or to send to a printing machine . In contrast , Raw files shop reinvigorated , uncooked ( unprocessed ) data point straight from thecamera ’s sensor . Because ferment that bare-ass data into a finished photograph is more complex than cooking boeuf Burgundy sauce , different plan convert the same Raw data in dissimilar ways .
Making the most of Raw
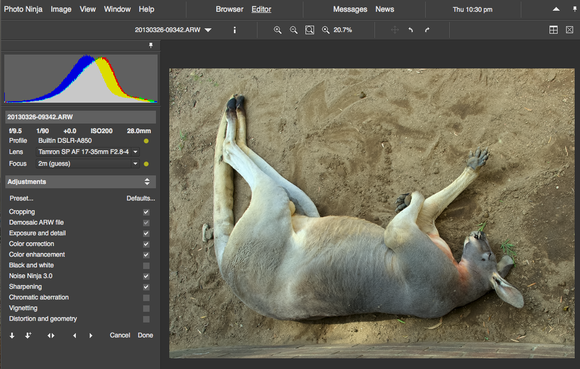
How well a program’sinitialconversion suits your penchant is the first interrogative to ask of a picture - processing app . So how well does Photo Ninja do for me ? Surprisingly well . Compared with rendition of the same file in other cutting convertor such as Adobe Camera Raw ( Lightroom ) and Aperture , Photo Ninja ’s nonpayment rendering of my bare-ass files typically had all right detail and more vivid color . Images that had a all-inclusive exposure range ( dim woods and sunny sky ) often open in Photo Ninja without the pursy highlights I ’d occasionally see in Lightroom or Aperture . For model , Aperture ’s initial changeover of the photo at the top of this clause ( of a mule van in the Grand Canyon ) left almost no color or detail in the sky in the upper proper corner . I thought I ’d simply blown the sky out . The image shown here , however , is Photo Ninja ’s nonremittal rebirth — with no tweaks at all . The sky is a gracious , naturalistic blue devil and you could even see the jet contrails , and yet the exposure of the main part of the picture prove acceptable exposure , dependable people of colour and deep detail . This is the variety of rude capture that Photo Ninja does best with .
Sometimes , the Photo Ninja version of a dead reckoning expose fine point but also less visible haphazardness than the Lightroom rendering ; this result is especially impressive , because ordinarily the localisation for noise involves blurring , which also hurts detail . In this heed , Photo Ninja ’s descent really point . It ’s from PictureCode , the same small Austin , Texas , company that bring about Noise Ninja , which for years was the selection of many pro photographer for move out digital noise from images .
After convince , comparing , and then post - processing scores of look-alike side by side in Photo Ninja and Lightroom ( and occasionally in other programme , including Aperture , DxO Optics Pro , Raw Photo Processor , and Snapseed ) , I descend to two conclusions .
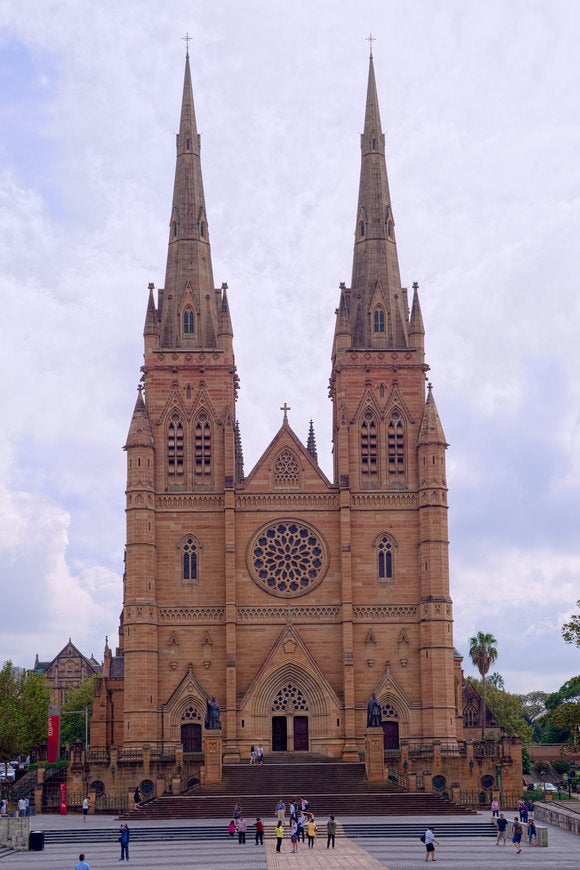
First , Photo Ninja ’s nonpayment cognitive process for rendering in the altogether files are remarkably effective — not often better than , but often on a equivalence with my all - fourth dimension preferent tool for challenging conversions , Raw Photo Processor . If your photographic work is detail - oriented — for example , if you shoot landscapes or computer architecture — you may see Photo Ninja ’s nonpayment as a revelation .
secondly , Photo Ninja and Lightroom represent very different ism about rendering image . Photo Ninja seems to taste to get the image “ right ” on the first try , leaving me little to do but launch the image , craw , and export . With Lightroom , on the other script , additional post - conversion tweaking is de rigueur . But that ’s not needfully a bad affair : Lightroom ( like Aperture ) take a more conservative approach to the initial interpretation , and leave a lot of creative determination regarding noise simplification , sharpening , color , and counterpoint to me . Frankly , Photo Ninja ’s nonpayment translation of some of my portrait file wastoodetailed . My clients do n’t usually like every pore or line to be seeable . you could , of course , blue-pencil your effigy in Photo Ninja to make them a little softer than the default conversion , but you could also edit your image in Lightroom or Aperture to intensify detail and clarity .
The whole package
Photo Ninja 1.1 has an impressive tilt of features for a new programme , particularly one produced by a pocket-size , independent software company . In add-on to the basic tools required for conversion ( picture , white balance , sharpen and randomness reduction , black - and - ashen conversion , cropping ) , Photo Ninja does an fantabulous job secure chromatic aberration and adjusting for lens system and/or perspective distortion .
Photo Ninja allow two demosaicing modes , normal and enhanced ; the latter is helpful if the nonremittal rendering generates moiré blueprint . The program also has a variety of “ training ” modes where you could teach it about the behavior of your television camera and lenses . This approach does n’t seem as good as DxO Optics Pro ’s carefully engineered camera and lens visibility , but it does offer the user more flexibility .
Nevertheless , Photo Ninjaisstill at version 1 , and it miss a lot of features found in its older , more matured competitor . Photo Ninja ca n’t make place correction ( remove blemishes or cherry-red - eye ) or local adjustments ( brighten a bride ’s frock or intensify the blue of the sky ) . Photo Ninja wo n’t help oneself you make photograph Holy Scripture or webpage , and it has no artsy filters . Its web browser app lets you feel picture , but its organisational tools are primitive . you may rank icon , but that ’s about it . Photo Ninja also lack a lot of the keyboard crosscut that allow me to move quickly through the 100 of files I make for back from shooting a wedding .
Cooperative, but not social
The undecomposed word is that Photo Ninja can service as an external editor alongside Lightroom , Photoshop , and Aperture . You might want to let Photo Ninja do the initial changeover and then switch over back to Aperture or Lightroom for detail or local adjustments .
And since Photo Ninja ’s browser app is so bare - bone , I urge using another programme to manage your ikon . Lightroom and Aperture are both excellent file cabinet manager , but you have alternatives . Photo Mechanic is profligate and powerful , but not cheap . For the budget - conscious , a endearing piddling app namedLynworks beautifully with Photo Ninja , giving you the respectable of both world .
One negative : Photo Ninja run well with the apps I just mentioned , but otherwise it ’s not very sociable . reading 1 has no support for uploading straight to Facebook , Flickr , Google+ , or other favorite photo - sharing situation .
Idiosyncracies
Photo Ninja has its idiosyncracies . Most obviously , the programme does n’t front like a typical Mac programme . The interface elements ( windowpane , dialogue box , push , sliders ) are minimalist techno - generic . You might like it ( I do ) , but I ’m certain some Mac users will notice the appearing a bit jarring .
fairly less obviously , some aspects of the computer programme body of work in novel ways and take getting used to .
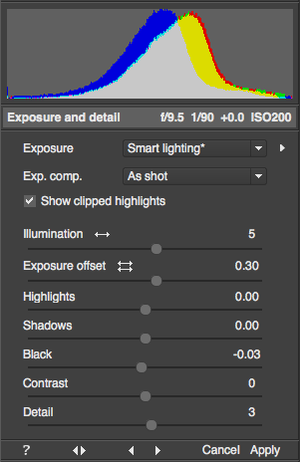
For example , in the Exposure and Detail tool group , the single Illumination slider can do two very unlike things . In “ unsynced ” mode , drag out miniature to the proper brightens the darker parts of the image without blowing highlights . In “ synchronize ” mode , on the other hand , prompt illuminance to the rightfield causes the ‘ Exposure offset ’ slider to move in the opposite direction ; this two - for - one adjustment has the outcome of compressing the picture ’s vulnerability scope ( to avoid losing detail in either shadow or highlights)withoutbrightening the image . In other words , in one mode , the Pseudemys scripta brightens the image , in the other mode , the same movement to the same yellow-bellied terrapin doesnotappreciably lighten the image . The arrangement actually works well , but I get it hard to grok , and I ’m still not certain it ’s a great theme .

In Lightroom and Aperture you may achieve standardized effects using multiple interface elements , each of which does something distinct . Lightroom , for example , would want you to apply the tone curvature . Photo Ninja has no curvature tool .
Bottom line
If you are happy with the JPEGs issue forth from your camera , you ’re better off staying with iPhoto , Picasa , or Snapseed . But if you ’re a Raw shooter and you ’re even occasionally dysphoric with the results you ’re getting now , I urge on you to give Photo Ninja a ( free ) trial run . Photo Ninja is n’t ready to replace Aperture as the go - to Raw convertor for my oeuvre , but I have already added it to my own workflow . It ’s too good not to have around .
Photos by Will Porter . All rightfulness reserved .