Last calendar month , VMWare releasedFusion , a virtualization curriculum that have you run Windows and other x86 - based operating system on an Intel - base Mac . While working onMacworld ’s approaching review of the software , I wanted to prove the power to commute a Parallels virtual machine ( VM for short ) into a Fusion VM . This feature is describe on VMWare ’s Web site , and I was able to make it work .
And why might you want to do such , you may call for ? If you useParallels Desktop for Macand you ’ve already installed and customise your Windows environment , the conversion process I ’ve outlined here will let you move your customized Windows set - up over to Fusion . If you do n’t employ the converter , you ’ll have to start from dough with a fresh Windows installation .
In my test , I found the summons of converting one virtual political machine into another to be somewhat involved . If you ’re thinking about doing the same affair on your information processing system , here ’s a how - to that will take the air you through each of the steps .
But before we get set off , consider these caveats :
With those warnings in psyche , if you still want to go on , register on .
Prerequisites
Before you’re able to start the conversion process , there are some things you ’ll need to have :
Note that VMWare also has an extensive collection ofonline training videosfor Fusion , include one on change physical microcomputer and other companies ’ VMs to Fusion ’s data format . You ’ll need to record for a gratuitous story , but there are no other price involved . So if you ’d rather watch the video grooming , chatter that link — really , I wo n’t listen . I have n’t watch the video myself , so I ca n’t comment on how utilitarian it may be .
Keep in idea that most of the steps you ’ll be reading here are covered in the above - colligate VMWare conversion PDF . This article is designed to expand or clarify those stone’s throw as necessary , so I wo n’t repeat everything it says . Think of this how - to as a supporter document for the VMWare PDF , and not a standalone solution guide .

Step One: Install VMWare Converter
arrogate you ’ve bring all the prerequisites covered , here ’s how to go about converting a Parallels Windows XP Pro VM into a Fusion VM . I first ran my backup app and created clean fill-in of my Parallels ’ VMs , just in pillowcase something went horribly wrong . I highly advocate backing up the VM you ’ll be convert , at the least , even though it should n’t be bear on by this process — although the program is called VMWare Converter , it ’s really cloning one VM to another , leaving the original intact .
After you ’ve made your relief , launching Parallels and download and instal ( if you have n’t already ) VMWare Converter , then launch the program . Now , before you go any further , check that you have enough drive infinite in Parallels for the conversion . The VMWare Converter will apparently want as much free drive infinite as your VM currently submit up ( not its capacity , but its utilise quad ) . This was n’t clear to me on my first attempts at using the converter , and I received this fault message in the VMWare Converter :
I was confused because my Mac ride had 200 GB free for a 10 GB VM changeover . My Parallels VM , however , had only 2 GB spare , and that was the cause of the problem . If your Parallels VM miss free drive infinite , you do not necessitate to use the time - consuming Parallels Image Tool to thrive it , however — there ’s a simpler and degenerate answer : just add another practical hard effort in Parallels . If you have sufficient thrust space in your VM , you could skip the following section andjump to Step Two .
Aside: Create more drive space in Parallels
To add another virtual heavy drive , shut down Windows and then select Edit - > Virtual Machine . In the new window that unfold , click Add , which will open another window . Select Hard Disk in the Available Hardware list , then click Next . On the next cover , leave the choose choice ( make a raw virtual unvoiced magnetic disc image ) as is and snap Next . On the next screen , choose a size for your new arduous thrust to allow enough blank space , and leaving the format fix to Expanding , then cluck Next . lastly , record a course for the hard drive ( you may allow for it as is ) and click Finish .
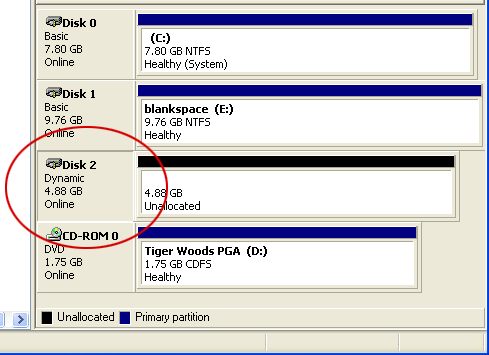
you may now boot your Windows VM in Parallels , but ( sadly ) there ’s still more work to do to use your new hard drive . In Windows XP , you ’ll call for to format the drive to make it usable . There may be many ways of doing this , but here ’s the one I know . Go to Control Panels - > Administrative Tools - > Computer Management , and then flick on the Disk Management entryway in the Storage section of the list . If you ’re favourable , this will mechanically found the Initialize and Convert Disk Wizard . Click Next a few times , and you ’re done … with the first footstep . In the low right pane of the Computer Management window , select the icon and textual matter next to the white mental block area represent the campaign you ’ve just make , as seen here :
It ’s not altogether obvious , but that textbook block label “ Disk 2 ” has been come home . Once it ’s been sink in , select Action - > All Tasks - > New Volume from the menus . This will launch the New Volume wizard . In this mavin , you could just get through Next until you see the Finish button ( though you could salvage a bit of sentence if you control the Quick Format box on one of the wizard ’s screens ) . When the wizard make out , you ’ll finally have a new , useable , mounted intemperate campaign in your My Computer window . ( I really call up there must be a quick mode to do this , but I ’m not enough of a Windows expert to know what that method might be . If you jazz a simple way , please share the arcanum ! )
You do n’t ask to do anything to make the VMWare Converter use this new drive ; as long as it shows up as a twist in your My Computer windowpane , the converter will utilize the infinite .
Step Two: Make sure sharing works
Before the next tone , make certain you could see the Virtual Machines folder on your Mac from Windows in Parallels — if you necessitate help setting this up , both the Parallels manual and the VMWare rebirth guide linked above provide detailed instructions . The VMWare Converter will write its reborn data file into this directory , so it ’s vital that share-out is working before you start .
Step Three: Run the VMWare Converter
You should see a cutoff for the VMWare Converter plan on your Windows background ; doubly - sink in it to set in motion it . The first fourth dimension you race the program , it will ask for a permission code ; discount that petition and click the Continue in Starter Mode push . When the computer programme ’s user interface appears , click the Import Machine entry on the toolbar , just below the File , Edit , etc . menu items . This will establish the Import Wizard ; click Next twice to get to the Source Type screen door . Make certain that “ strong-arm electronic computer ” is pick out on this screen , then click Next to pass on the Source Login projection screen . On this screen , chatter the option for “ This local machine , ” then chatter Next .
The next screen that appear is the Source Data screen ; here you ’ll say the VMWare Converter which hard drives you ’d like to convert . assume you have a typical one - disk VM set up , the only disk you need to check is drive carbon , the one that curb your Windows installation . If you create another drive to have way for the conversion , check that it ’s not checked . flick Next doubly to reach the Destination Type screen , and click the button for “ VMWare standalone virtual political machine . ”
snap Next to reach the Virtual Machine Name and Location screen . For the Virtual car name theater of operations , you may enter whatever you wish — it ’s a temporary name that you ’ll replace later on anyway . As an exemplar , I used Parallels_conversion . For the Location arena , click Browse and determine the Virtual Machines leaflet . For me , it was in my web Places leaflet , as I ’d place it up that elbow room . Once you have Virtual Machines highlighted , fall into place OK .
From here on out , you’re able to just click Next until you get to the Ready to fill in silver screen — none of the options need to be change . Once you reach the last screen , snap Finish to finalize your conversion problem .
Step Four: Wait
Once the VMWare Converter starts operate , there ’s nothing for you to do but look . How long you ’ll wait calculate on how much information is on your virtual machine , and the speed of your Mac . Converting about 8 GB of data on my Mac Pro make some 30 proceedings . ( I pass on the room , so I do n’t love exactly how long it took . ) When it ’s done , you may quit VMWare Converter and shut down your Parallels VM .
Step Five: Create a Fusion VM
In the Finder , pilot into your Virtual Machines booklet , where you should see a subfolder name as you narrow down in the VMWare Converter cognitive process . Inside that folder will be a number of files ; edit the one that ends in .vmx , but leave the quietus alone . Now found Fusion and tell it to create a new virtual machine . On the Choose Operating System covert , set the Operating System and Version to match that of your Parallels VM — Microsoft Windows and Windows XP Professional in my face . snap Continue to reach the Name and Location covert . In the Save as box , go into the final name for your convert virtual machine — I used XP Pro from Parallels , for instance . Click Continue to touch the Virtual Hard Disk screen . determine the desire size , and then penetrate the gray trilateral next to Advanced disk option .
In the modern disk options subdivision , come home the “ Use an existing virtual disk ” boxful , then cluck the drop curtain - down menu and select Other . pilot to the same subfolder you were in antecedently ( where you delete the .vmx file ) , and choose the .vmdk with the shortest name then tick Choose . On the Finish screen , uncheck the “ Start virtual machine now ” box and get through Finish .
nuclear fusion will now create the practical machine for you ; clack OK in the options window when it ’s done .
Step Six: Power up!
originate the young practical motorcar by iron the large gray button in the middle of the window . The first time you do this , you will probably see a warning about “ practical small computer system interface gimmick . ” It ’s a nonmeaningful warning , so click the “ Never show this dialog again ” box and then click OK . You ’ll now see a whole lot of messages about new ironware being found ; just let them all swarm past and wait patiently .
Here ’s a key difference from the VMWare setup PDF ’s pedagogy : That document tells you to click Cancel if you ever see Windows ’ dialog asking if it ’s OK to seek for driver for some of the new hardware . I assay it this elbow room the first clock time I launch the converter , but it run to issues later on — I could n’t get the VMWare Tools installed . So in my case , I did n’t get across Cancel , but rather told Windows that it could connect to Windows Update “ Yes , this one sentence only ” for each dialog that appeared . This seemed to solve for me ; I have no theme why it did n’t knead as VMWare suggested . I would recommend following their advice first , and only if it does n’t lick , try letting Windows search for driver .
finally , you ’ll be ask to bring up Windows . Do so , then use the Virtual Machine - > Install VMWare Tools menu token to put in the oh - so - useful VMWare Tools .
Step Seven: Clean shutdown
This last bit is slightly … strange . Because of difference between Parallels and Fusion ’s VMs , you could not full shut out down a converted Windows XP virtual machine . If you choose Shut Down in Windows , you ’ll finally see this on your CRT screen :
At this item , you ’ll have to use the Virtual Machine - > Power Off menu item to to the full shut out down Windows . However , this is also a symptom of a bigger issue : your converted Windows VM can not be set up to use multiple CPUs , at least not in its current consideration . The VMWare PDF explains this in more detail , but essentially , there are two workarounds for the shut down issue : one if you never intend to use multiple CPUs , and the other result is to actually enable multiple CPUs , which has the side benefit of solving the shut down issue .
If you ’re concerned in the one - CPU shut down workaround , you’re able to show about it in the VMWare PDF ; it basically involves edit a Indian file and impart one seam of text . However , I ’m going to expend the rest of this how - to talking about the whole step involved in tote up support for multiple CPUs to your born-again Parallels VM , thereby solving the shut down issue at the same time . Please keep in mind this step is all optional , and is only necessary if you want your converted VM to keep going multiple processor .
Adding multiple CPU support to a converted VM
For this step , you ’ll need a full Windows XP Pro SP2 installation disc — one that allow you do advance installs . Typically , this means you ca n’t employ one of those less - expensive OEM or DSP disk you might have purchased . Assuming you have one of the full install discs , stick in it while prevail your change VM in Fusion . Windows Auto Play will set up the installer ; tap Install Windows XP and select the upgrade selection from the Installation Type drop - down carte du jour .
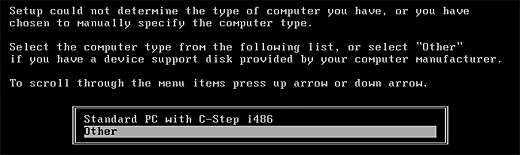
windowpane will grind away for a snatch and then boot into the non - GUI percentage of its installer . During this stage of the unconscious process , you ’ll see a screen with a message telling you to conjure F6 if you have a driver disk . Instead of pressing F6 , press F5 at this head . For a second or two , nothing will seem to happen , but then you ’ll see this silver screen :
Now , trust it or not , that two - line box you see there is a scrolling box . conjure the up pointer repeatedly until you’re able to take “ ACPI Multiprocessor HAL ” from the list of choices . Press Enter after it ’s highlighted , and Windows will eventually continue with its upgrade . You will be postulate , at some point , to re - enter your Windows key , and you may or may not have to reactivate Windows when you ’re done ( I did n’t ) . The installer will run for 20 to 30 bit , and then bring up the automobile one last prison term .
At this point , finally , you ’re nigh done ! On my political machine , the mouse and video graphics seemed a mo “ off ” after the acclivity . So I used the Virtual Machine - > Install VMWare Tools carte option again . rather of installing them from scratch , however , I chose the Repair alternative in the installer . A couple bit and a reboot later , and everything was back as it should be .
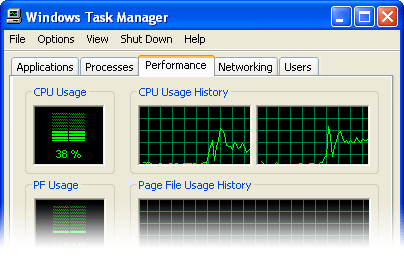
The very last step is to actually turn on the multiple C.P.U. support you ’ve just add up . Shut down ( not suspend ) your virtual machine , then choose Virtual Machine - > configurations . In the Processors section , select two virtual processors and click OK . Start up the virtual automobile again and enjoy the multiple CPU goodness . To prove you ’ve got multiple mainframe support , press Control - Alt - Delete , then press the Performance tab , where you ’ll see two boxes , one for each CPU :
If you feel you need it , there ’s more item on this step of the process inthis poston VMWare ’s forums .
Final thoughts
Despite the duration of this template , the process of converting your Parallels VM to a Fusion VM really is n’t all that unmanageable . There are just a lot of footstep , and it will take some time . Between this how - to , VMWare ’s fantabulous PDF , and the available video preparation , there ’s lots of aid uncommitted to get you through the process . The skilful news is that it worked — at least in my case — and the result converted VM seems to be just as stable as one I created with a brisk Windows XP installation .
I ’ll have more on Fusion in my full review article of that program .
[ Senior editor Rob Griffiths write the Mac OS X Hints web log and review Parallels Desktop 3 . ]
