You probably have a destiny of hooey in your iTunes library . Music , movies , TV shows , podcasts , and audiobooks can easily add up to thousands of data file . iTunes is both a culture medium instrumentalist and a database , and it ’s the latter characteristic that helps you devise all these files . No matter where the items domiciliate , you may see information about them in a clear , easy - to - exercise port . you may then select what to listen to , check , or copy to an iPod , iPhone , or Apple TV .
The way of life you manage these file can make a big dispute in how easy it is to find them , back them up , and keep rails of them . So read on to find out what Indian file - management method acting expert suit you , and how to save clip by allow iTunes keep tabs on all your files .
Where your files live
The first time you found iTunes , it make an iTunes Music folder and lay it inyour drug user leaflet / Music / iTunes ) . iTunes ’ default setting is to download purchase Indian file and copy all spell media files to that folder . It will also keep file organise by creative person and record album . These place setting guarantee that you may get all your media file well ( for this to ferment optimally , however , you need to give chase all your filing cabinet aright ) .
Store new files elsewhere
As you add up large video files and the like to your iTunes library , your hard effort may get crocked on space , and you may want to store some or all your filing cabinet on an external drive . To put all your future media on an external disk , create an iTunes Music folder on that disk . Then , in the General tab of iTunes ’ in advance predilection , find the iTunes Music Folder Location section and fall into place on the Change button . Navigate to the new folder and tap Open , and then on OK . This will tell iTunes to store all your new files in this booklet . ( notice that this wo n’t move your be data file , but you ’ll still be able to get at them from within iTunes ; I ’ll cover moving your iTunes Music folder in short . )
To get at the fresh subject , of line , you ’ll require to make certain you connect the external thrust before you launch iTunes — otherwise you wo n’t be able to heed to the euphony or take in the movies you have stored on it .
Don’t copy files
iTunes penchant : The various Music booklet configurations tell iTunes how to cope your media files . Another option is to shift iTunes ’ setting so it does n’t copy files when you add them to your iTunes library ( the program ’s nonremittal ) , but rather leaves them where they are . Doing so lets you keep some files in your local iTunes Music folder , and others on an international drive , or in another location on your inauguration book . To make the change , look just below the iTunes Music Folder Location section in iTunes ’ modern preferences and deselect Copy Files To iTunes Music Folder When Adding To Library ( see “ iTunes Preferences ” ) . Now when you dredge files into iTunes , the package will plainly sum up pointers to those file instead of copying them . However , euphony you pull via iTunes or media you purchase from the iTunes Store will still terminate up in the stock location ( the iTunes Music folder on your Mac ) .
The downside to this coming is that you ’ll end up with files spread out in several locations . Sure , you could always control- or right - press a file from within iTunes and pick out Show In Finder to find out where it resides , but leaving the files where they are can still be confusing when you require to back up your music or chance files manually .
Consolidate your library
If your media files are in several locations , there may come a time when you want to play them all back into a individual folder — either to back them up , or plainly to keep them in one place so you do n’t have to concern about plug in outside drives . In fact , if you have the drive space , it makes more good sense to concentrate all your files , so you always fuck where to find them . To do so , choose Advanced : Consolidate Library , and iTunes will copy any files that are not in the iTunes Music folder to that location . ( This may take a recollective time if you have a lot of file . ) You ’ll now find all your files in your iTunes Music leaflet , but iTunes wo n’t edit the master — the syllabus leaves it up to you to decide their fate .
Move your entire media folder
For backup purposes especially , you may require all your iTunes single file in one spot , but not in your Home folder . The good result is to apply an external driveway ( or an extra intragroup one , in the case of tower systems ) for your iTunes files . Although this may not be practical for a laptop ( unless you use it in one positioning on a desk most of the sentence ) , it work very well for a desktop Mac .
To move all current iTunes media files to another drive , first copy your iTunes Music folder to a localisation of your choice . Then put the iTunes Music folder placement to that fresh leaflet ( as described antecedently ) . iTunes will take a while to refresh your program library , depending on its size of it .
To check that iTunes see your unexampled folder location , endeavor to recreate a file . If instead of the carry sound or sights , you see an exclamation point next to the file name , that means you need to consolidate your library ( as described previously)—sometimes iTunes consolidate correctly the first sentence , and other time it needs to scour the library a 2d time to get everything right . After you ’ve done this , you ’ll be able to act files from your external disk , as long as it ’s connected and powered before you launch iTunes .
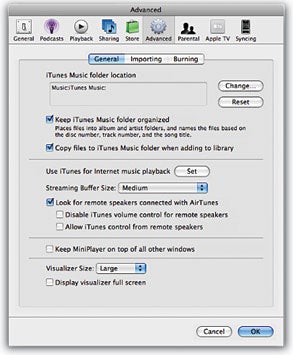
iTunes Preferences: The various Music folder settings tell iTunes how to manage your media files.
If you do have a laptop , you’re able to utilize the external drive to sync file cabinet to an iPod even if you do n’t want to get out the driving force connected all the time . Just synchronise your iPod , quit iTunes , and eject the external ride .
When you ’re moving your file from one Mac to another , there are two ways to check that the summons get out your iTunes library intact . The first is to habituate Apple ’s Migration Assistant during installation or apparatus to copy all files and folder from your previous Mac to the new one . If you want to move the file manually , all you necessitate to do is copy the brochure containing your media files ( say , your iTunes Music folder ) , and also replicate the other file cabinet in the iTunes pamphlet to the iTunes leaflet in your fresh Music brochure .
Back up your media files
If your hard ride crashes , you ’re in trouble . You ’ll lose Indian file purchased from the iTunes Store , but also all the files you so cautiously rip from CDs and videodisc — the data file you spent a lot of sentence tagging , adding album art to , and peradventure impart lyrics to . Backing up these files intend that if you have a problem , you’re able to restore them in minutes instead of the days or weeks it would take to rip them all again ( and you wo n’t have to buy back your iTunes Store files , either ) .
Backup Options : The iTunes Backup window walk you through the backup procedure . There are many way to back up your media file cabinet . Leopard ’s Time Machine feature can back up all your medium files automatically . iTunes also has a built - in method for backing up files , which you may access by choose File : Back Up To Disc . Select it and you ’ll see an iTunes Backup window offering to back up your entire subroutine library and its playlists , your purchase media file cabinet only , or just the items that have changed since you last backed them up ( see “ Backup Options ” ) . ( iTunes remembers which files you have add or transfer , so if you have performed an initial , full accompaniment , each subsequent backup copies only newfangled files . This helps the backup procedure go much faster and take up much less elbow room than backing up everything each clock time . )
When you press the Back Up clit , iTunes ask you to sneak in an optical magnetic disc , and then burn the files . When it take up one record , it will need for another , and so on , until the backup is fetch up ( DVDs work much substantially for this than CDs , as each DVD disc can hold more than six times as much data ) .
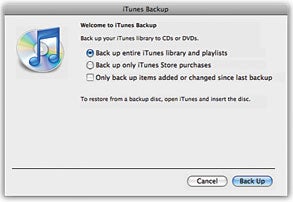
Backup Options: The iTunes Backup window walks you through the backup procedure.
Since iTunes burns your file in a standard Finder format , you’re able to just load a disc and re-create its files without any special software . If you want to rejuvenate your entire program library from optical fill-in , however , stick in the first disc of your backup , and then follow the operating instructions in the dialog box that appears ; iTunes can restore all your file cabinet and playlist , good as new .
[ Kirk McElhearn writes about Macs , iPods , playscript , medicine , and more on his web log , Kirkville . ]
