Drag-and-drop disk-image creation
Using Disk Utility ( /Applications / Utilities ) , you may create a magnetic disk image — a sorting of virtual severe drive — from any brochure in OS X. I practice disc images for quite a few thing : Classic hold out on a compressed disk image on my Mac . I make saucer images out of secret plan CDs — you could act some , but not all , games with the disc image mounted rather of stimulate the original CD in the crusade . I also keep a FileMaker Pro database of passwords and other sensitive information on an encrypted disc icon , which I can trip with , with some degree of certificate .
need to avoid the verbose process of opening Disk Utility , choose Image : New : double From Folder , and then navigating to the booklet you want to turn into a disk mental image ? you could . Drag - and - drop disk - image macrocosm disappeared from OS X 10.3 but quietly returned to OS X 10.4 . Now just drag your folder onto the Disk Utility app image — whether it ’s in the Dock , the Finder , or the Finder ’s sidebar or toolbar ( see “ Quick Disk Images ” ) . Disk Utility will launch , displaying the New Image From Folder dialog loge . Select an figure format ( choice include Compressed and Read - Only ) , and then decide whether you ’d like to encrypt the image so only you’re able to open it . That ’s it !
Hop through Spotlight results
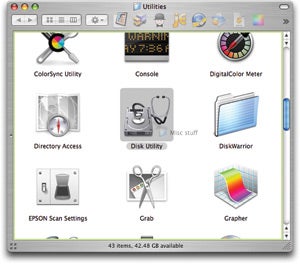
Quick Disk ImagesTo make a phonograph recording persona quickly and easily ( in bone X 10.4 or 10.2 , but not 10.3 ) , just sweep and miss a brochure or folders onto the Disk Utility icon .
When you use Spotlight to seek in OS X 10.4 ( by press Command - spacebar or get across on the Spotlight picture in the menu bar ) , the results appear in a free fall - down list , sorted into groups : Applications , Documents , Folders , and so on . Once the upshot appear , you may select any item in the list with the mouse , or by using the up- and down - pointer keys . But the keyboard shortcuts do n’t kibosh there — these tricks can also help oneself you quickly get to your selection .
First , if you require to take the Top Hit item , just withstand down Command and press return . To quickly jump between family , use Command - down arrow and Command - up arrow . Once you ’re in the desired family , use the arrow keys to scroll through it . you may rise to the bottom or the top of the entire list by agitate ascendency - down arrow or control - up pointer ( or by using the end or house key ) . ultimately , if you want to modify your lookup term , you may conjure control , selection , or Command and the left or correct pointer to jump to the beginning or end of the search field .
Quickly change iCal’s visible hours
Apple ’s iCal lets you apply three views to hold your calendar : Day , Week , and Month . For the Day view , you may choose the turn of hours seeable on screen by going to the program ’s orientation . But there may be times when you desire — or require — to see more hour ( say , for foresightful days with travel and previous appointments ) or fewer hours ( for days when you do n’t have much going on ) . as luck would have it , there ’s a simple way to modify this without having to take a trip to penchant . you could do it with your mouse ’s whorl wheel , or even with two - fingerbreadth scrolling on a trackpad ( on a Mac laptop computer that offer this feature , such as the MacBook Pro and certain PowerBook G4 model ) .
merely move your cursor over the Day or Week exhibit ( the actual window , not the button ) , hold down the pick key fruit , and then scroll down to show fewer hour or scroll up to show more of the day in iCal ’s window . If you ’re using a trackpad , hold down the choice samara and use two fingers to scroll down or up . ( Watch this flick of what pass off . )
As you scroll , you ’ll see more or less information for each consequence — the more hours you show , the less info will be visible . If your iCal window is small , you ’ll lose the time for some or all of your events , which will quail to one line . Show fewer hours to expand your events . Do this as needed , and you no longer need to worry how many hour you set in iCal ’s preferences .
Access a systemwide photo browser
If you oftentimes use photos in documents or air them to friends and family , you might have discovered that you may dredge your shots from Apple ’s iPhoto 6 ( part of the $ 79 iLife ’ 06 ; ; April 2006 ) into almost any app . At times , though , being able-bodied to snaffle a individual picturewithoutlaunching iPhoto would be convenient . After all , the program can take a while to found if you have many characterization or a dim Mac .
If you have iPhoto 6 and OS X 10.4 , you may apply Automator to access a systemwide photo web browser that impart you quick admittance to your entire iPhoto library . To jump , open Automator . In the Library column , press iPhoto . A list of actions will appear in the Action pillar . Select Ask For Photos , and drag it to the right - bridge player pane . Select File : Save . Give the work flow a name , for example iPhoto web browser , and then choose app from the File Format protrude - up menu to keep your work flow as an practical app . Save it anywhere — in your Applications folder , perhaps . ( Later you may drop back this little lotion to the Dock if you contrive to use it often . ) eventually , snap on Save .
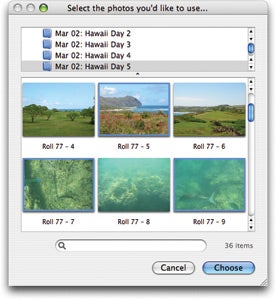
pluck a PhotoUsing Tiger ’s Automator , you’re able to create a one - contrast program that will display this ready to hand iPhoto library browser app ; then opt one or more look-alike from the browser app and drag them to where you want to use them .
Launch the software to view its simple port ( see “ Pick a Photo ” ) . From here you’re able to scroll through your entire library , select an album and scroll through its cognitive content , or expend the Spotlight lookup field of force to seek for a photograph by its title or keywords . When you find a picture you require to use , drag it to the background , to a pamphlet , or flat into a papers or an e - mail substance . you may also select multiple photos by curb down the Command key and clicking on several photograph .
You ’ll belike find this internet browser much faster than iPhoto when you ’re trying to find out a picture . The only difference is that you do n’t have iPhoto ’s export options — sweep pictures from this web browser will always give you full - size of it exposure .
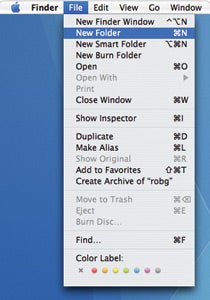
Bring back the old Command-N
If you ’ve been using a Mac since the sidereal day of osmium 9 , when the iPod was just a gleam in Steve Jobs ’s center , you ’ve had to exchange your ways quite a snatch over the years . One small accommodation was losing the shortcut Command - N for creating new brochure in the Finder . With the first version of OS X , Apple assigned Command - N to the New Window command and bidding - transmutation - N to the New Folder command . Many people plant the change jarring , as years of muscle retentiveness caused them to unfold Modern windows when they want to make newfangled pamphlet . But now there ’s a way to get the old shortcut back , using nothing more than the tool built into OS X 10.4 . ( This trick wo n’t function in OS X 10.3 . )
you’re able to use OS X ’s built - in power to create systemwide keyboard shortcut to change the behavior of Command - N. First , enter the Keyboard & Mouse preference acid ; then select the Keyboard Shortcuts tab key . Using the selection here , you could assign any action you ’d like to Command - N , once you reassign its current function to a new cutoff .
select the positive sign ( + ) at the windowpane ’s modest left to bestow a new shortcut . In the sheet that appears , set the software computer menu to Finder , accede

Go Old SchoolAre you a longtime Mac exploiter who wishes that the Command - N shortcut still made new booklet in the Finder ? If you ’re running OS X 10.4 , you could make it so , using nothing more than the system of rules ’s built - in tools .
Now shut the preference pane and switch back to the Finder . To make your changes take event , you need to re-start the Finder . One easy way to do that is to press and contain the option key and then click and restrain on the Finder ’s Dock image . When the contextual carte du jour come out , select Relaunch . If everything operate , your shortcuts will come along in the File menu when the Finder restarts ( see “ Go Old School ” ) .
Your last task is to reassign the New Finder Window command to the shortcut Command - faulting - atomic number 7 , completing the swop . ( You ca n’t do this during the previous step , since you must liberate up one of the keyboard crosscut to assign it to the other program line . ) start the Keyboard & Mouse preference pane again and press the Keyboard Shortcuts tab . Scroll through the inclination of shortcut until you see the Finder ledger entry in the software Keyboard Shortcuts part . cluck on the disclosure triangle next to the Finder entry , and you ’ll see the two commands you created . dawn on the shortcut next to the New Finder Window entry , get in Command - shift - N , shut the preference pane , and then relaunch the Finder again to make the newly designate crosscut effective .
If you decide that you prefer the standard OS X demeanor , go back to the Keyboard & Mouse preference paneling , sink in on the Keyboard Shortcuts tab , scroll down to the Finder entry , and find the two Finder cutoff you created . play up them both and clack on the minus sign ( - ) to edit them . Restart the Finder , and you ’re back to a stock setup .
OS X 101: Is it running?
One matter that turn on up new Mac user who ’ve switch from Windows is the different deportment of software windows in osmium X. In Windows , if you close your last Word papers ’s window , for instance , you give up Word . That ’s not true with the Mac — the file cabinet you ’re working on and the software itself are more sovereign of each other .
In OS X , if you close a window in an app program — via the red window pane in the upper left over corner or the data file : nigh Window menu point — you almost certainly have n’t quit the programme itself . Look at the menu bar at the top of your blind to see . If you shut a Word document , for case , you ’ll still see the Word menu next to the Apple card , which indicates that the software is still active . ( Like any good rule , this one has exceptions : some programs that utilize only one windowpane , such as System Preferences , iPhoto , Backup , and Calculator , willquit when you close up their windows . ) To cease any program on the Mac , pick out the File : Quit menu item , wardrobe Command - Q , or restraint - come home on the covering ’s ikon in the Dock and choose Quit from the contextual bill of fare .
practical app AvalancheIf your computing machine is feeling boring , correspond the Dock to see what ’s running ( as indicate by black trilateral beneath icon ) .
Leaving too many programme open at once can cause your system to slacken down . So how can you say what ’s currently running ? There are two very easy ways . The first is to just seem at the Dock . Any fly the coop program ’s icon will have a black triangle beneath it , or the trigon will be beside it if you ’ve moved the Dock to a screen edge ( see “ program Avalanche ” ) .
The second is to press and hold Command and then conjure the tab key . When you do , the OS cristal diligence switcher will come out on silver screen . Each meter you press chit again ( while continuing to have down Command ) the switcher will move to the next open program ’s ikon ( the program ’s name will seem under its icon ) . If you see a mickle of programs listed , and your machine feel dense , quit the ones you ’re not using . you could do this well by pressing Q when the program you need to quit is pick out in the program switcher.—ROB GRIFFITHS
Power tip: Turn your Mac into a musical alarm clock
Tired of heat up to your boring old clock receiving set ? Use your Mac as an consternation clock instead , and you’re able to wake up to your favorite euphony . All you take are a few progress - in OS X puppet : Automator , the Energy Saver druthers pane , and iTunes .
To begin , open Automator . tap Finder in the Library column . Then in the Action pillar , select Launch program and drag this action to the workflow area at the right of the window . Select iTunes from the program pop - up menu .
select iTunes in the Library column ; then drag the Get narrow iTunes Items action to the workflow area and set it below the first action . select the plus - sign button ( + ) and pick out a playlist . With iTunes still selected in the Library column , retarding force Play iTunes Playlist to the bottom of the work flow area . Select File : Save . Name the work flow and select software from the File Format pop - up menu .
open up the Accounts preference pane , select the Login Items lozenge , and drag your workflow to the Login Items inclination . Then open up the Energy Saver taste pane , chatter on Schedule , and opt the time to start up your Mac . When it depart , the Automator work flow will prevail , telling your Mac to roleplay the selected iTunes play list . Make certain you do n’t have any loudspeaker stop up into your Mac — if they ’re not move around on , you wo n’t hear anything , and there ’s no point in leaving your speakers on all night . Your interior speakers — even on a laptop — will be fine for this other - break of the day serenade.—KIRK MCELHEARN
