Use screen-saver images as desktop pictures
Apple ships a number of very nice screen savers with OS X — you’ll find them all in the Desktop & Screen Saver predilection pane . Some of the screen savers , such as Beach and Cosmos , consist of gorgeous paradigm that appear in sequence , fleet and slip into and out of view . But what if you require to use a screen - saver image as your desktop background ? Here ’s how .
afford a Finder windowpane ( Command - N ) and voyage toyour user leaflet / Pictures . Then open another Finder window and voyage to /System / Library / Screen Savers . The system ’s screen savers are in this pamphlet . Hiding insomeof the screen savers are double you could liberate for your own employment . Specifically , the following single comprise usable desktop figure : Beach , Cosmos , Forest , Nature Patterns , and Paper Shadow .
I ’ll practice the Beach screen door saver as an example , but these instruction manual also utilize to the others . ascendancy - snap on Beach.slideSaver , and prefer Show Package Contents from the contextual card . When the novel window opens , voyage to Contents / Resources , and voilá — there are the images !
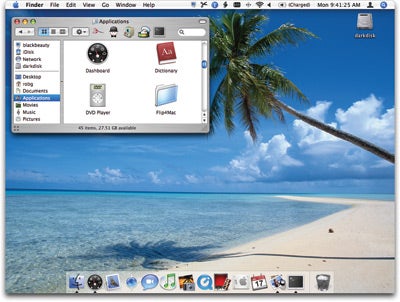
Beachy KeenIt ’s easy to expend any of the Apple - render screen door - saver images as novel desktop backgrounds . Here , I ’m hanging out on the beach and enjoying the prospect .
The next steps are simple . Decide which visualise you want to take up ( or press out Command - A to pick out them all ) , and then drag and dangle them into your openyour drug user folder / Pictures folder . Close that brochure , launch the Desktop & Screen Saver predilection pane again , fall into place on the Desktop tab , and select your Pictures folder in the source list . chatter on the look-alike you desire , and it will appear as your desktop ikon .
More secrets of the Application Switcher
OS X ’s program Switcher supply a ready to hand path to jump between applications . Just fight Command - tab , and a words of ikon appear on your cover . These icons represent currently running app program , and they are expose in ordination of most- to least - recent exercise . While continuing to control down the Command Florida key , military press tab to cycle through them . When you reach the one you want , release the keys , and that program will leap to the foreground .
We covered some app Switcher tricks in the July 2005Mac OS X Hints , but we have n’t discussed how you may utilise dragging and dropping with it . Say you require to drag and cast something into a TextEdit papers , but you ’ve hide out TextEdit so you ca n’t see its unresolved windows . No trouble ! commence dragging the aim you want to cut down , press Command - tab to activate the switcher , and then tab over to TextEdit ( while holding down the computer mouse button , so you do n’t strike down your pull operation ) . Release Command - pill when TextEdit is highlighted , and it will touch off and unhide . Now you’re able to devolve the item into your open TextEdit document .
But hold off — consider the old example . Only this time , after unhiding TextEdit , you discover that you do n’t have an open written document window on screen to swallow your dragged item . You might think you ’ve got to scrub your retarding force operation , create a newfangled document in TextEdit , and then start the process again . But that ’s not the case . After you switch to TextEdit ( that is , after you ’ve released Command - tab and are still hold your item with the computer mouse ) , just press Command - N to create a fresh window . Even though you ’re in the middle of a drag operation , TextEdit will receive the command .
You ’re not limit to open new documents with this trick — you may use any app ’s other keyboard shortcuts while you ’re dragging , too . But this worksonlyif you ’ve switched to the app via the app Switcher ( or by using Exposé ) .
Note that you ca n’t drag and drop an object at once onto an applications programme ’s icon in the program Switcher — you have to first trigger off the address program and then drop your dragged object . If you ’d like to get behind and drop now onto app Switcher icons , you might try Proteron ’s $ 15 LiteSwitch X 2.6 ( ) , which bring home the bacon that utile feature and others .
Group Finder search results
I employ the Finder ’s lookup feature ( by pressing Command - F in the Finder ) more often than full - blow Spotlight research ( accessed by pressing Command - spacebar ) . As long as I ’m comparatively specific about what I ’m looking for , the Finder quickly create results that are usually relevant .
But with Spotlight searching , you may do something that does n’t seem possible with the Finder : form and group search outcome in a meaningful way .
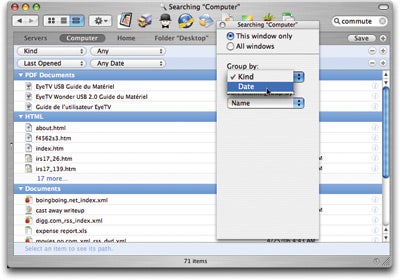
A Nice SortThe Finder ’s search characteristic ( Command - F ) can give you more class choice for search results . Just press Command - J to open up the View Options dialog box .
There is , however , a way to kind and group ( in a somewhat modified matter ) the Finder ’s search results . lead your hunt ; then select View - > Show View Options ( or just press Command - J ) . This will bring up the Finder ’s View Options dialog box , with some additional preferences specific to the search results window . Here you may group by Kind or Date , and sort by Name , Date , or Kind . These choice are n’t quite as powerful as the grouping and sorting options offer up in the Spotlight results window , but they ’re a estimable starting line .
Old-School HomePage editing
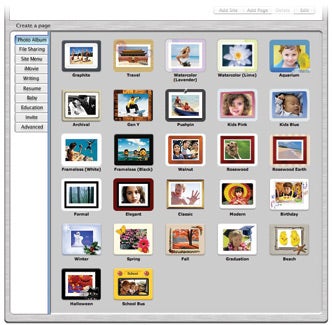
Photo Albums in a SnapIn former version of iPhoto , one push connected you to .Mac ’s very easy - to - use of goods and services HomePage instrument . In iPhoto 6 , that clitoris is gone , but you may still publish a flying online photograph album if you know the whoremonger .
My result is not quite as simple as clicking on a push button , but I think it ’s easy than creating a full site with iWeb . In iPhoto 6 , pick out the photos ( or album ) that you want to turn into a .Mac exposure page . Choose File : Export . Set the Scale Images No Larger Than airfield to 800 x 600 or 640 x 480 , as you wish ( larger images will take longer to upload and use more .Mac platter place ) . Make certain that the Use Extension option is take — if the image figure do n’t have extensions , then the .Mac site wo n’t let you use them in an icon Sir Frederick Handley Page . press Export . In the dialogue loge that appears , select your iDisk in the sidebar , and then tick on the Pictures folder . This is where .Mac stores the moving-picture show used in photo pages . snap on New Folder , name the novel folder , and flick on Create . select OK to export the images .
That ’s all you have to do to export the photo . Next , access to .Mac to create your unexampled photo page . cluck on the My Pages link and choose one of the Photo Album styles . When the next screenland appears , choice ( by click once ) the brochure of images you just create ; then press Choose . Fill in the captions and descriptive text and tick on Publish — then you ’re done .

OS X 101: Text-clipping tricks
Many multitude find thattext clippings — snippet of schoolbook that have been sweep out of applications and then drop in the Finder somewhere — are an easy style to store tidbits of knowledge they intend to employ in the future . And if you ’re run for OS X 10.4 , you’re able to do new tricks with trim .
How to make a trim
OS X bring out a point of complexity to the simple task of creating a text clip . How you sweep text differs , calculate on what type of program you ’re in . In Carbon apps , such as Adobe Photoshop , the Microsoft Office apps , Mozilla Firefox , and many other convert from OS 9 , dragging whole kit as you might estimate . Just spotlight a auction block of textbook , cluck and bear the mouse over the highlighted auction block , and then drag it to wherever you ’d like it to go .

If the computer programme was write in Cocoa , as most of Apple ’s applications ( including TextEdit , Mail , and Safari ) are , the procedure is a bit different . After highlighting the school text to hale , click and hold the mouse clit over the highlighted text , butdon’tstart drag right aside . If you try , you ’ll find that the platform will start a raw text selection . or else , concur the black eye push down for about half a second , and then start dragging . If you ’re not sure which technique a particular app requires , add the hold before seek to drag .
cut short the clippingUnlike in past version of OS X , when you go to paste your press cutting into another app , OS X 10.4 lets you select textwithinthe press clipping , instead of force you to apply the entire cutting . Select and copy individual words ( by double - clicking on a Bible ) or lines ( by triple - clicking anywhere on the argument ) and then scuff .
Dandy Dock drags
What ’s most ready to hand about text clippings in Tiger is that you may now drag out selections of school text to software icons in the Dock . This lets you execute a wide smorgasbord of labor more quickly . Here ’s a sampler :
Start a novel Mail messageDrag a lump of text and dismiss it onto Mail ’s Dock image . Mail open a new Es - mail message window with the drag text edition in the body of the message .
start out a new textbook fileDrop your drag out text onto TextEdit ’s Dock icon , and TextEdit creates a young text file hold that text .
Run Google searchesDrag a lump of textual matter from Microsoft Word onto Safari ’s Dock icon , and Safari will launch a Google search for the phrase . ( In Cocoa app , you’re able to also just manipulate - press a word and pick out hunt In Google in the contextual menu that come out . )
Create a Stickies noteDrop your drag school text on Stickies ’ bob image , and a Modern distinction appears hold in that text . ( If you ’re in a Cocoa app , you’re able to also squeeze Command - shifting - wye to do this . )
Create universal resource locator shortcutsHave a short list of sites you always access ? cart and drop each computer address from Safari ’s address bar to the right - manus side of your Dock to create a one - click cutoff for that site .
quick spread out a vane pageOccasionally , you may require to see what a Web page reckon like in another internet browser ( or you may desire to render to give a page in Firefox because Safari is having trouble with it ) . Highlight the universal resource locator in Safari ’s speech saloon , click and hold on it , and wait a second . Now drag the selection to another web browser ’s Dock icon to unfold the page . ( you may also drag the reference directly to another internet browser ’s opened window . )
Power Tip of the Month: Hide user accounts in Tiger’s login window
Lean LoginBy using one Terminal Command in OS X 10.4 , you may hide user news report you apply infrequently — turning a mussy scroll login window …
One of the nice things about OS X is that it makes creating additional user account easy . So you may have as many as you need — for example , a work history , a troubleshooting account for diagnosing organization problems , a gaming chronicle that uses lower screen resolutions and does n’t include startup items , personal accounts for everyone in your family , and even a guest account for visiting congener . And this is all well and near , but it does lead to one problem — the never - end login window . Instead of have to pick through account in a prospicient list , would n’t it be great if you could hide the one you get at only occasionally ? If you ’re running OS X 10.4 , you could do just that .
If you were brave and bluff , you could do this in former versions of OS X. But now veil accounts necessitate only a immediate head trip to Terminal ( /Applications/ Utilities ) and the use of one command . To start , you demand to know the short name of each account you require to cover . Go to your Accounts preference pane , press the account name in the My Account chromatography column , and front in the Short Name airfield . Once you ’ve got the necessary short names , open Terminal and enter this command ( which you may simulate here ):
In the above example ,
… into a trim , neat one .
Now sign out ( Apple menu : lumber Outyour substance abuser name ) and take a look at the login screen door . You ’ll observe two changes . First , the substance abuser figure you hid wo n’t show any more , and second , there ’s a new entry : Other . cluck on Other , and you ’ll be able to enter a exploiter name and password to access any of the secret accounts . story shroud this way also do n’t show in the Fast User Switching menu ( unless the exploiter are logged in ) .
you may unhide a out of sight score by going to Terminal and get in this dictation ( which you may copy fromthe same varlet as above ):
By specifying no names in the command , you ’ll readjust the list of out of sight users . The next time you render to the login windowpane , you ’ll see all your account again .
