Distinguish docked URLs
One handy OS disco biscuit feature article is the Dock ’s power to give you one - click entree to web land site . Drag a uniform resource locator to the correct side of the Dock ( or to the bottom , if you orientate your Dock vertically ) , and you produce a fountain icon that you could sink in on to go directly to the Web page . ( This works with Apple ’s Safari , Mozilla ’s free Camino , andThe Omni Group ’s $ 30 OmniWeb . It does n’t do work with Mozilla ’s freeFirefox . )
This is a great time - recoverer if you have a few URLs you access often . The job is that every land site gets the same generic spring picture , so a casual glance at the Dock wo n’t tell you which site each picture represents ; you must hover your pointer over an ikon to give away its deed of conveyance . Here ’s a workaround that will get you apply a unique icon to each dock URL .
Start by creating a new folder on your desktop ( or , if you do n’t wish a cluttered screen background , inyour drug user booklet / Documents ) . Name it Docked URL . When you want to create a docked universal resource locator , drag the URL from your web internet browser into the Docked URLs folder alternatively of directly to the Dock . This create aWeb - locationfile , just as drag a URL to the Dock does .

Now look at the Web site you need to bookmark , and find a logo or an image that will help oneself you discover the site . You ’ll use this graphic as a custom image . Once you ’ve found it , press Command - shift - control-4 . Your cursor will flex into crisscross - hair ; then click and dredge to take the graphic , examine to make the selection as substantial as possible . put out the black eye when you ’re done . The clipboard now contain the image .
In the Finder , open up the Docked URLs folder and select the vane - location file you created . Press Command - I ( File - > Get Info ) . choose the HTTP icon in the top left-hand corner and then press Command - V ( Edit - > Paste ) . You should see your usage graphic in the pocket-size lame — OS X will automatically scale it as required . exit the Get Info window and move your customise URL to the Dock .
Puzzled by your tail universal resource locator ’ generic natural spring icon ? Make them easy to identify at a glance with impost icons .
Get selective with Finder selections
Sure , you jazz how to pick out something in the Finder by clicking on it ( seeMaster the Finderfor a survival primer ) . But what happen if you select several data file and then gain that you want the unselected particular in that location instead ? For example , say you ’ve grabbed all the image files in a folder that contains image filing cabinet and text edition document , but then you decide that you want to leave the images where they are and move thedocumentsto a new emplacement .
You could start over , but that ’s the severe elbow room — at least if you use the icon or column view . or else , just move the shiner to an empty country within the current folder , press and hold Command , and start dragging over everything in the windowpane . ( If you use the tilt view , you must begin drag from the left of a file name . ) As you do so , you ’ll see your current choice become unselected while the previously unselected items are pick out . ( There ’s a movie that shows this technique in legal action . )
Uncover missing Keynote animations
When Apple upgrades computer programme , it sometimes also downgrade them in certain ways ( normally silently ) . Such is the case with Keynote 3 ( part of the $ 79 iWork ’ 06 rooms ;) . When I first look at Keynote 3 , I see nothing but useful raw features . But then I went looking for one of my favorite Keynote transitions — Motion Dissolve — and it was nowhere to be found . It worked fine in existing presentations , but I could n’t contribute it to a new one . A bit of investigation expose more wanting effects — the Burn , Drop , Falling Tiles , Grid , and Twirl transitions , along with the Drop and Twirl build effect . Thankfully , retrieve these effects is quite dewy-eyed . Go to Keynote : Preferences , get across on the General tab , and pick out the Include Obsolete Animations In Choices option . That ’s it — all the missing animations will seem back in their proper spots in the Build and Transition pop - up menus .
Use the Keyboard in Preview slide shows
Have a folder full of mental image you need to retrospect ? There ’s no need to open them all in Apple ’s iPhoto or Adobe Photoshop . The OS X 10.4 version of Preview ( /Applications ) includes a handy slide - show tool that bring in quick looking at several images a breeze .
Choose View - > Slideshow in Preview ( dictation - transmutation - degree Fahrenheit ) to start the show . An on - screenland control have you pause the playground slide show , view all the images as an forefinger sheet , on/off switch between the Fit To Screen and Actual Size modes for an image , tote up an persona to iPhoto , and exit the glide show .
If you opt using the keyboard to using the black eye , you’re able to employ the pointer keys to move between each image in your slide show . But Preview also offers a few other time - saving keyboard shortcuts . Press A to look at an prototype at its actual size . Press F to resize an image so it fills the screen . Press I to consider the index page . On the index pageboy , you may apply the arrow keys to take an image , and then press income tax return to catch the selected trope .
Compare or merge the contents of two folders
Unless you create software for a living , you belike have n’t explored Apple ’s Developer Tools . These destitute tools can be very useful , so they ’re worth checking out . ( You ’ll find the Developer Tools software package on your Tiger Install DVD . Once you ’ve installed the package , you ’ll see a new Developer folder at the root level of your arduous drive . )
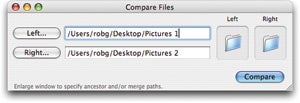
Consider FileMerge , which you ’ll find in /Developer / Applications / Utilities . This program is typically used to compare two text files — puff files to the Left and Right fall zones in the Compare Files window , and FileMerge will expose a comparison Sir Frederick Handley Page that shows the conflict between the two files . This feature article is very ready to hand if you do a lot of employment with HTML , PHP , or other virgin textual matter filing cabinet and often have multiple , nearly identical , versions of those files .
But not many people know that you’re able to also use FileMerge to compare two folders . For example , say you have two folder of images , and you ’d like the brochure to be monovular . You could invest in a synchronizing utility such as Econ Technologies ’ $ 30 ChronoSync ( ) , but that might be overkill . Instead , give FileMerge a stroke .
Use FileMerge ( part of Apple ’s Developer Tools ) to compare two pamphlet .
Launch FileMerge and then drag one folder into each driblet zona in the Compare Files windowpane . Once you ’ve added the booklet , just penetrate on Compare . FileMerge opens a new window with a inclination of grey-headed and inglorious file names . A gray file name betoken that the file is in both folders . A black filing cabinet name suggest that the file is in only one folder . Select a file to see a position message at the bottom of the windowpane . If the subject matter reads , “ summate to right wing , ” the file cabinet is in the folder you placed in the veracious drop cloth zone . If the message read , “ added to left , ” the file cabinet is in the Left drop curtain geographical zone ’s folder . To simplify this view , use the Exclude chip boxes . Select the Identical option , for example , if you do n’t need to see single file that are in both folders .
If you ’d wish to depend at any of the data file , press the View button to display a drop - down menu of pick . Choose Comparison ( for text data file only ) to launch the traditional FileMerge compare windowpane , or habituate the Left File or Right File option to see the genuine text or images in the specified folder . The Ancestor and Merge views are for people using FileMerge to check codification . ( you may read more about these options in FileMerge ’s service charge . )
If you wanted only to visually equate the two folders ’ contents , you ’re done . But you could also use FileMerge to merge the two folders into one new one . To do this , choose all the files in the leftmost newspaper column ( press one and then press Command - A ) . Then take Combine Files from the Merge pop - up computer menu ( or contract Command-1 ) . FileMerge will ask you for a unexampled folder name and then merge the two brochure .
Hide Mail messages from Spotlight
Are you an Es - mail ring crumb like me ? If you were to peer into my written matter of Apple ’s Mail , you ’d see more than 15,000 messages filed out . I ca n’t add myself to delete them — just in caseful . Who knows when I might require something in that folder of substance from every individual who registered for my vitamin E - Quran about OS X 10.1 ? Or what if a critical composition of entropy is in the folder containing press releases that date back to 2002 ?
In previous versions of OS X , having all this data stuffed in my Mail folder was n’t a job . But with the spillage of rendering 10.4 , Spotlight accede the picture . Left to its own equipment , Spotlight will index every Mail message you keep . For me , this meant that Spotlight search would often take back tons of irrelevant match from archived substance . I do n’t need to chuck these messages , but blot out them from Spotlight for sure would be commodious .
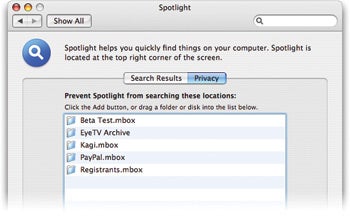
If you keep a sight of e - mail substance in sometime booklet that you do n’t want Spotlight to search , omit the folders from Spotlight ’s index by pick out them in the Privacy tablet .
An anonymous tout on the Mac OS X Hints World Wide Web site launch a unproblematic solution . spread the Spotlight preference pane and then press the Privacy check . select the positive sign ( + ) at the bottom of the window , and then sail toyour user brochure / Library / Mail/ Mailboxes . Now just get across on the booklet you ’d like to exclude , and then tap Choose . ( you’re able to select more than one folder at a time by hold down the Command headstone . ) Each time you do this , the leaflet is bring to the tilt of localisation on your computer that Spotlight does n’t indicant .
If necessary , voyage into the folders within the Mailboxes folder to give subfolders . When you ’re done , shut down the Spotlight pane , and that ’s that . If you ever decide you want Spotlight to let in a certain folder again , just return to the Privacy tab , select the folder , and press out the minus signaling ( - ) to take away it . As soon as you do so , Spotlight will update its index to include all the messages therein .
OS X: 101: Master the Finder
Need to move some files around or open up a gang of files in one app ? you’re able to keep a lot of time by learning how to use primal combination in the Finder . Pressing the control , Command , option , and/or shift keys in conjunction with a mouse click or drag unlocks all sorts of special ability that can help you get things done more easily .
Command - ClickThe handy Command samara is right next to your spacebar — it ’s sometimes telephone the command key , the cloverleaf Francis Scott Key , the Apple key , or “ that squiggly fundamental . ” This key lets you select noncontiguous items . In the lean , chromatography column , or icon view , press and take Command before clicking on an icon . go forward to admit down Command , and tap another icon . You ’ll see that you now have two items select . This is a skillful way , for example , to seize all the JPEG files in a folder even if they ’re not next to each other . Once they ’re selected , you may then drag and drop off them onto your trope editor program or move them to a young position .
teddy - ClickIf you act upon in the tower or lean view , you could shift - click to select a chemical group of immediate files . tap the first file you require to take , press and keep the shifting key , move the black eye to the last file in your excerption - to - be , and then dawn the computer mouse . Presto , all the neighboring files are pick out . In the icon view , shift - detent works the same as Command - click .
Control - ClickWhen you press and hold the control cay and then press an image in the Finder , you ’ll see a pop - up window that ’s called acontextual menubecause the options it provides vary depend on what you ’ve selected . command - get across on an diligence , and you ’ll see Show Package Contents in the menu ; control - select a document , and undefended With will seem in the bill of fare . you’re able to do all sorts of utilitarian things from a contextual menu . For example , you’re able to open up document in programs other than those that produce them , afford the Get Info windowpane , or utilise color label to your folders .
Option - DragBy nonpayment , OS X moves files when you drag them from one spot to another on the same unvoiced driveway . To force the Finder tocopythe file instead ( so that you have a copy in both places ) view as down the option winder while you drop back .
Command - Drag By default , OS go copies object when you cart them from one hard drive to another . Drag a Word document from your arduous drive to an external drive , for instance , and you ’ll have a transcript on each . But what if you ’d rather just move the file ? In that case , press and halt Command while dragging the file .
Command - Option - DragIf you press and hold both Command and pick as you drag something , you ’ll make an assumed name of the chosen file(s ) in the terminus folder . assumed name are a utilitarian way to hoard pointers to different files , in one location ( see last month ’s Mac OS X Hints column for more about false name ) .
Power tip: Turbocharge mice and trackpads
Does your mouse or trackpad move slower than you ’d like ? If you ’ve got your background propagate across two 30 - inch liquid crystal display monitor lizard — or some other deluxe setup — reaching the File menu with your pokey pointer can feel like a grueling event in the Elbow Olympics . And even maxing out the setting in the Keyboard & Mouse preference superman may not assist enough .
One choice is to shift to a third - party mouse . They usually let in their own driver , which may provide faster cursor speeds . But if you ’re using a portable Mac , this may not be a suitable answer . Instead , you may use a simple Terminal command to give your built - in trackpad or farm animal Apple mouse a upper boost . Open Terminal ( /Applications / Utilities ) and typecast one of the next commands .
If you have a mouse :
If you have a trackpad : defaults write -g com.apple.trackpad.scaling number
Thenumberat the end of each bidding must be exchange by a number indicating the speed you ’d wish to use . The higher the figure , the faster the tracking will be . The nonpayment value for maximum black eye speed is 3.0 ; maximum trackpad speed is 1.5 . You might assay a start value of 5.0 for your turbocharged mouse , and 2.5 or 3.0 for a turbocharged trackpad .
The easy path to make your variety take consequence is to sign out and then lumber in again ( Apple menu : Log Outuser name ) . Upon login , you should have a more responsive stimulation twist . Just take it easy with the increase , as you may find that a superfast pointer is unusable . Also note that if you ever move the f number slider in the Keyboard & Mouse preference pane again , you ’ll overthrow your turbo circumstance .
