One of the things that makes the Intel - based Mac mini such an attractive media centre of attention is the slimmed - down desktop ’s television output capabilities — just crochet the DVI port up to a high - definition television set , and you could watch the high - def movies stored on your mini the way they were meant to be project .
Would that it were that simple . Few HDTVs have DVI connections , so you have to find a elbow room to connect your Mac to whatever port your televisiondoesoffer ( a High Definition Multimedia Interface port wine , more often than not ) . Then , there ’s the matter of what to do if the aboriginal resolution on your HDTV is n’t one that Mac OS X offers . Some users wind up with a strip of unused picture element around the edge of the filmdom ; others are treated to a picture that bleeds past the monitor ’s visible edges . Adding to the confusion is that unlike high-definition television confront different challenges — there ’s no one - size - fits - all solution .
To bring a small amount of order to the bedlam , we ’re askingMacworldeditors to divvy up their experience hooking up a Mac mini to an HDTV — what went flop , what blend in wrong , and how they subdue whatever problem they faced . We ’ll update this page sporadically as we get the prospect to try out more high-definition television models .
And we want to hear aboutyourexperiences . If you ’ve try gazump up a Mac mini to an high-definition television , just e - mail us a detailed explanation of what you did and whether you ’re satisfied with your setup . We ’ll include reader responses as part of our on-line Mac mini / HDTV scout .
Last update : July 28 , 2006
Panasonic TH-42PX60U 42-inch plasma TV: Christopher Breen
When I first looked at the Intel - ground Mac mini as a media center , I did so with a received definition CRT television set . While it was possible to view DVDs — and , to a pretty bare extent , the Mac ’s desktop — on my Sony WEGA TV , it was time to see how the miniskirt looked in Hi - Def .
I corrupt Panasonic ’s TH-42PX60U 42 - inch plasma TV found on review , recommendations from friends , and its price . The idiot box is equipped with multiple inputs — three composite , three S - Video , two factor , and two HDMI .
The Mac mini includes a DVI telecasting connexion , and a DVI - to - VGA transcriber come in in the box seat . To connect the mini to my CRT I ’d used Apple ’s DVI to Video Adapter , string an S - Vide cable length between the adaptor and my TV . With the superfluity of higher - resolving power inputs useable on the plasma display , I know I could do well .
I did so with a DVI - to - HDMI cable purchase from my local Radio Shack . The clerk initially direct me to Monster ’s $ 100 3.3 - footMonster HDMI - to - DVI Cable . Put off by the cable’s length ’s mellow price I rooted around in the store ’s house - grown cable segment and excavate the $ 25 Radio Shack12 - foot DHMI - DVI transmission line . The Monster cablegram may have offered better - looking video but I was n’t unforced to spend an special $ 75 to feel out .
I connected the miniskirt to my TV with this cable , prefer the HDMI 1 input signal , and fired up the Mac . The gray CRT screen and Apple logotype appeared in glorious widescreen .
Checking the Displays system predilection on my mini , the depiction automatically dissolve to 1,600 - by-900 pixels at 60Hertz . I tried some greater and lesser resolutions — producing text that was either too hard to read or too bloated – and determine that the Mac had made the correct choice right out of the box .
tick the predilection ’s Color tab reveal a Panasonic telly visibility mechanically created by the Mac . I peered into the Options lozenge and found an Overscan alternative . exchange it on do the picture to run beyond the edge of the display — the bottom parcel of the menubar and its command were still approachable but much of the text was cut off . Switching Overscan off bring out the full desktop with an inch or so of shameful blank around the edges . I decide to go with overscanning on , figuring that I could see enough of the command to pilot around the Mac while also enjoying the merit of full - screen playback for movies , slideshows , and the like .
I was n’t entirely pleased with the color profile . Metal windows displayed a typical pinkish cast and everything was a little too undimmed . The tv set was coiffe to its Standard display profile ( rather than the Vivid visibility which incline to be too shining ) so I resolved to make a more pleasing color visibility on the mini .
fall into place the Calibrate push button within Displays ’ colour tab I ply through the Display Calibrator Assistant and played with the mount . In the Select a Target Gamma portion of the Assistant I tried the 2.2 Television Gamma setting but find it a little too dismal . Instead , the Francis Scott Key to my Big Screen satisfaction was a setting in the Select a Target White Point orbit .
That ’s where I select the 9300 setting rather than the default aboriginal place setting . The 9300 scene is depict as “ nerveless blueish white — standard for most displays and televisions . ” On a figurer admonisher this place setting turns the display far too blue but on the TV is was perfect . The pink stamp vanished and everything else on screen became richer without adopting a too - blasphemous demeanour . fall into place through the Assistant ’s Continue buttons I finally saved the profile .
Before completing the frame-up I took note of this admonition in the TV manual :
The manual helpfully lists Typical Still Images ; among them was Computer Image . With that in mind I dashed to the mini ’s Desktop & Screensaver arrangement predilection and configured the silver screen saver to kick in after 5 minutes of inactivity . I also call for the Energy Saver system orientation to put the display to kip after an inactive 15 minutes .
The finding of fact : So , is it deserving connect your Mac to an high-definition television ? give that it ’s as easy as plop down a couple of dozen buck for a DVI - to - HDMI cable and shift on the Mac and TV , absolutely . It ’s coolheaded enough that you could watch HBO’sDeadwoodandRomein gamy resolution . It ’s cool still that with the push of a clit that same telly becomes a gorgeous 42 - inch reminder .
Pioneer SD-582HD5 rear-projection TV: Rob Griffiths
As part of the detailed look at the Mac mini Core Duo I put together earlier this year , I hooked up the desktop to my high - definition telly . This proved to be more of challenge for me than it might unremarkably be for other users — you see , I ’ve get a Pioneer SD-582HD5 , a five - year - old three - tube CRT rear projector . The only way to connect it to a Mac miniskirt is via an RGB cable’s length .
Only one job with that : the TV convey absolutely no information about what resolutions it support via the RGB cable . So when I fired up the miniskirt after purloin it up to the television receiver , all I had to show for my endeavour was a completely scrambled figure .
After way too many hours on Google , talking with champion , and experimenting with more ironware in the living room than I give care to think about , I contend to get it working to the limits of my television ’s capability . Here ’s what I did :
First , I made certain I had the follow William Christopher Handy : The mini ( obviously ) ; a keyboard , admonisher , and mouse I could move into the TV room ( I found I involve the monitor to join our wireless internet — your apparatus could be different from mine ) ; a second Mac , preferably a laptop Mac of some sort ; net connectivity for both Macs ; and a male - to - male person RGB cable television .
On the miniskirt , I installedDisplayConfigX. ( remark that you ’ll need the $ 12 registered version in lodge for this mite to work . You ’ll have to resolve if the damage is worth the result , but in my case , it clearly was — HD video recording on the big screen looks great . ) This program is the key to succeeder for the whole venture ; without it , I ’d still be bet at nothing but an out - of - scan - range image .
On the mini , I opened the Sharing System Preferences control panel , and made sure Remote Login was checked . Then , I enabled Apple Remote Desktop and clicked the Access Privileges button . On the next screenland , I checked the box that record “ VNC viewers may control screen with password , ” and infix a word . I go over the loge next to my exploiter name in the top left portion of the windowpane ; then I clicked OK . This enabled outback control of the mini from the other Mac . To in reality moderate the miniskirt , I installedChicken of the VNC(CotVNC ) on the PowerBook .
Before I unplug everything to move it to the TV elbow room , I tested the connectivity between the PowerBook and the mini . On the PowerBook , I launched CotVNC and entered the IP speech and password for the miniskirt . If you ’re following along at dwelling house , you should be greeted with the miniskirt ’s screen on your PowerBook . Next , I opened the Displays System Preferences instrument panel , and do the resolution of the mini to 800X600 . This will only make the VNC connexion faster . I shut out everything down , and moved the whole setup to the television way , admit the PowerBook .
Now it ’s meter for the actual connection and configuration . Because of the AirPort connectivity proceeds at startup mentioned above , I chose to boot once with the monitor attached , get unite to AirPort , and then kip the organization . If your mini connects automatically , you could vamoose all that .
Making certain my television receiver was turned off , I connected the RGB transmission line between the mini and the goggle box . On our set , this is a switchable input ; there ’s a toggle switch next to the RGB porthole that I had to flip over to aerate the connection .
From the PowerBook , I establish CotVNC and link up to the miniskirt . If you ’re doing this yourself , you should now see the 800×600 blind that was set up earlier . From here on , I execute all listed commands on the mini via CotVNC , unless specified otherwise .
I opened Displays in System Preferences looked at the resolutions heel . Now you need to find oneself out what firmness your HDTV supports . Hopefully this information is in your manual of arms , but if it ’s not , explore Google with the model bit of your set and available resolve should develop some meaningful compeer . In my type , our Pioneer supports 480i , 480p , and 1080i .
A brief aside on the “ i ” and “ p ” options for the above resolutions . The “ i ” means enlace , which mean the TV draws every other line on one pass , then goes back on passing game two and fills in the neglect lines . The “ p ” means progressive , which take in every line of business in monastic order . When used for displaying a computing machine screenland , interlaced painting are horrendously flickery , but when play video back , you wo n’t find the interlacing . So for my TV , a 1080i signal would give me the best HD playback , with a useable but flickery computer screen . 480p , on the other mitt , would make a attractively stable , but quite small , data processor CRT screen , and lower quality for HD video . Since I primarily wanted the mini to play back HD clips , I needed to regain a way of life to send a 1080i signal from the miniskirt .
embark DisplayConfigX. This program let you tell the Mac to mail any sorting of telecasting signal you desire to the attached monitor . It does this by installing customized settlement preferences directly into the Displays preferences panel , through a special exhibit Overrides directory . When you cross-file , you may make your own mise en scene from shekels , as well as use some predefined gamy - character options that might work flop out of the box . As take note earlier , you ’ll need the registered adaptation to make this bakshish work .
I clicked on the Resolutions pill followed by the plus ( + ) mark at the lower leave to sum a raw resolution . In the new window that opened , I choose a resolving that matches one my high-definition television offers — HDTV 1080i . Clicking the Done button , I view the new resolve at the bottom of the inclination . This process can be repeated for any other resolutions your telecasting go . ( I added “ SDTV-480p ” and “ NTSC-480i ” to the list . ) you’re able to also , if you wish well , uncheck any entries in the Resolutions tab that your TV does not extend ; this will deactivate those resolutions . I suggest entrust 800×600 , or whatever solving you were currently using , in the list .
Now I clicked on the Install check , then clicked the Install button . This re-create my newly - defined resolutions into the Displays Preferences Panel . At this point , take line of the Uninstall button , and the guidance underneath , just in case thing go horribly wrong .
To see the new values in the Displays gore , I restarted the miniskirt and then reconnected via CotVNC on the PowerBook and give the Displays dialog box .
I turned on my HDTV . ( If your experience is like mine , there probably wo n’t be a photograph yet , just distortion patterns . ) On the PowerBook , I selected one of the HD resolution I just installed . My HDTV trade over to the new resoluteness , giving me a photograph — and most significantly , the ability to chatter the confirmation button to hold the Modern configurations . If you ’re using a eminent resolution such as 1080i , you may bump ( as I did ) that CotVNC ca n’t refresh quickly enough to show the ratification button , hence the penury to expend the mini ’s computer mouse to confirm via the HDTV icon .
At this full stop , I discovered I could n’t see all of the menubar and Dock or the sides of the screen . This is due to something call overscan , wherein the TV draws those double off the top and bottom of the display . To fix the trouble , I re - launched DisplayConfigX and choose the resolving I was using ( again , 1080i ) from the Resolutions tab . Then I click the plus mansion again . This brought up the New Resolution screen , with the selected note value already completed . I snap the pop - up at the top of the windowpane , and switch it to Timing ; that make every field on the concealment editable . I changed the Front porch ( top or left border ) and Back porch ( bottom or right border ) configurations for the Vertical and/or Horizontal columns . To make the menubar and Dock visible , for example , you necessitate to increase the Front and Back Porch values in the perpendicular column . In doing this , you also require to change the participating entry , such that the figure in Total does n’t alter . Total is just Active + Front Porch + Sync + Back Porch . I ’ll apply my configurations as an example , and hopefully that will make this flake clearer .
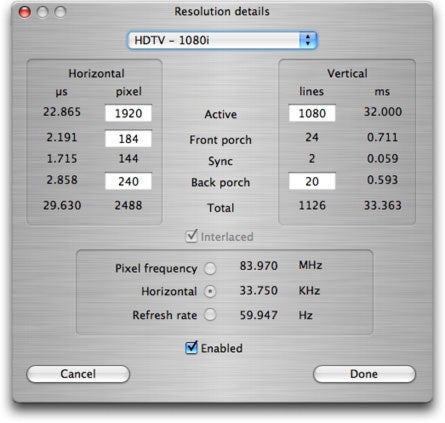
Here are the default configurations for 1080i in DisplayConfigX :
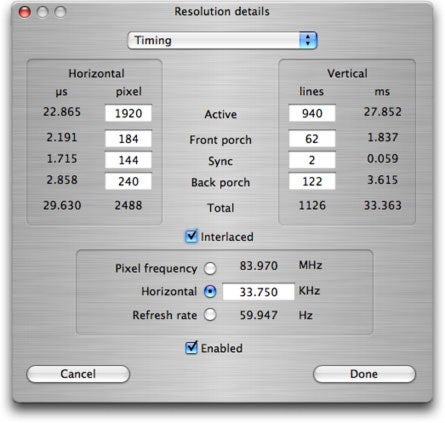
When I function on my overscan setting , after a few iterations ( more on that below ) , here is what I come out with :
As you may see , I had to move the Front Porch from 24 to 62 , and the Back Porch from 20 to 122 . Since these time value increased by a aggregate of 140 , that amount had to come out of Active , drop it from 1080 to 940 . These are tumid overscan time value , and there ’s apparently a avail mode hack writer for my Pioneer that will repress the overscan . I have not yet tried this , but if I can lower the overscan , I can reduce the porch size , giving back more resolution for the motion-picture show itself .
How do you find your idealistic porch values ? Lots of testing and rebooting , in my case . ( you could attempt to use the Test Screen lozenge in DisplayConfigX to measure how many line of merchandise are drop , but I found it too punishing to register on the 1080i screen . ) The basic process is : double the basic setup , and tweak the porch prize a bit . Click all right to add the resolution , then flick the Install check and then the Install clitoris to put the new answer in the system . boot the miniskirt to start the new solution , afford the Displays System Preferences panel , and take the new solvent .
Once I did all that , I tested the Dock and menubar to see how much of them were seeable . Since I missed seriously the first prison term , I bring back to DisplayConfigX and repeated the summons — duplicate the resolution I just screen , increase the porch economic value again ( remembering to decrease the dynamic time value by the same amount ) , saving the resolution , put in the resolution , rebooting , pick out the settlement , and examination . I did three iterations of this before I got the setting fundamentally correct for my set .
Once you ’ve stupefy the Dock and the menubar , you ’re done . you’re able to try playing some HD videos , and they should look great . Of course , if you have n’t bought a “ minijack to Toslink ” sound recording cable , you ’ll be listening to the crummy Intel mini ’s speaker , but you ’re on your own for that one .
If you ever move the mini to another monitor lizard , you ( probably ) do n’t need to worry about lose your display configurations . DisplayConfigX stores your usance preferences as the values for an unknown monitor . I moved the miniskirt back and off several time , and never lost my impost setups . You could , however , fall behind your configurations if you connect another nameless monitor , as it seems that OS X keeps only one bent of mise en scene for any unnamed monitor .
The verdict : Hooking up the mini to an older HDTV set is a turn of a challenge ; unexampled sets do n’t pose the same sorts of obstacle . However , if you want to watch HD cognitive content on a big cover , it ’s worth the effort — Apple ’s movie drone never looked so good !
