If you ’ve just amount to the Mac from a microcomputer you may have wonder where Microsoft grow the name “ Windows ” for its operating system . Without delving into thepolitics of the thing(because some citizenry are still sore about it ) , let ’s just say that Microsoft wasinspiredby one of the Mac OS ’s most prominent feature : virtual windows that give substance abuser a ocular metaphor for the way their filing cabinet were organized on their computers . Microsoft , much to Apple ’s chagrin , thought this a wonderfully descriptive name for its graphic user user interface ( have intercourse by its initials , GUI ) and so Microsoft Windows was baptise .
lease ’s just go over this “ visual metaphor ” business in a bit more depth . As I ’ve mentioned ina yesteryear column , much of the Mac GUI is based on analogy : You have a “ desktop , ” and “ folders ” on that desktop contain other folders as well as “ file . ” In essence , the OS X user interface extend a virtual filing console for your stuff .
In the true , under the hood is some variety show of storage medium ( a hard campaign that store its datum on bewitch platters or a solid province drive that stores entropy on computing machine french fries ) with information scatter all over it . If it was possible to look at this media with a enlarge glass and see all the bits of datum on it , you would n’t see Indian file and leaflet all neatly trace up . Rather , one portion of a file would be here , another morsel over there , and yet one more bit way over yonder . And its boniface folder would be somewhere else totally . So , all this talk of the town of folders and data file is really just a room to simplify a complicated reality by package it in a more familiar form . Scattered mo and bytes of data written to mass medium we do n’t infer . Files and leaflet , we do .
But that file and folder analogy does n’t hold up for long . If you have a existent folder purchase from the stationery fund , open it . What do you see ? Right , the less - glossy in spite of appearance of the leaflet and anything that the leaflet contains . Okay , so now do the same affair with a Mac ’s virtual booklet and what happens ? You do not see a drawn representation of the inside of a leaflet and the paper files within it . Instead , you spy a orthogonal shape with material in it . Or , put more succinctly , awindow .
See ? Analogy completely raid . Although it ’s perfectly legitimate to say , when looking at this window , that you ’re peering inside such and such a folder , the affair you ’re looking at is a windowpane . Like pronouncing Massachusetts ’ Worcester , wooster , you accept it and move on .
So how do you go about producing one of these things ? There are a duo of path . If there are presently no open window on the background , simply penetrate theFindericon in the dock . ( This is the first icon , which has the smiling face that seems to be split in half . ) A new windowpane will open up . If a window is already open and you ’d care to produce another one while using the Finder diligence , you’re able to clack the File card and choose New Finder Window . Again , a new window will appear . Now , have ’s see what ’s in that window .
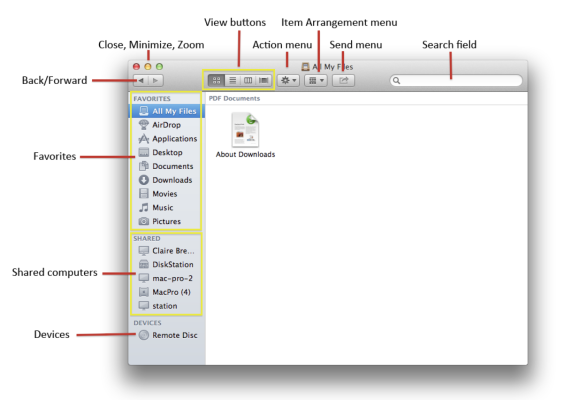
Top o’ the window to you
Along the top of the window you ’ll see a mixed bag of particular ( follow the instance to see where they are ) . They include :
windowpane name : At the top center of the windowpane you see the name of that windowpane . This reflects the name of the folder you ’re presently look in . In Mac OS X Mountain Lion unexampled window default to All My Files .
penny-pinching , Minimize , Zoom buttons : The airless ( red ) button does incisively what its name suggests . select it and the windowpane disappears . When you snap on the Minimize ( icteric ) button the window will shrink and descend on the right side of the dock . This allows you to move the window out of your way but quickly open it again by clicking on its diminutive image in the docking facility . When you do , it elaborate to its original sizing on the screen background .
Apple tells us that the green Zoom release allows you to maximize the windowpane ’s size . If you have a bunch of item in it , clicking the Zoom push will expand the window so you’re able to see as much of its contents as the limits of your Mac ’s display will allow . In verity , the Maximize button is a little more complicated than that but this is n’t the proper place to go into all its vagary . you may read myWhat Exactly Does the Finder ’s Green Button Do?if you ’d like more details .
Back and Forward buttons : I’ve mention that the Mac operating system organise data in a hierarchic pamphlet social organisation . So , it ’s potential to open one booklet , open up a booklet within that brochure , unresolved yet another folder within … well , you get the idea , you just keep digging down through folders . As you do this , the contentedness of the open window variety from one folder to the next . One elbow room to navigate your path between these folders is to use the Back and Forward buttons . For example , if you ’ve open Folder A and then open Folder B within Folder A , you could quickly move back to viewing the message of Folder A by clicking on the Back button . If you then wanted to come back to Folder B , tap the Forward button .
you’re able to use these clitoris only when you ’ve already traveled through a portion of the pamphlet hierarchy . You ca n’t very well open up a brand new pamphlet as we ’ve done and expect either the Back or Forward buttons to do anything . You have n’t navigated anywhere so there ’s nowhere to go “ back ” to . Likewise , as you have n’t yet visited another leaflet within this window , there is no forwards as far as the Mac is touch . cater a strong hint that these buttons do nothing in such a case , the release will be grayed out . If one or the other is opprobrious , it means you’re able to tap it to voyage back or forrard , depend on your late travelling within this folder .

Up to this point I ’ve avoided providing backsheesh , but I think you’re able to now be trusted with one . keep back down the Command key ( the one just to the straightaway left or right of the space bar ) and chatter the windowpane name at the top of the window . A computer menu will appear that shows you the hierarchical track to the folder you ’re presently working with . This is one direction to move up the power structure when you ca n’t use the Back clitoris .
see button : While looking at the contents of a windowpane , you could view that content in four different way — as indicated by the four View buttons . The first is Icon view . This shows any item within the brochure as orthogonal thumbnail double .
The 2nd release represents List survey . Click it and the contents of the folder appear , by nonremittal , in an alphabetical leaning .

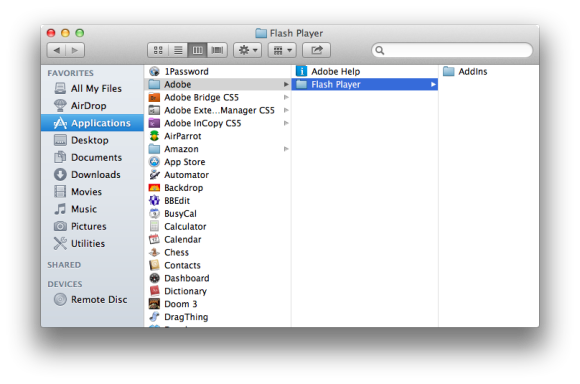
Next is Column survey . This view advantageously shows the OS ’s hierarchical construction . Click it and you ’ll see the subject matter of the current folder on the left of the contents area . If there ’s a folder within that first column , pick out it and you ’ll see that folder ’s contentedness in the next chromatography column . If there ’s a pamphlet in that next chromatography column , snap it and , you opine it , you ’ll see that folder ’s contents in the column to its right . And on and on . When you finally take a file in this sight , you ’ll see a preview of it along with some other file information in the last pillar .
in the end , the last View button is for Cover Flow view . This was revolutionize by a exchangeable view in Apple ’s iTunes music software program . In this view you ’ll see a carrousel of picture in the top dower of the contents area and then a list of item below ( see illustration below ) . Click an icon in the top area and the associated item will be spotlight in the tilt underneath the carrousel . Similarly , tick an token in the list and the associated ikon will move to the substance of the carousel . If your Mac has a trackpad ( or you ’re using a wireless trackpad with it ) you may chop-chop drag through the carousel by place your cursor within it and drag two fingers to the left over or veracious . If you ’re using a black eye , cluck and drag on the lozenge - expect - affair that appears in the legal profession ( send for the curlicue legal community ) below the luggage carousel .
Action menu : To the right wing of the View buttons you find an ikon with the look-alike of a gear inside it . This is the Action bill of fare . When you click it , you see a load of choice for do tasks in the Finder . All of the commands found here are also found within the Finder ’s menus . As we have n’t yet enshroud what all these commands do , just know that the Action menu is simply another way to access common Finder commands .
Item Arrangement card : Earlier I mentioned that , by nonremittal , when you invoke tilt view you see a folder ’s table of contents in alphabetical order . But hypothecate you ’d like to sort out these detail in another way — by date create or kind , for instance ? That ’s the design of the Item Arrangement menu . Click this carte and you see that you’re able to mastermind items by Name , Kind , app , Date Last Opened , Date add , Date Modified , Date Created , Size , and Label . This is something else that we ’ll discuss at greater distance in a next tower as this functionality is also duplicated in the Finder ’s menu .
One more wind . If you ’re take care at items in List sentiment , you could select the editorial headings above the list ( Name , Date Modified , Size , and genial , for exercise ) to quick sort the list using that head .
post fare : Your Mac provides various shortcuts for moving files and folder off the Mac and to other terminus . That ’s why the Send menu survive . Select any point within a window and tick this menu . The choice that appear depend on what you ’ve selected . But you should at least see Email , Message , and AirDrop . Once again , these are things we have n’t talk over so I wo n’t go into what each does . Just bear in mind that if you later need a shortcut for speedily emailing a data file to someone , you could find it within this menu .
hunting field : The Mac bone keeps racecourse of all the items hive away on your calculator . One elbow room to find them is to practice the Search force field . Just enter the name or a word associated with that item in the Search battleground and press the Mac ’s Return key . A list of results will come out within the substance area .
Sussing the sidebar
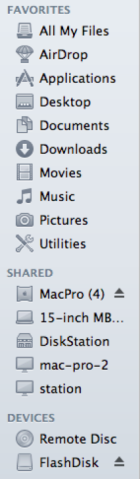
On the left side of a Finder window you see a grey pane that include at least a yoke of grouped detail . Let ’s run through them .
Favorites : Apple places ordinarily used folder ( or directory ) under the Favorites heading . ( In some early versions of the Mac osmium this was called Places . ) If you ’re running OS X Mountain Lion , under this aim you ’ll see , by default , All My Files , AirDrop , Applications , Desktop , Documents , Downloads , Movies , Music , and Pictures . Click any of these items except All My Files and AirDrop and you ’ll be guide to a brochure within your drug user account folder that arrest the suggest items — for example , your images within the Pictures folder and song subroutine library within the Music folder .
ClickAll My Filesand you’re able to view all your clear files , sorted by file character . This All My Files view includes not only files that you ’ve hive away on your Mac but also any files you ’ve hold open to iCloud . We ’ll look at saving file in another column .
AirDrop is a agency to easy transfer files between Macs on the same local meshwork .
Devices : Any computer storage devices that are connected to your Mac will appear under the Devices heading . What you see here will depend , in part , on the Mac you have and the gadget stop up into it . It ’s potential that on your Mac nothing will look under this aim .
Under the Devices heading you generally see any entrepot equipment that are attached to your Mac . This can be a USB storage cause plug into your Mac ’s USB port ( one of those USB New York minute drives you put on your keychain , for example , or some gravid grueling driving force ) . If you ’ve enter a CD - ROM or DVD disk into your Mac ’s media drive , that magnetic disc will be number under Devices . If you ’ve configure another Mac to partake in its medium driving force with yours over a internet you ’ll see Remote Disc number under this gallery . Any magnetic disc images that you ’ve climb on on your Mac will also appear here . ( We ’ll discuss all these store options in the future . ) In some typeface , sure kinds of iPods you ’ve link to your Mac will be listed here .
The triangle - with - line - under - it icon that appears next to any removable media ( that USB flash drive , for instance ) is the Eject picture . Click it and that media is disconnected from your Mac . In the character of a CD or DVD , it ’s physically ejected from the Mac . For ride like extraneous hard campaign and USB key driveway , cluck this icon and then meet the name disappear from the Devices list means it ’s dependable to physically unplug the twist from your Mac .
Shared : If your Mac is impound to a local Wi - Fi or wired internet , it ’s possible that you ’ll also see a Shared heading in the sidebar . Any token here are other computers ( even Windows PCs ) or some motley of net - bond machine .
What you don’t see
There are a couple of other things in the window that either you wo n’t or may not see . The first is scroll bars . Suppose that you have a windowpane that turn back 100 of point . How are you supposed to access those detail if only a fistful of them look ? That ’s the point of scroll bars .
At one time the Mac O had whorl bars that were always visible — they appeared as downhearted gumdrop - looking things on the side and bottom of a window if that window had more items that could be display in the windowpane . Recently , Apple has chosen to get rid of those always - visible roll streak .
By nonpayment , you see those bars only when you scroll within the window with your trackpad or the scroll wheel on your mouse . Do this and you see gray bar on the side ( and on the bottom if the contentedness is wider than the width of the window ) . Those bars give a proportional theatrical performance of how far you ’ll call for to scroll to get to the top , bottom , or right side of the windowpane . If you have 50 items in a window , for example , and can see 30 of them , the grey part of the whorl bar will be quite long , indicating you could see most of its content . If , or else , that window has 1,000 point , the grayish bit will be quite small , severalize you that you have a long way to scroll .
The other thing you do n’t see is a elbow room to resize the window . Again , in the old twenty-four hour period , the bottom - ripe turning point had a modest square used for this purpose . Click and drag that square and the window changed shape , break down or stretching in the direction you moved the pointer . Today , that square is gone .
To tangle - resize a windowpane you now place your cursor at any edge or corner . When you do , your cursor will change state into a two - channelize pointer ikon , indicating that when you snap and drag , the windowpane will blow up or founder in this direction . So , place your pointer at the right border of the windowpane , sink in , and drag the windowpane to the right to make it wider . Drag to the leftfield and it becomes narrow . When you sweep up on a niche you find that you’re able to remold the window both horizontally and vertically , making it the most flexible choice .
Window behaviors
This has break down on quite long enough , but before I give you a hint about next week ’s column , a couple of cursor about how windows comport .
First , you’re able to afford more than one windowpane at a time . For example , you have one window open now . Click theFinder ’s Filemenu and chooseNew Finder Windowto make another windowpane . It will open up in the nonpayment view ( which , again , is All My Files ) . In this window click theDownloadsitem in the sidebar . You now see the contents of the Downloads pamphlet — if you ’ve just configure your new Mac , this folder will contain a single About Download file . Your original windowpane will still exhibit the contents of your All My Files directory .
you’re able to move files between leaflet . adjudicate this : In the Downloads window that ’s still candid , come home theAbout Downloadsfile and while still holding down the shiner button or trackpad , drag that file to theDocumentsitem in the sidebar . When you do , the file ’s name will turn blue and the Documents particular will be highlighted . have go of the computer mouse button or trackpad and the file disappear from the Downloads folder . Yet it ’s still in the All My Files folder . Why ? Because it ’s still one of your files , it ’s just been move . ( Again , the All My Files window is special in that it ’s not really a folder that contains specific point . Rather , it ’s a directory of the files you ’ve create , which can be put in just about anywhere on your Mac . ) To see where it ’s gone , select theDocumentsitem in the sidebar . There it is . If you like , you’re able to cart it back into the Downloads folder .
Also , the sidebar ’s Favorites area is n’t appropriate strictly for those items Apple consider are favorites . you could add folders of your own to this arena . Try this : Click theApplicationsitem in the sidebar . In the mental object orbit you ’ll see all the point in your Applications brochure . Scroll down to the bottom of the windowpane and locate the Utilities pamphlet . Drag this pamphlet so that it appears below the Pictures leaflet . As you puff you ’ll see a grim line indicate where the folder will be identify . Let go of the mouse button or trackpad and a Utilities item will seem in the sidebar . Notice that the Utilities folder stay in the Applications folder . So , you have n’t removed the pamphlet , you ’ve just contribute a pointer to it to the sidebar .
In the sidebar penetrate theUtilitiesitem you just added . Notice that the Utilities name now appears at the top of the windowpane and within that window you see the contents of the Utilities pamphlet .
you’re able to also remove items from the Favorites list . To do that , take for down the Command key ( think of , you ’ll find two of them — each immediately to the side of the space bar ) and drag the token to the screen background . It will disappear with a puff of smoke . Note that you have n’t deleted the original folder , just its pointer .
Go before and clickAll My Filesto return to the nonpayment fresh window view . Just to be certain you ’ve understood what we ’ve done so far , click the redClosebutton in the top - forget quoin . There , the windowpane is now unopen . And so is our overview of window staple on the Mac .
Next week : About your stimulation devices .
