If you ’ve got an iSight - equipped Mac , you ’ve probably tried out Photo Booth , Apple ’s digital recreation of that discount depot staple . You may have even detect it slightly fun to use , and perhaps you ’ve accumulate a decent classification of images that you ’d wish to bring into iPhoto . Photo Booth include an iPhoto push button just for that design — but it only works on one image at a clip . That ’s not so handy if you ’ve taken 20 film that you ’d like to import into iPhoto . gratefully , there are two workarounds to quickly spell all your Photo Booth effigy into iPhoto .
The easy manual way
Photo Booth conveniently stores all of its photos in your substance abuser ’s Pictures leaflet , in a subfolder named ( surprise ! ) Photo Booth . interchange to the Finder , navigate to that folder , open it , select all the images ( named Photo 1.jpg , Photo 2.jpg , etc . ) , and then drag and drop the selection on iPhoto ’s image in the Dock ( or into iPhoto ’s main window , if it ’s already running ) . As with any dragged selection of images , iPhoto will import them all into a new motion-picture show paradiddle , ready for your use .
The hard automated way
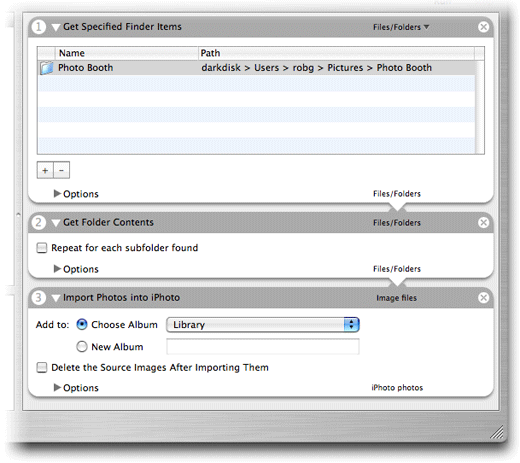
If you apply Photo Booth a hatful , it might get tedious making repeated trip to the Finder to drag - implication a bunch of single file from your Photo Booth folder . Using Automator , however , you’re able to build a bare program to mostly automate the process . Launch Automator ( in /Applications ) and you ’ll see a white silver screen on which you may work up your new workflow . The screen is divided into four section — the Library and Action column , a minuscule info window , and a liberal blank window . To build up a work flow , you first select a Library , then drag the desire military action into the blank work area . The workflow for Photo Booth to iPhoto is amazingly unsubdivided , requiring only three steps :
That ’s it for the workflow ; when you ’re done , it should look something like this — I’ve snip only the work area portion of the screen , just to make it somewhat narrower for display :
Now all that ’s entrust is to salve your newfangled workflow as an app for easy use . Select File - > Save As , and set the File Format pop - up to software . Name your raw platform ( Photo Booth Importer ) , and store it somewhere secure , like your drug user ’s Documents folder . To make it easy to use your new app , drag it to the Finder ’s toolbar or sidebar , or into the Dock .
When you ’re ready to import your Photo Booth images to iPhoto , just run your new Automator program . It just does n’t get much elementary than that !
