Sometimes to do what you need to do on your Mac will take access System Preferences . Those new to the Mac may be question “ What is System Preferences on the Mac and where can I find it ? ” Others may be unaware of what System Preferences makes potential and how easy it is to make tweaks and changes to the way your Mac is set up .
How to get to System Preferences/Settings on a Mac
The System Preferences program ( basically , the place setting on your Mac ) is found in your Applications folder . It is also uncommitted from theApplemenu at the top - left field of the screen ( come home the Apple logo ) . It may also be in yourDockat the bottom of the screen – the icon is a solidification of interlinked cogs , like the image above .
If you want to add System Preferences to your Dock here ’s how :
Now when you want to access System Preferences it will be there in your sorrel .

When launched , System Preferences provide access to a numeral of panes that deal with various aspect of how yourMacworks , appears and behaves , such as screen firmness , wallpaper images , input machine shortcut , maternal control configurations , and internet account .
How to use System Preferences on a Mac
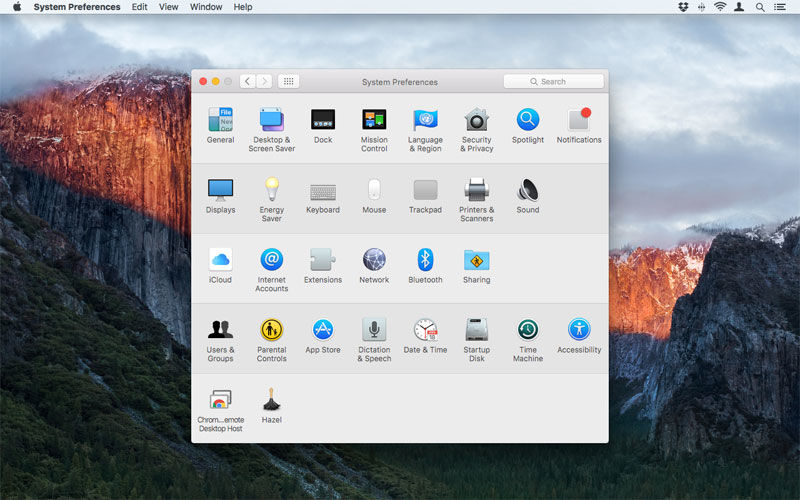
When System Preferences is first launch , you ’ll see rows of icons , each equate to a specific chemical group of related to option . press any icon to enter the relevant panelling .
If when you open System Preferences it is n’t show the below port , tap the release hold 12 dots to get to it .
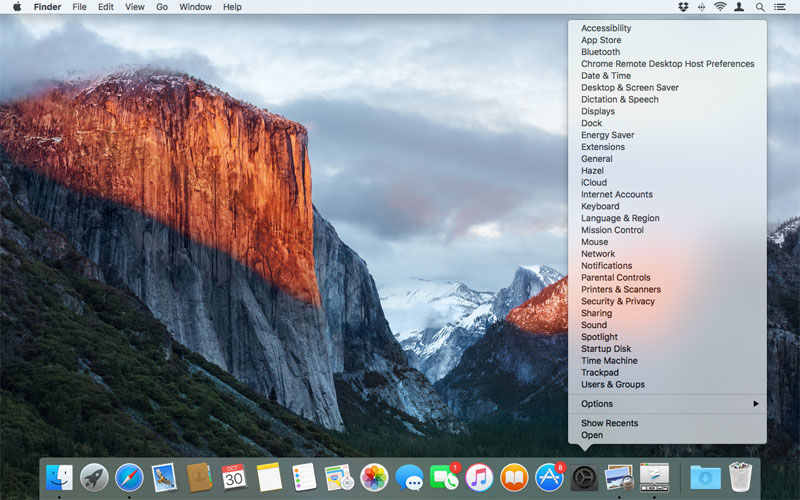
instead , you may rise to preferences for a particular matter just by click - clutch , Ctrl - snap or right - flick -ing on the System Preferences Dock image . Then you will see a contextual menu , as below . At the top of the menu you ’ll see the name of the currently active pane .
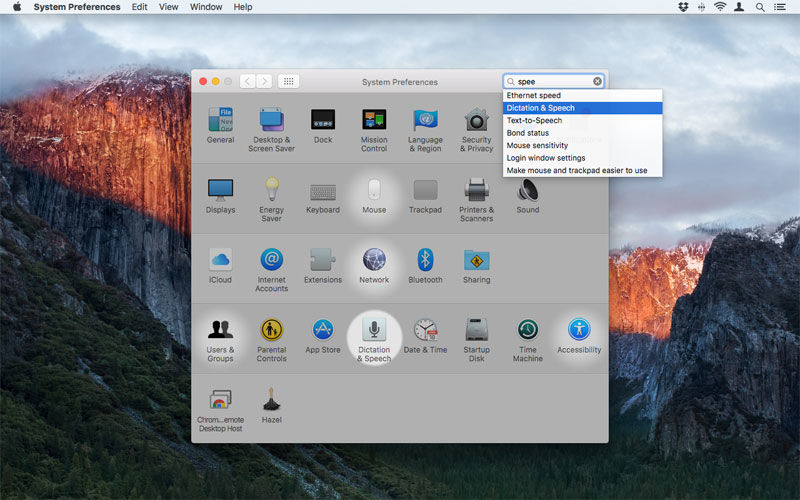
If you ’re not indisputable on the dot what you ’re look for , use the build - in search in the top right corner of System Preferences . snap in the search field ( or press Cmd+F ) and start up typing .
As you type , the phone number of issue in the results inclination will be permeate to match your hunting terminal figure , and glare will appear , highlight potentially relevant panes that might offer what you require . Use the cursor keys to sail the termination listing and the spotlight will become more vivid over the alternative you ’re about to opt . bid Return or clicking a result list item will confirm .
How to customise System Preferences
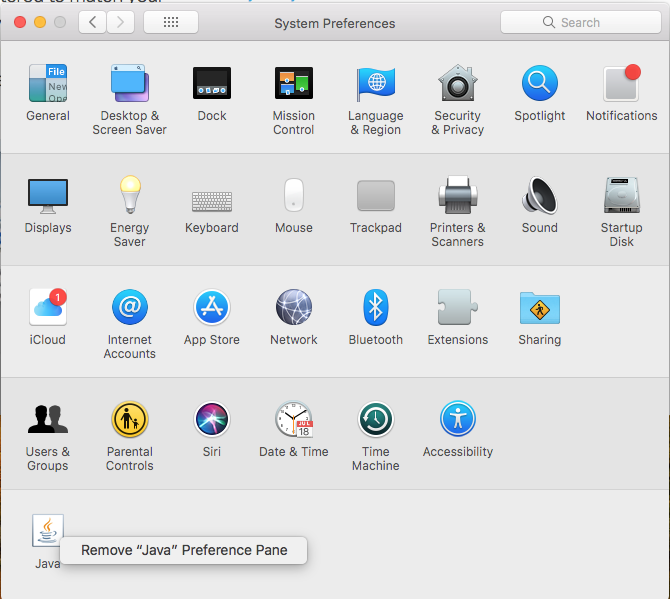
There are two unlike form of customisation worth mention with scheme preference : the panes that are install and the panes that are visible . By default , macOS High Sierra and earlier versions of OS X will provide you with just under 30 panes ( the accurate number is determined by the hardware you ’re using – for case , if you ’ve no optical drive , ‘ CDs and DVDs ’ will not be present ) , but third - party products may also install into System Preferences . Such panes are placed at the very bottom of the window .
A third - party System Preferences loony toons can be get rid of either by the pane ’s own uninstaller ( if it has one ) or by Ctrl / right - clicking it and selecting ‘ Remove … ’
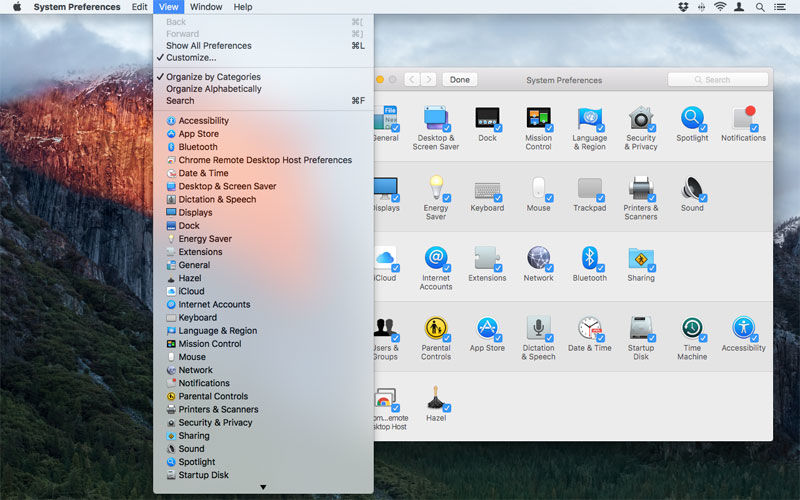
you may reorder the panes by using the View fare , which provides option for prepare panes by family or list everything alphabetically .
Click View > Customize to enable changes to be made . When you select this option , checkboxes look next to each window pane . Deselect any pane ’s checkbox and click Done and the pane will be hidden , but it will stay accessible from the View computer menu and when performing search . Revert a pane ’s visibility by using View > Customize , selecting its checkbox and clicking Done .
Read next : Which Mac do I have : How to identify model , yr and serial numberandHow to mark your Mac ’s tech eyeglasses
General Settings on a Mac
The General pane is a catch - bagful of options related to appearance , scroll bars , document behaviour and the number of late point shown in the Apple card .
TheAppearancemenu determines the release , carte and window composition for your Mac , enable you to switch between Blue and Graphite . This move nonremittal buttons in duologue , take menu items , and also the close / minimise / full - cover button at the top - left of most app windows . With the Graphite musical theme , all of these are greyish . In the Blue root word , you get the familiar ‘ traffic light ’ button at the top - left field of window and blue buttons / selected fare items elsewhere .
New in Yosemite was theUse dark menu measure and Dockcheckbox . This turn the menu bar and Dock fatal , rather than whitened , to better fit in with some professional applications that have dark interfaces and facilitate intone things down so that the menu is less distracting . This choice also adjustsSpotlight‘s appearance . Read : Turn on the Macs ’s Dark Mode
New in El Capitan was theAutomatically conceal and show the carte du jour barsetting . When active , this selection hides the menu stripe unless the cursor is at the top of the filmdom , in a interchangeable manner to how you’re able to show and hide the Dock ( which you’re able to do by correct clicking on the Dock and fall into place go Hiding On ) .
Highlight colourenables you to alter the colour of highlighted substance such as selected text in document , as below . Apple provides a list of colouring material you may pick out from , but you may fix your own by choose Other and using the standard Mac colour picker . Read next : How to customize your Mac ’s desktop
Sidebar icon sizegives you alternate choice for the sizing of icons in Finder ’s sidebar . Medium is the default , with child is good if you regain it hard to accurately click the existing ikon , and Small is the good choice if you ’ve a modest display or like squint a mess . take down that the scene you define here also dissemble the sidebar inMail .
Show Scroll Barsadjusts how scroll bars in macOS / OS X behave . By default , they are not seeable , but show mechanically when you move your black eye or trackpad over them , their optical visual aspect in part defined by the stimulus gadget . you could conform this so that they only show when scroll disregarding of the input machine ( consanguine to how scroll works on iOS ) , or always show when content is too big for the viewport . The last of those alternative provides much thicker scroll bars than what you usually see when scrolling ; instead , their appearance is like when you vacillate over a MacOS / OS X scroll legal community and it widen for drag - based fundamental interaction .
TheClick in the scroll stripe tosetting change how macOS / OS X jump to content when you click inside a gyre streak . WithJump to the next pageselected , substance jump in screen - height or Page , in the counselling of your click ; withJump to the spot that ’s snap , it instead jumps to the decimal point in the document relative to the location clicked on the scroll Browning automatic rifle . The first choice is less sharp but ho-hum . If , for example , you were wait at the top part of a very turgid list in Finder and then clicked the bottom of the whorl bar , leap out to the next varlet would take several clicks to make the bottom of the listing , but with Jump to the spot … it would take only one .
TheDefault web browsermenu is a place setting that commonly exists in a web web browser ’s preferences , but you’re able to now define in System Preferences whetherSafarior another web browser should launch when you , for model , snap a connection in an email .
The next group of options tidy sum with document behaviours . take to keep change when closing documentsandClose window when drop by the wayside an applicationdo much as you ’d expect . In the former case , it ’s worth mention that changes are automatically carry through when papers are closed : by wrench on this option , you instead get the pick regarding whether to save the change or turn back the document to how it was when last opened . If you leave Close window … unchecked , heart-to-heart documents should reappear as they were when you last closed an program . Check this option and applications will establish without any open text file , unless they have their own built - in stage setting to override macOS / OS X ’s nonremittal conduct .
TheRecent itemsoption defines how many items appear in the Recent Items menu in the Apple bill of fare . By default , up to 10 of each type ( applications , documents , servers ) are shown , but other options are bring home the bacon . Note that any setting choose also bear on late - itemDockstacks . you may produce one of those by typewrite the succeed inTerminaland then hit Return :
defaults write com.apple.dock relentless - others -array - add ‘ { “ tile - data ” = { “ list - type ” = 1 ; } ; “ roofing tile - type ” = “ recents - tile ” ; } ’ ; killall Dock
Allow Handoff between this Mac and your iCloud devicesdetermines whether the Mac has the potentiality to broadcast / invite in - progress documents to / from iCloud equipment running compatible versions of macOS , OS X or iOS . Unless you ’ve a compelling reasonableness to rick it off , do n’t .
eventually , theLCD baptismal font smoothingoption piss text seem in a slightly more pleasing manner in macOS / OS X. Again , there ’s no compelling reason to turn this off , so we suggest you leave it on .
Have some geeky fun with theseTerminal tricks and projects for the Mac
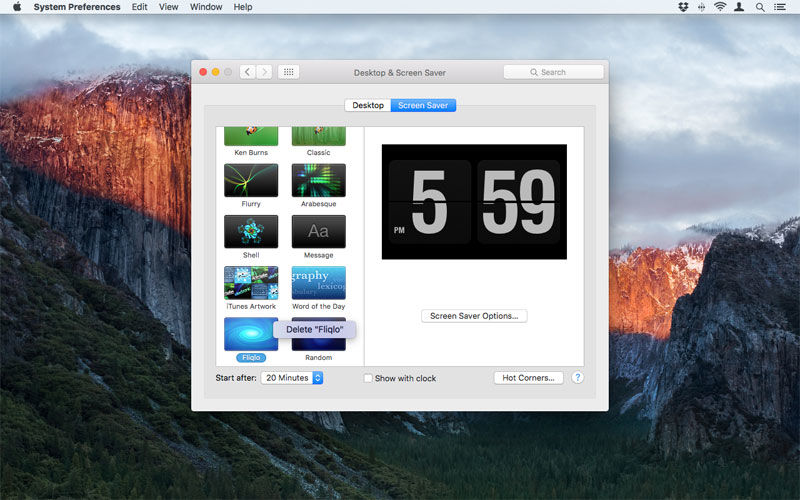
Mac Desktop & Screen Saver settings
The Desktop & Screen Saver pane in System Preferences is where you adapt your desktop background image and/or the screen rescuer that kick in after a drug user - specify period of sentence .
flip the background image does n’t in fact call for a trip to System Preferences . In Finder , you could Control - tick any compatible look-alike and prefer Set Desktop Picture ( in the Services Cuban sandwich - menu ) ; likewise , Control - click an image in Safari and you may be able to choose Use Image as Desktop Picture , depending on how the site is set up . you could also simply right tick on the screen background and pick out Change Desktop Background to jump to the configurations screen . However , the System Preferences pane provide a much greater degree of control , along with a central area to access collections of images . ( you could also access this dot by right-hand clicking on your background and choosing Change Desktop Background . )
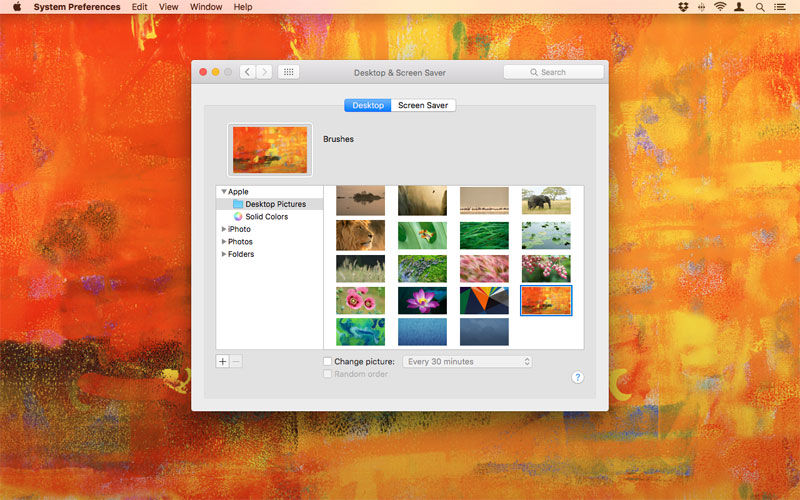
In System Preferences > Desktop & Screen Saver snap the Desktop tab to access desktop setting . This will exhibit a thumbnail of the current background figure of speech , alongside which will be its statute title . From the back breaker on the left , you may choose collections of images . By default , you ’ll see two under the collapsable ‘ orchard apple tree ‘ list ( Desktop Pictures and Solid Colors ) , and your iPhoto and/or Photos record album appear under relevant headings . The next detail is a collapsible list address Folders , to which you could add custom folders by using the + release . ( Sneaky point : Apple includes a lot of pamphlet in /Library / Screen Savers / Default Collections , which are otherwise only used for screen saver . They ’re deserving adding if you wish wildlife , space and landscape painting shot . )
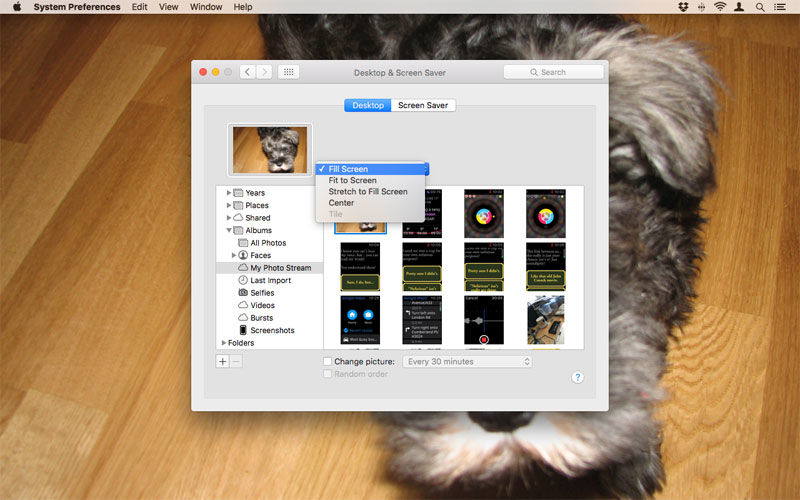
To change the desktop background , select a accumulation and then click any of the images within . or else , you’re able to drag out an image to the well from Finder . ( drag in from Photos does n’t go , but you may use the Share button in that app to do a selected detail as your desktop image . ) If the image is of a suited size and view ratio for your display , it will be resize automatically . If not , a menu will look enable you to define whether the image should meet the filmdom , set to the cover as best it can , extend , be center , or tile .
It ’s also possible to have your background background change at veritable interval . To do this , select a solicitation and then tick ‘ Change picture ’ . In the pop - up menu , limit how often you ’d like the background to commute ; options provided range from 5 seconds to day by day , along with login / wake - up . If necessary , specify how the mental image will replete the screen using the aforementioned pop - up menu . Your screen background screen background will at the appropriate times subtly cross - slicing to the next image in the collection ; if you alternatively want each modification to be randomised , beat ‘ Random orderliness ’ .
In OS XMavericks , there was a chunk - in option to stop the semitransparent card barroom , release it a solid light grey . This evaporate from OS X Yosemite , which go transparence configurations to Accessibility > Display , where they persist in El Capitan and macOS . This is a useful option for increase readability .
Change and manage your screen savers on a Mac
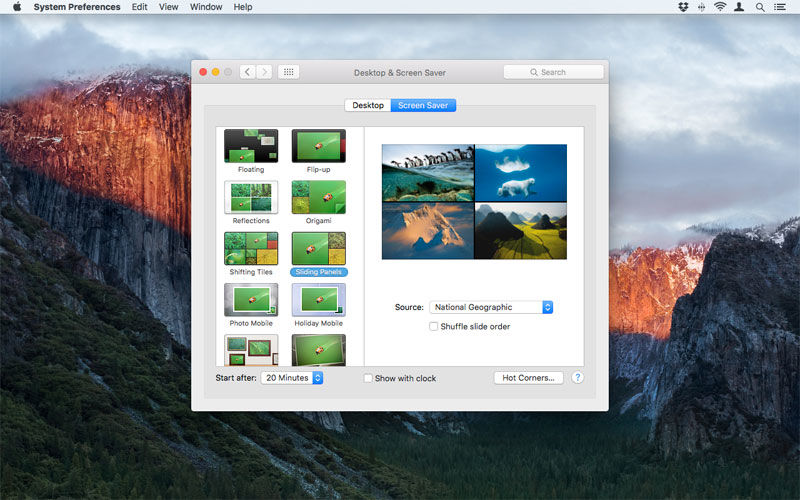
Click Screen Saver to get at the screen saver pane . To the leftfield is a selection of build - in filmdom recoverer ; prime one to choose it as the presently active screen saver ( or choose Random to have one be choose at random whenever the concealment saver is trigger ) , and use theStart aftermenu to determine how long your Mac remains unwarranted before the screen saver start . Optionally , a clock can be overlaid on the cover rescuer , by checkingShow with clock .
calculate on the concealment saver chosen , you may get options . For the various photography - establish screen savers , you ’ll see a Source menu , enabling you to define a reservoir folder of photos to use . On choosing a new origin , the screen saver prevue will update accordingly . CheckingShuffle glide orderrandomises the display from the selection of images .
For other screen savers , you ’ll get aScreen Saver Optionsbutton that when clicked offer in - context circumstance for that special screen recoverer . For example , Apple ’s own Flurry enables you to aline how many stream of colouration appear on the screen , how thick they are , and how tight they move .
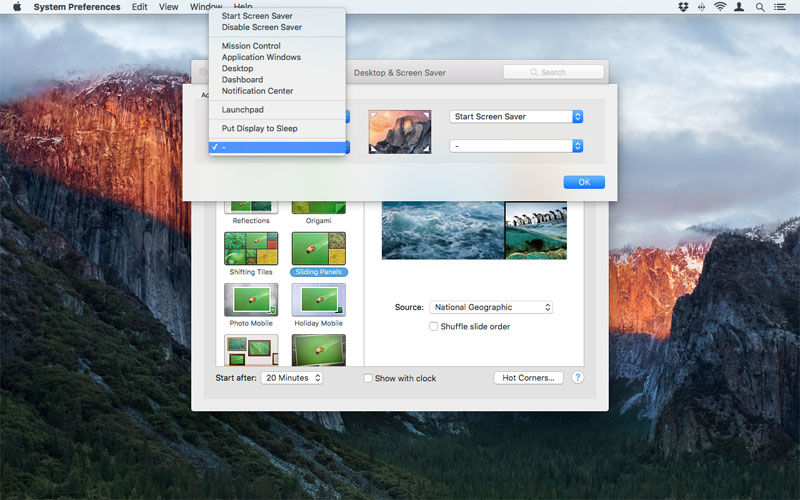
To the bottom - right of the dose is aHot Corners … button . The options are share with Mission Control and provide the mean to touch off various macOS functions when you move the cursor into a filmdom box . The first selection is Start Screen Saver , and is a very immediate mean of activating the silver screen saver . This can be specially utile if you ’ve also used the Security & Privacy dose to require a countersign be entered to exit the screen saver .
It ’s also potential to install third - political party screen savers . Once installed , these look below the build - in options . If you later decide you want to blue-pencil a screen door recoverer , Control - chatter it and choose Delete .
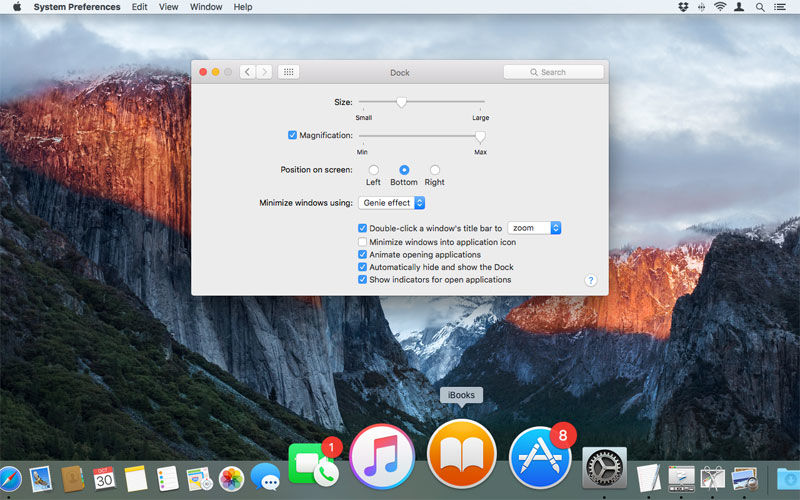
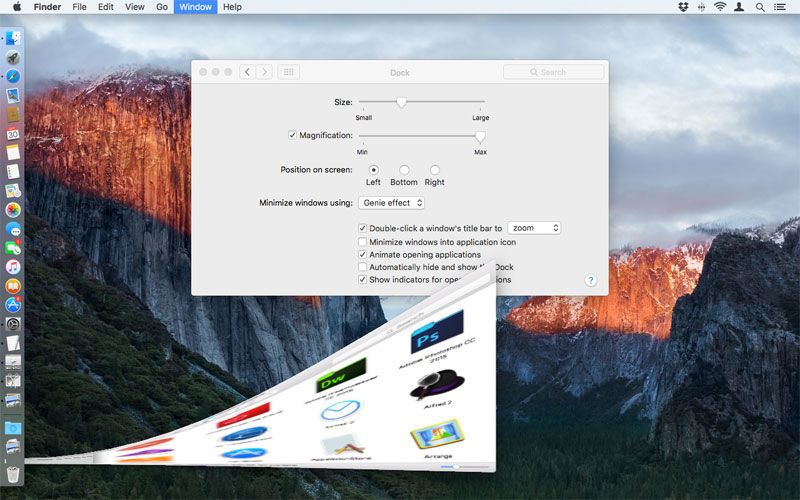
Change the Dock using System Preferences
Many of the Dock ’s preference can be adjusted by restraint - clicking the thin line that divides apps and folders and pick out from the various selection . However , the Dock pane of glass in System Preferences is worth explore , because it provide a very vindicated visual overview of all your Dock ’s setting .
Size and Magnificationdetermine the sizing of the Dock image and how much they expand when the pointer is over them . Magnification is easily used when you ’ve so many Dock icon that they ’re not leisurely to pick out unless zoomed ; if you do n’t care the burden , you may handicap magnification totally .
Position on screendetermines the screenland bound the Dock sits on . Under OS X Mavericks , the Dock displayed as a flat rectangle at the remaining or correct bound , and as a metal ledge at the bottom of the screen . Under OS X Yosemite , the Dock became a semi - transparent rectangle .
TheMinimize windows usingmenu bring home the bacon two effects for when windows are minimise to the Dock : Genie and Scale . The former appears to ‘ suck ’ the window into view , whereas the latter is a much simpler rapid climb that ’s less taxing on quondam Macs and also a mass faster .
Read:12 bakshis for using the Mac Dock
The ‘ Prefer lozenge when opening document ’ fare enables you to state whether unexampled text file should always unfold in tabs , open in tabs only when an app is in Full Screen mode , or only open in tabs manually ( the nonremittal ) . notice that not all apps are compatible with tabs . Those that are n’t ignore this setting .
The remaining alternative adjust various behaviours of the Dock : Double - click a windowpane ’s title legal community to … enables you to select between zoom and minimise when making that action;Minimize window into software iconsends downplay window to the relevant app ikon in the Dock rather than to the Dock ’s veracious - hand side;Animate opening applicationsmakes apps bounce while launching;Automatically hide and show the Dockmakes the Dock disappear from opinion when not in enjoyment , and demands you move the cursor to the relevant screen sharpness to show it ; andShow indicator lights for open applicationsplaces a little fatal dot beneath the icon of apps that are currently running .
Using Mission Control in OS X
TheMission Controlpane is the spot for adjusting how Apple ’s window overview works . On newer Macs , F3 is a Mission Control keystone – press it and you see all your open windows ( in OS X Yosemite these were aggroup by app and badge with the relevant icon , ikon ; as of OS X El Capitan , the older Exposé demeanour return and you could see all your open Indian file at once ) . In this screen , you could also create multiple desktop ( which Apple concern to as ‘ Spaces ’ ) that you could switch between .
In the System Preferences > Mission Control window pane , the first five choice determine aspects of how Spaces appear . The first choice rearranges space based on recent custom , rather like the Command+Tab app - switcher . The second option when active mechanically switches you to a blank with an heart-to-heart window for an app when the app itself is change to .
The next two pick put whether windows are grouped by program ( turn that on and Mission Control groups app windows alongside the app’;s icon ) , and whether presentation have separate space . With the latter option alive , clear-cut workspaces can be created for each of your show . ( Apple also note that should you at any point need to have a single app windowpane span multiple video display , you should turn offDisplays have multiple Spaces . )
at last , the Dashboard fare enable you to set Apple ’s ‘ widgets ’ screen as a quad , as an overlay , or turn it off wholly . As an sheathing , you ’ll want to get across the Dashboard app ikon or use a keyboard shortcut – F12 by nonpayment – to spark it . take down that much of Dashboard ’s functionality now subsist within Notification Center ’s Today panorama , so see if that crop for you before rick Dashboard back on .
The 2d section , titled Keyboard and Mouse shortcuts , provides a centralised area to specify shortcuts for trigger Mission Control and the ‘ diligence Windows ’ feature ( which shows only the windows of the currently combat-ready app ) , and showing the Desktop or Dashboard . For any keyboard cutoff , you may specify a function Francis Scott Key or a modifier gene ( a specific Shift , Control , Option or Command key ) , although the latter selection is n’t unremarkably a adept idea , because it makes the prefer modifier unavailable elsewhere . you’re able to , however , combine a changer and a social function samara : for exercise , to sic Shift+F1 to activate Mission Control , hold Shift , get to the Mission Control carte , and click F1 .
It ’s worth note that if your Mac keyboard include a Mission Control icon on its F3 key , modifier can be used in conjunction with that cay in fiat to get at Mission Control functionality : Command+F3 shows the Desktop , and Control+F3 activates the ‘ software Windows ’ feature .
lastly , TheHot Cornersbutton has been mentioned antecedently in our overview of System Preferences , and it works identically here – any one of the four screen corners can be used as a trigger for Mission Control , ‘ software Windows ’ , show the Desktop , or unfold Dashboard ( among other commands , such as point Notification Center or Launchpad ) . Reverting any of the menus to the ‘ - ‘ option inactivate the hot corner exclusively .
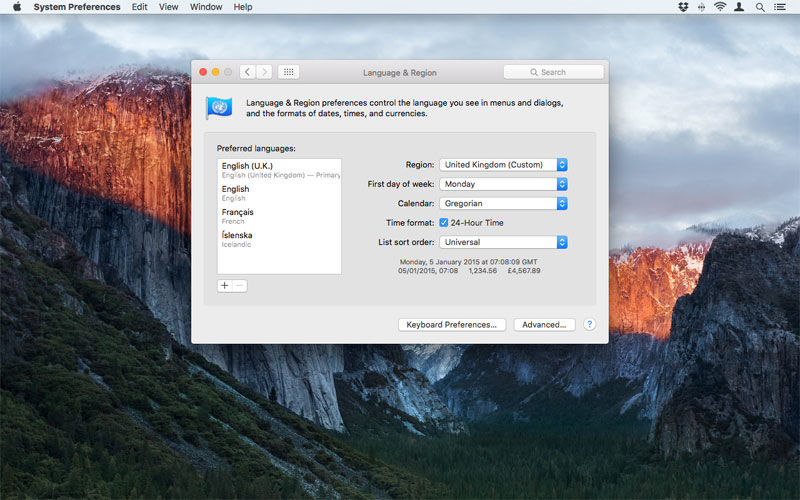
How to set the Language & Region in System Preferences
This pane controls the language prove in menus and dialogue boxes , and the format of engagement , times and currentness . It will by default utilise the speech communication you tell you wanted to utilise when you set up your Mac , along with the most appropriate format for your placement .
you’re able to total or remove speech from the Preferred Languages list by using the + and – push button . On tally a new language , macOS will ask whether you need to use it as your primary speech . If you confirm this is the case , it will be moved to the top of the list , and dialog boxes will change to the selected unexampled language . The addition of a young language will also add a ‘ tilt sort order ’ card , which you’re able to use to conform how names are assort in Finder , if a speech extend an club other than the Universal nonpayment . Some other aspects of macOS may require you to logout and login for changes to fully take gist .
To the right of the Preferred Languages tilt , you may upgrade your area set using the Region menu . If you commute it ( for object lesson , switching between United Kingdom and United States ) , you ’ll see how other options are automatically update to equal the region ’s conventions . Should you want to , specific element can be overridden , using the fare : the first day of the hebdomad , the calendar used , and whether the sentence data formatting is 24 - hour ; and whether the temperature is displayed in Celsius or Fahrenheit . With Time format unchecked , the macOS clock will employ the 12 - hour formatting typically favor in the USA .
Any elements adjusted here may touch on on apps elsewhere in macOS although some apps also have their own intragroup preferences for sure things , and so you could not rely on your System Preferences changes to always filter through .
The two buttons at the bottom of the windowpane are Keyboard Preferences and Advanced . Keyboard Preferences takes you to the Input Sources tab within the Keyboard System Preferences pane , where you may define keyboard type for your machine ( for example , bring one that ’s more suitable to a particular language you often work in ) . Advanced opens a sheet that provides the substance for editing a number of more detailed display options for your chosen neighborhood .
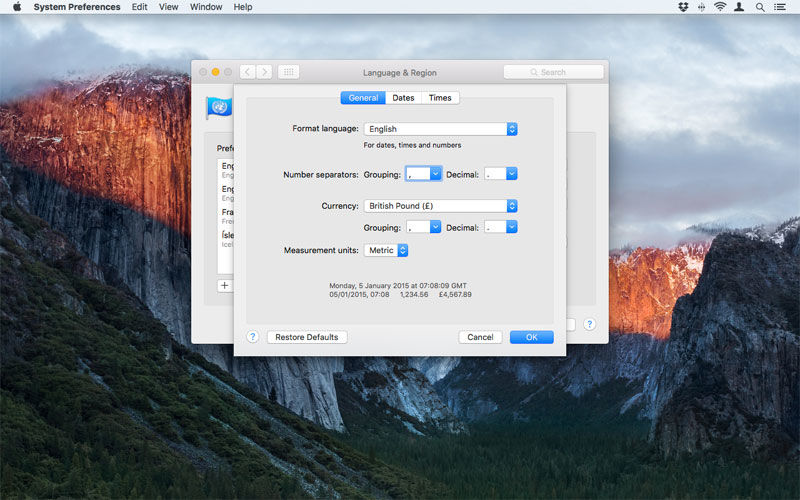
For the most part , these options should be leave alone , but if you have very specific specify - up needs , they ’re worth enquire . Under General , you could change the format voice communication for dates , clip and number , and the number separators used for grouping and decimal fraction . English uses , severally , a comma and menstruum for group and decimal ( for object lesson , 1,000.00 ) , but if you ’re working in a speech that uses something unlike , you’re able to adapt the relevant setting here ; similarly , up-to-dateness and its relevant grouping / denary selection , can be defined , along with nonpayment measurement units for the system ( Metric or US ) .

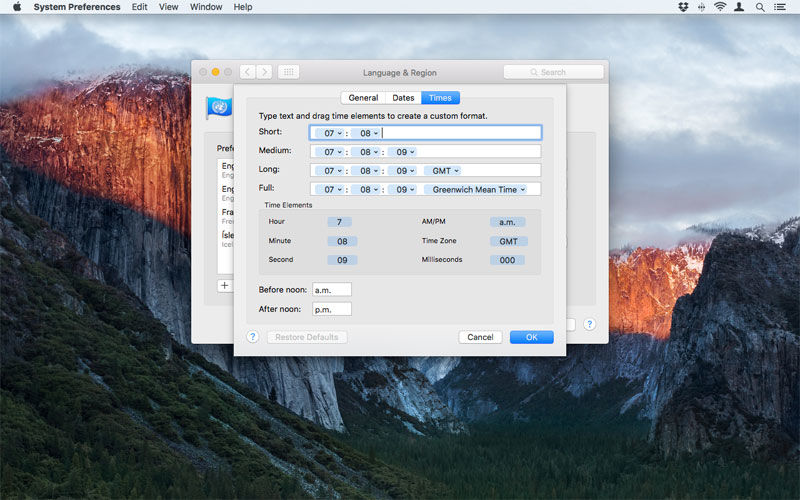
The Dates and Times tabs both offer a set of study where you may drag individual appointment or time chemical element to project custom formatting . In engagement , for example , the ‘ short ’ date on a British English system would read 05/01/2014 for the fifth of January , but you’re able to adapt this to beseem your own preference , summate elements ( such as the era or specific characters ) or slay them alone , clicking OK when done .
Be aware that change made here can touch on apps throughout the system , and making major allowance can have unintended outcome . If you decide you ’d like to return to OS X ’s system defaults , go back into the relevant tab and fall into place Restore Defaults ( which is ab initio greyed out , but becomes a clickable button when any change are made ) . At any full stop , when you return to the System Preferences Elvis , you ’ll see a abbreviated overview of your setting under the Temperature or List variety decree carte du jour , count on whether you have the latter seeable .
How to set up Security and Privacy in System Preferences
When it comes to System Preferences panes , Security & Privacy is perhaps the most intimidating ; it ’s therefore no surprisal many Mac users quash it whole . However , it ’s crucial to understand the scope within , particularly when you work with apps that expect control condition over your figurer , or if your Mac happens to be in a fairly candid or public environment . to make changes to the options within this acid , you ’ll likely have to come home the padlock and input an admin username / watchword . Read : How secure is Mac OS X ?
The first tab isGeneral . The setting here are broadly speaking split into two sections , the first dealing with logins and the second with the ability to install downloaded apps .
you could habituate theChange Passwordbutton to alter the parole for the presently log - in user . Click the push and you access a rag , into which you type the old password , then the newfangled one and a recovery confidential information ; clicking ‘ Change Password ’ confirms .
Note that should you be using an iCloud countersign to login on version of OS X that permit this ( macOS Sierra does not ) , you ’ll get a dialogue that gives you option to habituate a freestanding password , cancel , or change your iCloud password .
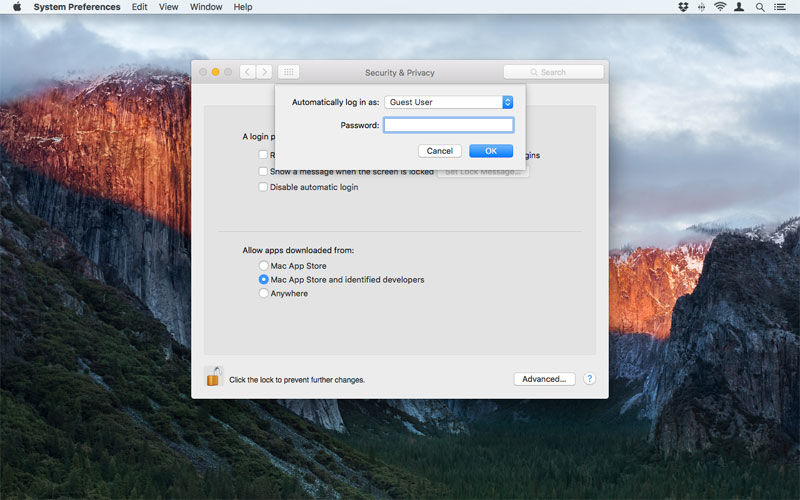
The three checkboxes are design to assure your estimator during your absence . The first when tick induce it so your login watchword is want to exit rest or the screen recoverer ; the sentence limit can be set to one of seven pre - set values , including ‘ immediately ’ and the the likes of of ‘ 5 moment ’ , to ensure you are n’t forced to input your password if you accidentally trigger off the screen saver yourself . mark that if you by and by disable this option , your Mac will monish you and ask whether you want to carry on usingiCloud Keychain .
The next checkbox enable you to add a message to the ringlet screen for anyone who tries to login while the silver screen recoverer ’s running . The third checkbox enables you to disable automatic login , and ask you to delimitate a default report for the Mac , along with inputting the relevantpassword .
Read : Best Mac antivirus software system .
The second incision within the pane determines what types of app the substance abuser can download and install . This default option toApp Store and key developers ; leave the setting alone unless you ’ve compelling reasons to alter it – for example , installing a very trustworthy app that just happens to not have been released by an identified developer .
Under such context in OS X El Capitan , exchange the setting to ‘ Anywhere ‘ and then back again post - install , for best security . As of macOS Sierra , the Anywhere choice is scatty . However , you may set in motion unsigned apps in Finder by Control - clicking them and choosing Open .
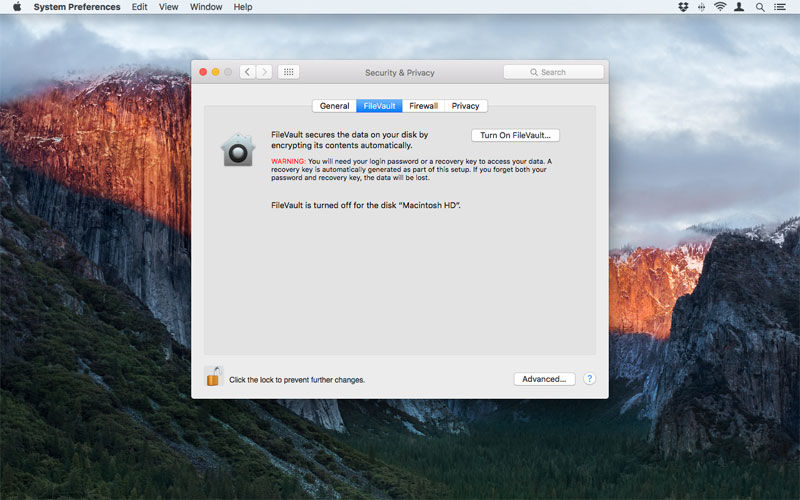
The next check is FileVault . This automatically encrypts your data point – in fact , it encrypt the entire bulk . With FileVault participating , a password is required when reboot the Mac to unlock the parkway . Without the story password ( or a retrieval key ply during set - up ) , you ’ll for good lose access to your data point , so take care if you adjudicate to use FileVault ! Readhow to change the admin countersign on your Mac .
Turning FileVault on is simply a case of clicking the only button on the pane . take note down the retrieval key , and you may also optionally start the key to be stored with Apple , defend by security measure questions . The thrust encryption process can take minutes or hours , depending on the sizing of the drive and the data on it .
remark that FileVault is only protective cover for your datum when the Mac ’s turned off . When you ’re access , it does nothing , and so is best used in tandem bicycle with the antecedently mentioned password for exiting sleep or the screen saver . If using FileVault , you should also encrypt back - ups in the disk - survival sail of Time Machine .
To later disable FileVault , click the ‘ Turn Off FileVault ’ push in the FileVault tab .
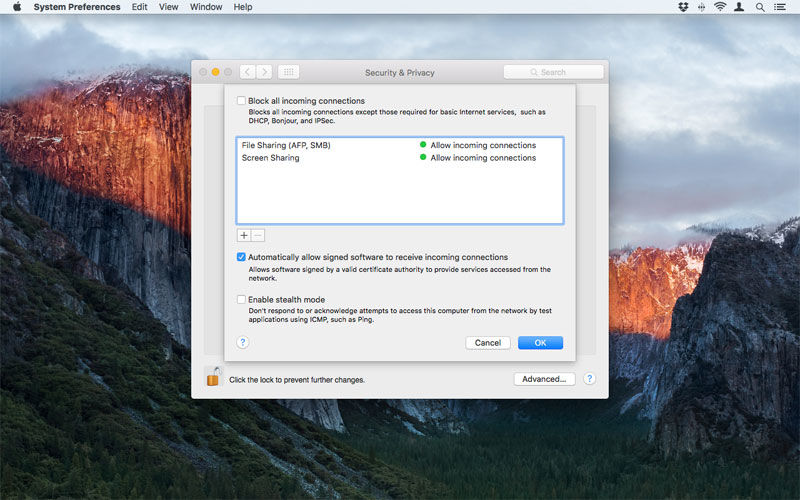
The Firewall tab is for activating and pluck your Mac ’s firewall , designed to foreclose unauthorized apps , programs and avail from accepting incoming connections . Click ‘ Turn On Firewall ’ to turn it on , and then ‘ Firewall Options ’ to configure it . In the pane , you may allow or deny incoming connections for listed item or add your own using the + button . By nonremittal , signed ( trust ) software system can receive incoming connections . you may also enable stealth mode , which mean your Mac wo n’t respond to any attempt to access it from uninvited dealings .
It ’s deserving noting that if you ’re on a secret nursing home web , chances are your router already has a hardware firewall that ’s on and in use ; firewall are generally more important when on public networks . However , it ’s also unlikely to have any major public presentation issues if you do trip the firewall . Should you have connection issues from other devices or to / from on-line services , it ’s deserving investigating whether the firewall is the cause , though .
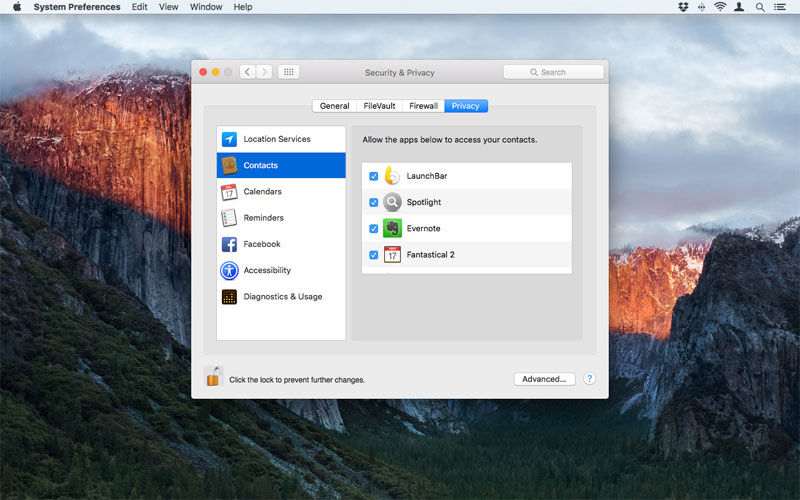
The Privacy tab is for defining which apps have access to certain services . Such requests are made for various reasons : for example , a calendar app might require access to your calendars for act ; additionally , apps that control the computer ( such as window managers and launchers ) will need the means to do so , and permission is provided in the Accessibility section within this chit . There ’s also a Location Services section , for apps that desire to determine your location .
In all cases , select from the list on the left and employ checkboxes on the right to define the apps that have access to the relevant service . Only deny access for an app you no longer expend or that you ’re sure you no longer desire to communicate with the item it requested access to . you could of track change your nous later if you find functionality on your Mac impaired by any decision you make in this tab .
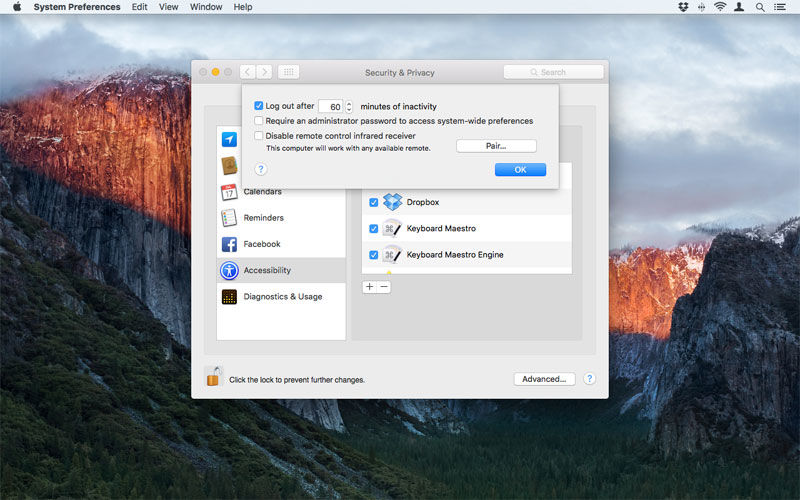
eventually , at the foot of the page is the advance button . Click it to open a sheet with yet more options for securing your Mac : the means to sign out after a determine geological period of inactivity ; a essential for an administrator parole for access system - panoptic preference that have been locked ; and a setting for handicap command from an infrared liquidator . The Pair button can be used to pair the computer with an available remote .
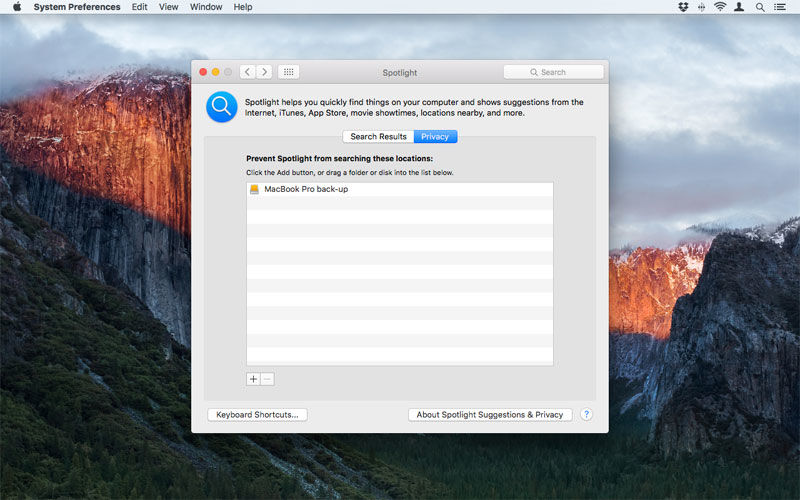
How to change Spotlight settings in System Preferences
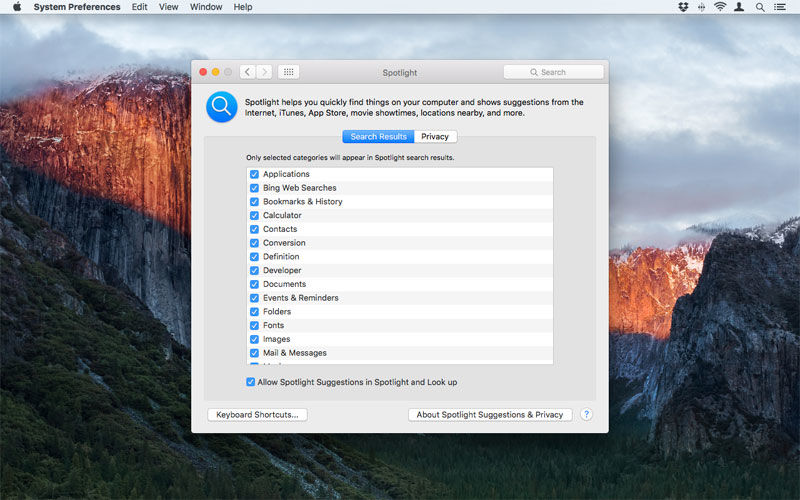
TheSpotlightSystem Preferences pane enables you to determine the form of results that appear in Spotlight , along with the contentedness Apple ’s hunting system happens to indicator . you may also remedy the shortcut used for Spotlight , by clack ‘ Keyboard Shortcuts … ’ , which strike you to the Shortcuts tab in the Keyboard Elvis within System Preferences . ( Note that when changing shortcuts for Spotlight , ensure your choices do not collide with commonly used shortcuts elsewhere . You ’re most likely to need to remedy the Spotlight shortcut if you often exercise with multiple language . Command+Space is also used by default to tack stimulation sources . )
As of OS X El Capitan , it ’s no longer possible to reorder hunt results category . glare alone now determines relevance . However , you’re able to still overleap intact categories by unchecking their checkboxes . remark that some options require an internet connection . For example , if you ’re not online , you wo n’t be experience Bing vane Searches , results from the iTunes Store , or live currentness conversions .
Underneath the scroll categories pane is the optionAllow Spotlight Suggestions in Spotlight and Look up . This is a switch for Spotlight ’s capableness for access impertinent results , such as sports lots , and those based on location , including nearby eating place , cinema sentence and atmospheric condition reports . turn off the option and these sort of results will not be available . ( Apple notes privacy implications for Spotlight suggestion on its website , if you ’re concerned about your hunt data being send to various online service . )
We ’ve got some related advice inTips for using Spotlight on Mac .
Click thePrivacytab and you could prevent Spotlight from searching specific locations . To add a booklet , click + and then choose the location from the sheet that appear . observe that you could block entire volume / drive from being searched by choose the emplacement drop - down menu and going up to its top level , which include any attached drives .
In special , we powerfully recommend adding any drive that include back - up clones assume with the likes of Carbon Copy Cloner or SuperDuper ! This is because otherwise Spotlight may return multiple result for fundamentally indistinguishable target , and you might end up opening the wrong written document in error ( as in , the one from a back - up drive ) , delete and saving it , only for it to be overwritten during the next relief .
you could also cart items from Finder to this list ; to subsequently slay any item , select it and clack the – clit .
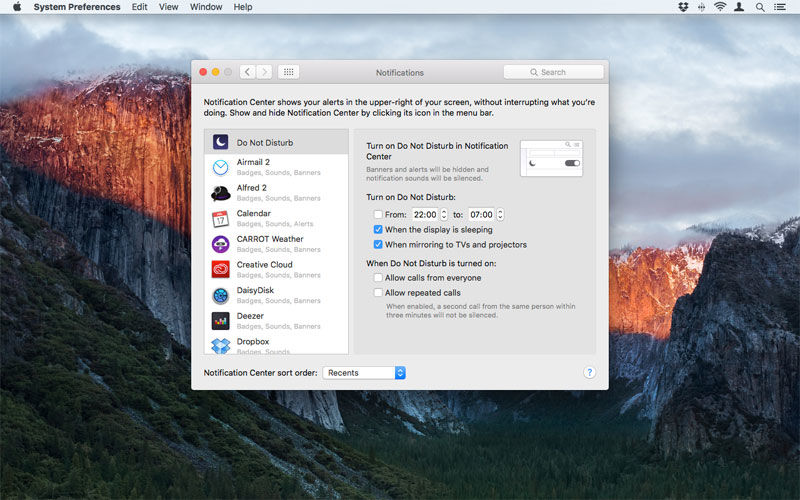
How to change Notification settings in System Preferences
The Notifications System Preferences pane provides the mean value to manage and tame macOS Sierra ’s notifications system , which can be very helpful but also a huge distraction if you ’ve loads of notifications coming in all the clip . register Centre on the Mac .
The first option isDo Not Disturb . Select that and you may define a prison term period when notifications wo n’t bother you . Optionally , you may also deform on Do Not shake up when mirror your Mac ’s display to a TV or projector , which is likely to occur when watching a film or during a demonstration . Note that when Do Not interrupt is active , the Notification Center image at the far - right wing of the bill of fare bar will turn grey . Your System Preferences setting can be manually overridden at any point by opening Notification Center and flicking its Do Not Disturb switch .
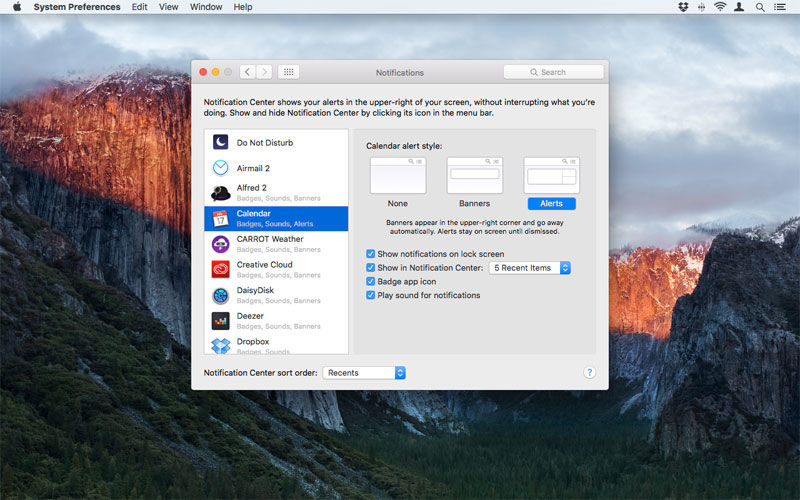
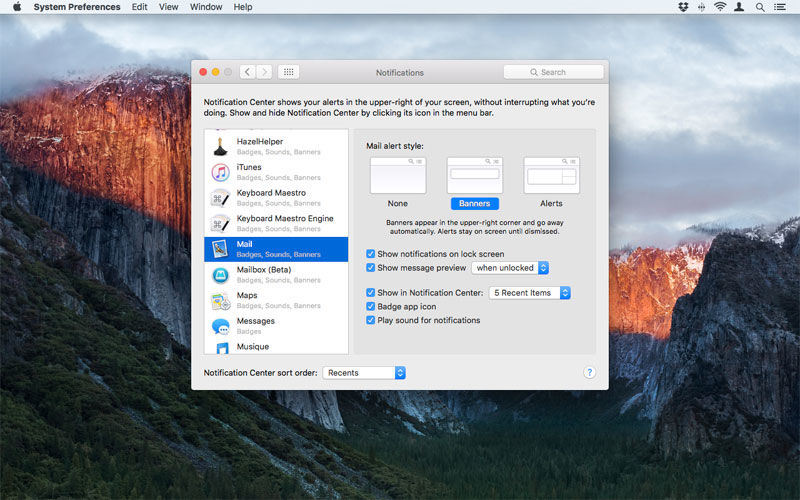
Below Do Not Disturb in the sidebar , you ’ll find a leaning of apps .

Select an program program and you ’ll get a bent of options , and the nonpayment options are designed to best suit the specific program they go to ; however , they ’re deserving investigate , specially if you ’re getting swamp with notification .
The first section define the alert style , from which you’re able to beak None , Banners ( which appear in the upper - right corner and fly after a few indorsement ) and Alerts ( like banners , but ask a user action to dismiss them ) . Simply click an option to select it , and its championship will take on a risque lozenge as its background .
Below , you ’ll see up to four choice . ‘ Show notification on whorl screen ‘ defines whether notifications will seem when the Mac is locked , and is worth invalid on public Macs . Show in Notification Center allows you to adjust how many point for the app are displayed : 1 , 5 , 10 or 20 . For the likes of Calendar , usher upcoming event , you might want a longer tilt , but the particular phone number for many apps can be reduced without touch on your workflow .
The Badge app ikon option determines whether a red badge appear on an app ’s icon when notifications occur ( for example , unread emails for Mail ) . ‘ recreate strait for telling ‘ will make a interference when a apprisal appear .
Mail and Messages have an additional choice : Show subject matter preview , and this can be set to ‘ when unsecured ‘ ( the nonremittal ) or ‘ always ‘ ; the second of those is not recommend for Macs in public place , unless you do n’t mind anyone potentially insure a preview of your incoming message . Twitter also has an additional option , a Notifications push button that enable you to fine - tune what eccentric of Twitter communication theory macOS Sierra notifications are displayed for ; by default , Direct Messages are included , but you’re able to also be advise about mentions and replies from hoi polloi you follow or anyone who happens to adjoin you .
At the bottom of the window , there ’s a sort fare . you could define this to sort your telling by late apprisal ( Recents ) , late notification by app ( Recents by App ) , orManually by App . Bafflingly , there ’s no alphabetic variety option .
Although macOS Sierra has yet to get quite as telling - happy as iOS , we recommend taking some time to manage this section of System Preferences . Turn off banners and get apps out of Notification Center if you do n’t need notifications from them ; and for those things you do need notifications from , minimise them whenever potential . If you ’re well distracted but get a fortune of email , for example , it ’s a sassy move to block Mail notifying you with a standard every time a raw message hail in , but you could always leave the app icon ’s badge place active , to provide an at - a - coup d’oeil reading of how many unread electronic mail you have .
Display settings
The options you ’ll see within the Displays panelling are in part reliant on your Mac hardware . At a lower limit , you ’ll see Display and Color tabs for , respectively , set firmness of purpose and color profile . If you ’ve multiple displays , that will supply an Arrangement tab ; some exhibit will also bring home the bacon an Options tab .
Within the Display tab , you ’ll see an image representing your display ( or the closest Apple equivalent weight ) , result options , a Brightness skidder , and some other options that are determined by your computer hardware hardening - up . Under Resolution , ‘ good for display ’ sets your display to the most optimal choice . clack Scaled to instead pick out from other supported resolutions . Hold Option when clicking Scaled and you ’ll get a prominent inclination of firmness . Some of these may not be defend well by your display , so employ caution . Holding Option and clicking Scaled a second time reverts the inclination to recommended resolutions for your auto .
Resolution : On non - Retina Macs , specific resolution will be listed ( such as 1920 x 1200 ) ; on Retina Macs , you instead get graphic histrionics of what your selection will accomplish , label with the likes of ‘ Larger Text ’ and ‘ More blank space ’ . get across an option will immediately change your display ’s resolution .
TheBrightnessslider adapt the showing ’s luminousness go under more apace than using your keyboard ’s media key ( F1 and F2 ) , and on notebook computer you ’ll have an optional checkbox for automatically line up brightness ; this is worth keeping on at all prison term unless you find it does n’t work well for you .
Other selection you may see are as watch :
Rotation : conform the revolution of the sieve to 90 , 180 or 270 degrees .
Refresh pace : Adjusts the refresh rate for the exhibit .
Gather Windows : In multiple - display set - ups , you will get a separate Displays pane on each screen . Clicking this button gathers them all on to one screen .
Detect Displays : If you ’ve multiple display connected and the Arrangement chit does not appear , hold Option and click Detect Displays to give the pane a nudge .
AirPlay Display : This mirrors the presentation to another compatible screen , such as your television via an Apple TV . This choice can be more well access by checking ‘ Show mirroring options in the menu bar when usable ’ . This gives you a free fall - down AirPlay menu alongside the the likes of of Spotlight and your menu - bar clock .
Note that should you own a Retina Mac and/or require a more traditional firmness of purpose switch in the menu bar , debate set up the free but capableDisplay Menu , the drug user - friendlyResolutionator , or the extremely versatileSwitchResX.
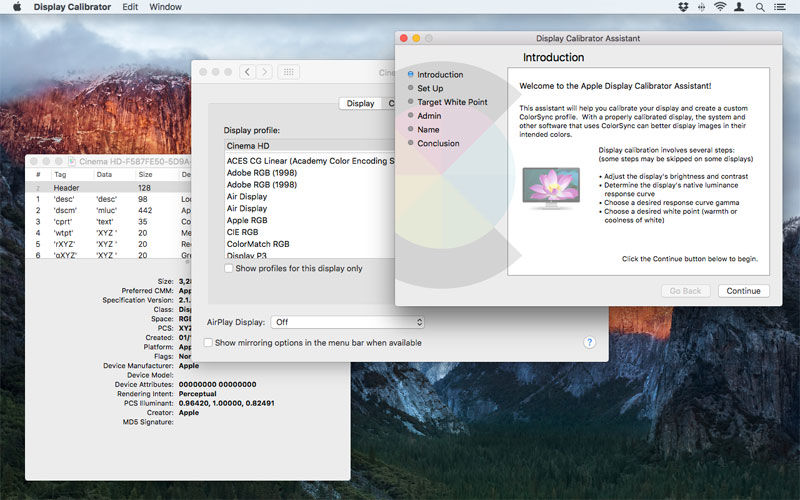
TheColortab is something distinctive user will never require to visit , but if you mould with photography and purpose , you may require to calibrate your show . Unchecking ‘ Show profiles for this video display only ‘ will number some pop profiles you could select from . ‘ Open Profile ‘ loads the current profile into the ColorSync Utility app , so you could delve into its inside information in the ICC single file formatting . Delete Profile edit any selected custom profile but will not remove those that are preloaded on to your machine .

TheCalibrateoption loads the Display Calibrator Assistant , a wizard for calibrating your display and creating a new bespoke profile for your special readiness - up . The initial screen include an ‘ Expert Mode ‘ checkbox for users who need additional options beyond the defaults .
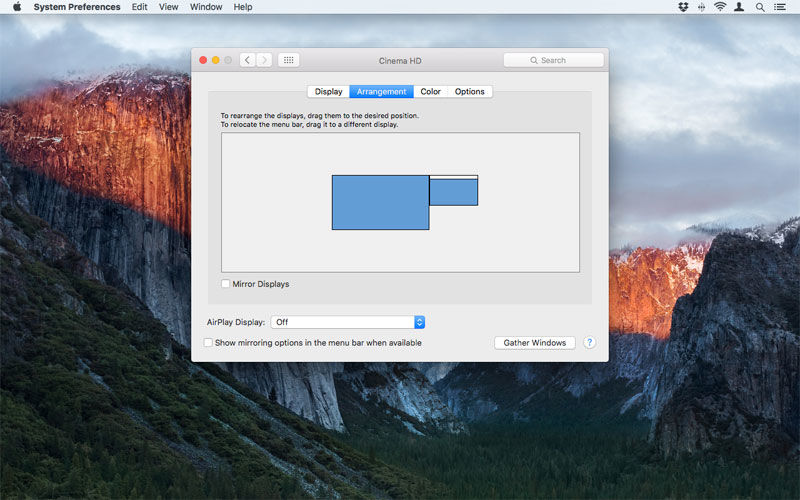
The aforementionedArrangementtab appears when multiple displays are connected . If two displays are mirrored ( denote by the ‘ Mirror Displays ’ checkbox ) , canonic representations of them will be overlaid . When this option is not pick out , you may drag the display around to exchange their positions . Typically , it ’s common to place one next to the other , providing a logical pathway for your mouse cursor to use , but you could aim one on top of the other , if you wish . One of the displays designate in this chit will have a computer menu bar on , and that can be dragged to another to make it the principal display ; however , as of OS X Mavericks , every video display has its own menu bar anyway .
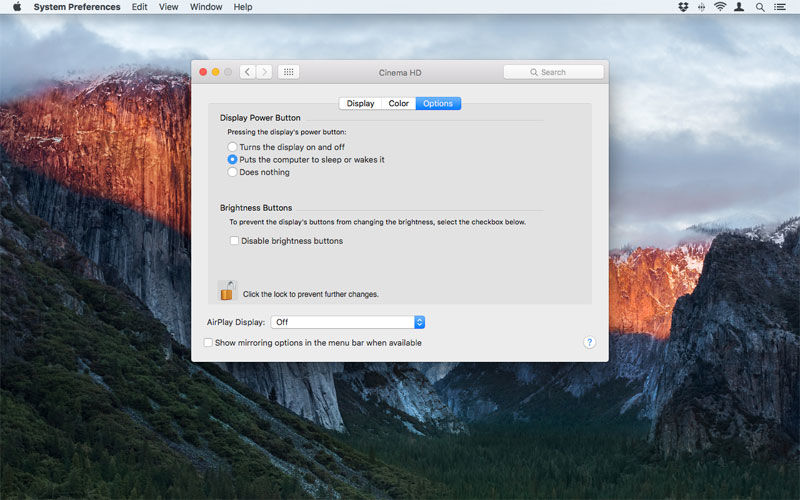
If you have anOptionstab on your macOS install , its preferences are specific to that show , such as using the show mightiness clitoris to catch some Z’s / ignite the Mac or power down / power up the showing , or disabling its own brightness controller . You ’ll take to click the lock and authenticate with your username to make changes .
TheNight Shifttab can be used to set a schedule for adjusting your showing ’s semblance after darkness . The idea behind Night Shift is to mechanically bump off blues and increase warmth , which may help you kip best .
Our baby site in the USinvestigated thisback in 2016 and conclude that Night Shift probably wo n’t have much unmediated upshot on you , and is perhaps best thought of as a placebo or a admonisher to start winding down your fourth dimension in front of a screen . Still , some people do find warmer colours are less likely to cause eye strain when working of late – just check you disable Night Shift when work on colouring material - decisive work !
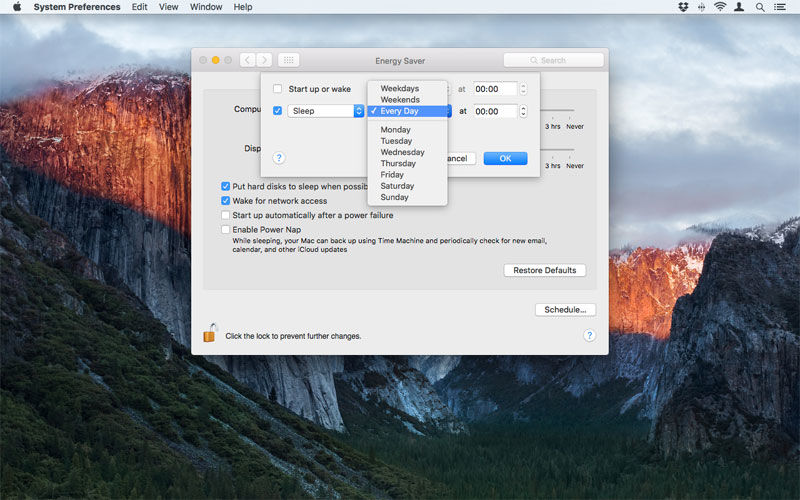
Energy Saver options in macOS Sierra
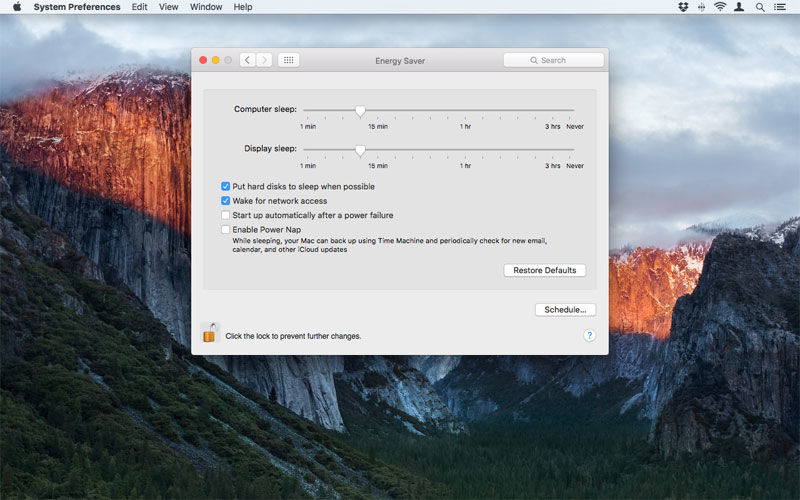
TheEnergy Saverpane is designed to align power configurations base on drug user - defined criteria , which can be especially useful when eking out extra minute of arc from a notebook computer . You may require to click the curl and login to make changes .
Again , there are variations on this pane , depending on the computer hardware you own . Desktop machines get a single pane with separate sliders for limit how long the Mac should wait before kip the computer and display . Further choice enable you to slumber disks when potential , awaken the Mac for internet access , and to begin - up your Mac automatically after a might failure . ‘ Enable Power Nap ‘ is also available for Macs with newer mainframe ; when selected , this choice enable your Mac to execute basic tasks while sleeping , such asbacking up to Time Machineandmaking iCloud updates .
TheSchedulebutton provide further control , enabling you to define a embark on - up / wake meter and a quietus clock time . These can each be set to feed daily , only on weekdays , only on weekends , or only on a specific sidereal day of the week .
The Energy Saver dose on notebooks make some changes to these options , providing the means to set dissimilar preferences for battery power and when you ’re using a king adaptor . TheBatterytab logically take away automatic restart after a power failure and waking for web access . you could also show your current barrage condition in the macOS Sierra bill of fare streak by clicking ‘ Show shelling position in menu barroom ‘ .
The MacBook Pro with Retina video display create further adjustments , remove the ‘ Computer sleep ‘ option and add the mean to prevent the computer from sleeping mechanically when the display is off .
In all cases , Restore Defaultswill turn back your Mac ’s mount to manufactory defaults .
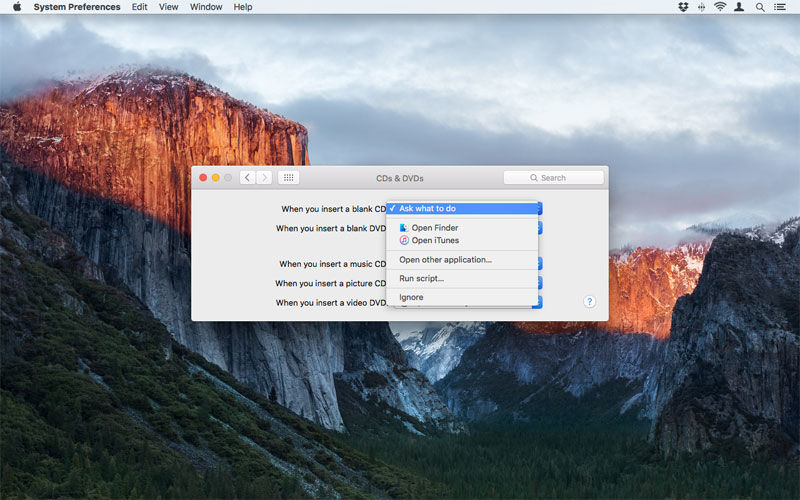
CD & DVD settings in macOS Sierra
The CDs & DVDs battery-acid only look if you have an visual drive for your Mac . This does n’t involve to be a built - in private road – just one that ’s attached to and recognised by your arrangement . ( Remote Disc does not count . )
The five menus are all generally similar , enabling you to set a nonpayment action at law when certain eccentric of ocular media are discovered by your Mac , namely the insertion of : a vacuous CD ; a vacuous videodisc ; a music CD ; a movie CD , and ; a telecasting DVD . If the option is set to ‘ Ask what to do ’ , you ’ll get a dialog box on inserting a relevant disc .
Alternatively , you may define a specific software or script to run , or evidence your Mac to do nothing by pick out ‘ Ignore ’ .
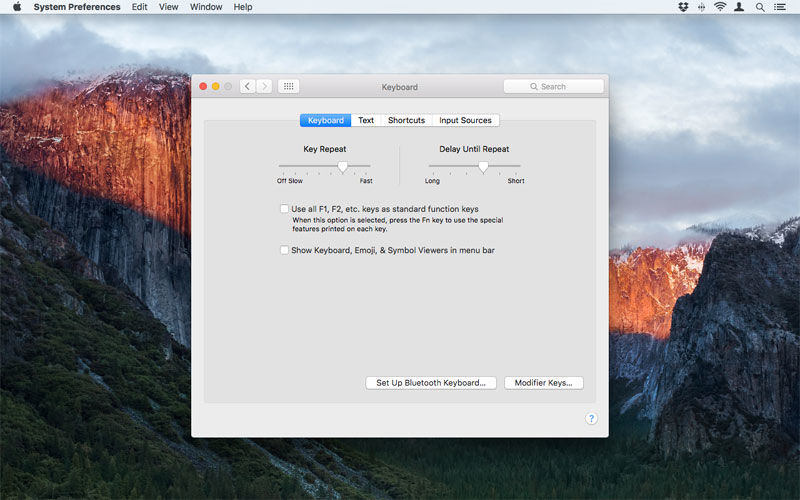
Keyboard settings
The Keyboard pane of glass provides a great hatful of control over keyboard stimulant .
The Keyboard tab has control condition that exchange how your hardware influence . TheKey RepeatandDelay Until Repeatsliders , respectively , determine how rapidly a character repeats when its tonality is held down , and the postponement that pass off before the repeating commencement . Not all key repeat . Although you’re able to create a row of hyphens by hold ‘ - ‘ , holding a letter of the alphabet will instead bring up a pop - up with related to alternate characters , such as à or ä when holding ‘ a ’ ; typecast the adjacent number to any of these makes a selection without using the black eye . Read : Keyboard shortcuts for Macs .
UsingTerminal , you’re able to regress to Old OS X behaviour ( recur for all keys ) by entering the following statement and restarting your Mac :
defaults spell -g ApplePressAndHoldEnabled -bool mistaken
Switching ‘ false ’ for ‘ unfeigned ’ reverts . notice that this bid no longer go as of macOS Sierra .
The awkwardly named first checkbox in the Keyboard window pane , ‘ employ all F1 , F2 , etc . keys as received function keys ‘ , shape whether the top row of keys on your keyboard performs actions such as adjusting brightness and switching tracks in iTunes , or literally sends subroutine - Francis Scott Key - presses . The latter is often helpful in figure software system . retick the checkbox and especial feature will require you to also obtain the ‘ fn ’ paint to aerate them .

If you ’re using an older keyboard with a newer Mac , sure functions may not be available via particular Florida key , butFunctionFlipenables you to remap keys to the the likes of of open Launchpad ( F4 on newer keyboard ) . However , you ’ll call for toapprove its use in Security & Privacy .
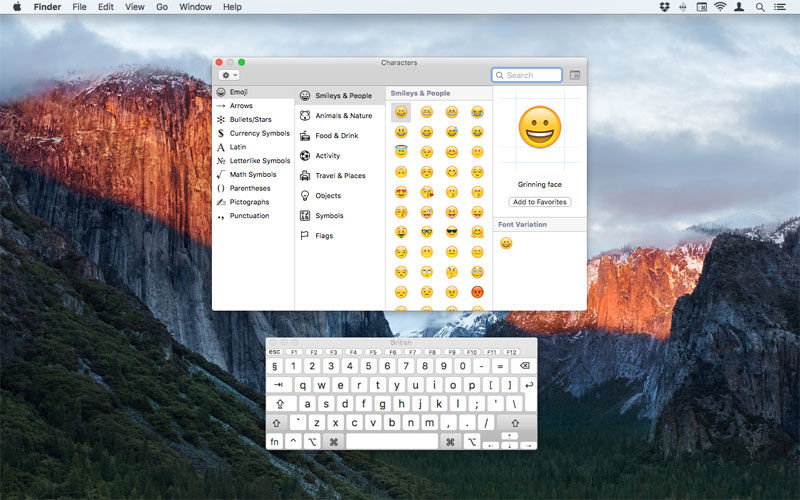
The second choice enables you to get to the Keyboard Viewer and Emoji & Symbols from the menu cake ; these seem under a individual carte du jour extra . If you also have multiple input sources ( see later ) , this menu extra will likely exhibit as a flag . If not , the icon resembles a small keyboard with a Command icon .
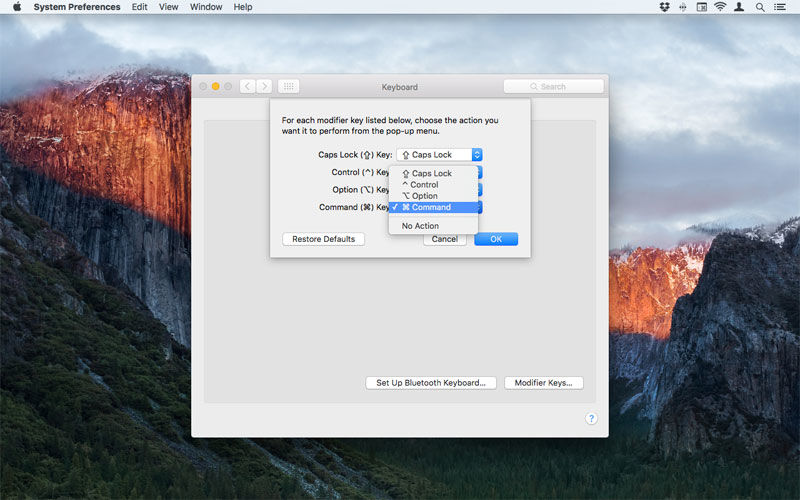
Underneath these checkboxes are two buttons : one to fructify up a Bluetooth keyboard , which brings up the received OS X discovery window , and one to change how Modifier Keys work . Using the card in the drop-off - down sheet , you may turn off modifiers ( Caps Lock , Control , Option / Alt , Command , Function ) , or swop them round . Unless doing so for availability reasons , they ’re best left alone . ‘ Restore Defaults ’ in this window restores factory preferences .
TheTexttab provides a wealthiness of automobile - correction feature article . To the right are checkboxes for mechanically correcting spelling , and , as of macOS Sierra , automatically capitalise Word and add a period with a double space ( like on iOS ) . TheSpellingmenu provides the means to take a language ( automatic by nonremittal ) .
Software will sometimes overthrow any defined system nonpayment , and call for you to specifically turn on such changes in Edit > Spelling and Grammar / Edit > Substitutions , or equivalent scene .
Below theSpellingmenu are option for automate impudent quote / style , and also for lay out the formatting of smart quotes .
The Replace / With table is for adding specific correction , which is useful for regular literal you make that macOS does not correct or spelling it mistakenly updates . It can also be used as a basic textbook elaboration tool , for case expand ‘ omw ’ to ‘ On my elbow room ! ’ . It ’s also potential to add multi - line entries in the With pillar by hold Option / Alt when hitting Return for a novel line .
Your shortcuts should be shared using iCloud and can be especially handy on Io where typing ’s typically slower . ( We say ‘ should ’ rather than ‘ will ’ because this aspect of macOS and Io likewise continue funnily flaky . )
For shortcuts , it ’s important to not use textbook strings that could be unintentionally activate . One way of doing this is to end shortcut with a double - comma . For example , you could have the like of ‘ fivestar , , ’ thrive to five unicode stars , or ‘ address , , ’ become your full address . ( Double Polygonia comma is a good ‘ trigger ’ , because it ’s a pairing you ’re unlikely to use elsewhere when typing , and the comma key is pronto accessible on all platforms . )
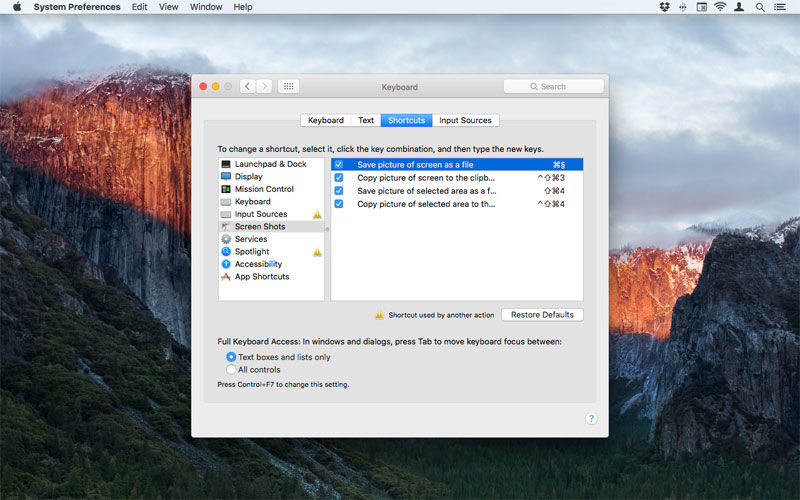
TheShortcutstab houses arrangement - wide and custom app - specific shortcuts , which are user - definable . These are categorize in sections , selected from the Zen on the left ; click one and you ’ll see all link shortcuts on the right . Below the right - hand pane is a Restore Defaults button that reverts any changes for the current category alone .
Shortcuts are edited by double - clicking the zone to the right hand of a crosscut ’s name and then holding your preferred key combination . For example , prime Screen Shots in the odd pane , then double - detent to the right hand of ‘ make unnecessary movie of screen as a file ’ and hold Ctrl and § . This will update the crosscut for taking a screenshot from the standard Shift+Cmd+3 . Should you create a custom cutoff that clashes with another , you ’ll be informed ( a warning trigon will be displayed , and also highlight the relevant category where the clangoring has pass off ) and should then modify one of them .
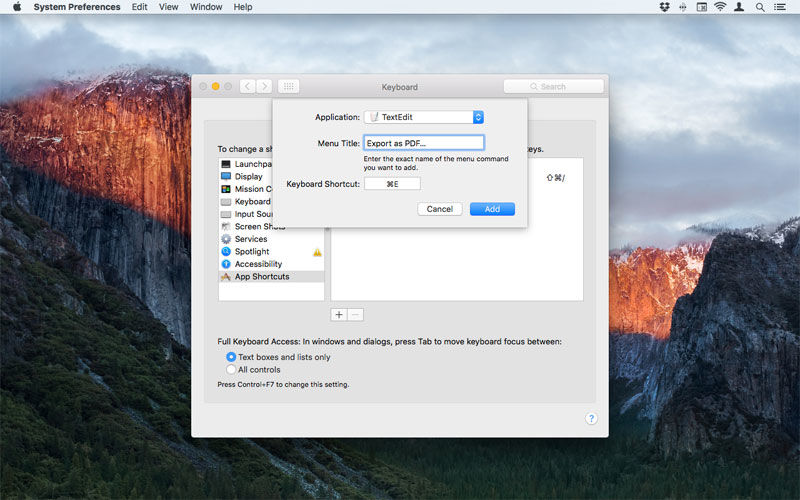
In App Shortcuts , you could create your own crosscut for menu bid that do n’t have them , or I you desire to transfer .
Click + , pick out an software ( or ‘ All Applications ’ if you want your shortcut to utilize across all apps with the same instruction ) , type theexactmenu title , and then add your cutoff . Click Add to continue .
For instance , if you ’d like a nimble shortcut for exporting PDFs from TextEdit , you ’d choose TextEdit in program , type ‘ Export as PDF … ’ in Menu Title , and then get through inside Keyboard Shortcut and add your shortcut ( such as Cmd+E ) . Note that the ellipsis is required in Menu Title ; that can be typed using Opt+ ; .
Be careful to not override existing cutoff within applications when adding custom unity , and take note that you may not revert this entire segment to factory defaults ; or else , you may pick out individual shortcuts and use the ‘ - ‘ push to blue-pencil them .
At the foot of the windowpane , you could adjust how the Tab cardinal works . By default , it will flip the cursor focus between text box seat and lean . So in Safari , for model , urge on Tab switches you between comment boxes on a WWW page , but if ‘ All dominance ’ is active , Safari check and web - pageboy button are bring to the cycle . In Mail , or else of only tabbing between pane and search , ‘ All control condition ’ adds buttons and the ‘ Sort by ’ card to the cycle . Generally , the default are okay and faster , but ‘ All control condition ’ is a useful accessibility aid ; you’re able to also use Ctrl+F7 to toggle this command in an ad - hoc manner rather than spark off it in System Preferences .
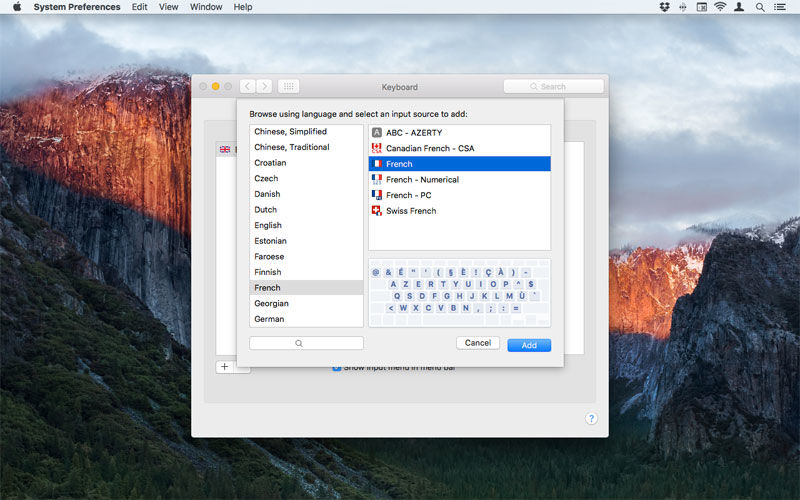
The Input Sources tab enables you to lend different keyboard layout that you’re able to flip between , such as ones that aid comment in alternate languages , or the Dvorak ‘ simplify keyboard ’ , which rearrange the keys in an attempt to increase type rates and lessen errors . On pick out a keyboard , a trailer of the layout is shown .
Optionally , you’re able to opt to show the input menu as a card extra , whereupon you ’ll see a flagstone or icon ( as appropriate ) in the menu bar to denote your current keyboard . come home it and choose a source to switch to it . you’re able to also from this menu select the Character Viewer and Keyboard Viewer .
Shortcuts > Input Sources will seem on adding a second remark source . This enable you to definea shortcut to switch to the next / previous germ ( Cmd+Space by default , which clashes with Spotlight , so it ’s good to change that to something else ) . The final checkbox enable you to mechanically change over input signal source when you ’ve pick out an input source for a document . The setting remains active only until the text file is closed . For good example , if you were working in two documents , one in English and another in Icelandic , you would opt Icelandic as the input beginning for the latter . Then as you alternate between document , OS X would toggle your input origin between English and Icelandic keyboard without you accept to do so manually .
TheDictationtab , when available , provides access to the port for setting up bidding functionality . You choose an input beginning from the menu under the mic image , choose a speech from the ‘ Language ’ menu , and choose a shortcut for trigger off bid ( Fn twice by nonremittal ) from the ‘ Shortcut ’ fare .
Within the ‘ words ’ carte du jour , you could supply further languages by selecting ‘ Add Language … ’ and prefer from the pick in the tabloid that seem – but remark each may lead to a download .
When dictation is dynamic , a lilliputian mike pour down - up appears and you’re able to start talking . If you ’re using enhanced command ( which is on by default in macOS , but may require a download when activated for older systems ) , words will appear roughly as you speak . If not , you ’ll have to occasionally pause to let your text edition upload , get translate and then download to your Mac .
While command accuracy is n’t perfect , you’re able to ameliorate your result textbook by manually stating punctuation mark and styles ( such as ‘ comma ’ and ‘ raw paragraph ’ ) ; rather oddly , the system translate ‘ smiley face ’ and ‘ frowny face ’ , too . you’re able to also expend the keyboard to edit text while you speak .
Using your shortcut again will change state off dictation , or you’re able to click the Done button on the papa - up .
Mouse options in macOS Sierra
The Mouse battery-acid is where you limit configurations for a mouse connect to your Mac . The pane ’s appearing can vary greatly , and is fully contextual , the option award depending on your hardware . Read : How to apply a shiner and trackpad on a Mac
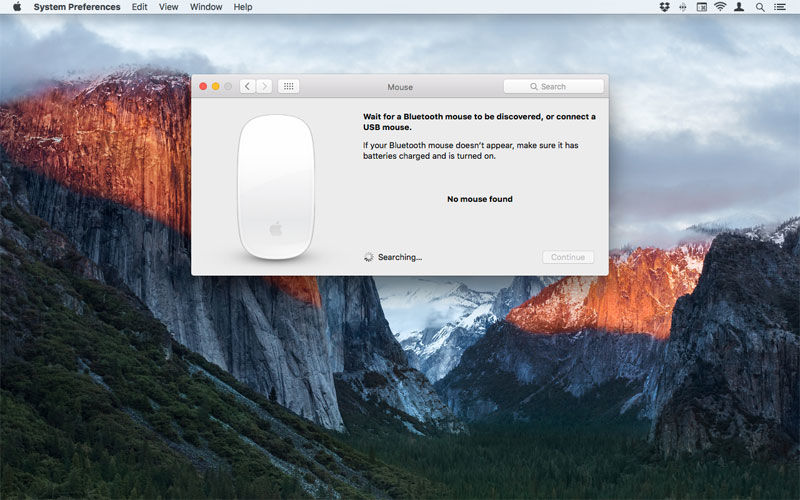
On opening the superman without a black eye connected , it will show an image ofApple ’s Magic Mouse , and state your Mac ’s searching for a shiner . The pane will update when a Bluetooth mouse is obtain and you could then ( if relevant ) start the set - up physical process ; instead , you could just plug away in a USB mouse . Regardless of the hardware you contribute , Set Up Bluetooth Mouse remains a button option at the bottom - right of the pane ; next , if relevant , will be your Bluetooth mouse ’s battery spirit level . Apple provide asupport documenton couple Bluetooth accessory with a Mac .
punch in the most basic possible mouse and you ’ll see ‘ trailing hurrying ’ and ‘ Double - Click speed ’ sliders , which , severally , enable you to adjust how far the cursor moves across the screen when you move your mouse , and how quickly you need to replicate - click the mouse clit for that activeness to be register by macOS . Only place either economic value towards Slow if you ’re a proportional starter or take slower response for accessibility reason ; otherwise , tend towards profligate , peculiarly with trailing . Doing so mean you’re able to cover more projection screen blank space with pocket-sized mouse movements .
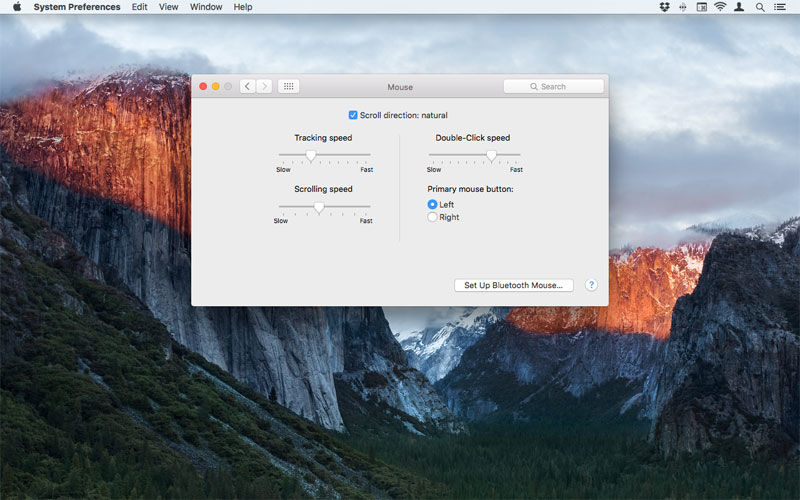
With more powerful / able mouse ironware , you ’re likely to see more options . Plug in a two - button mouse and you may delimit the left or right button as the ‘ chief ’ one for click events ( the other being reserved for the contextual card ) ; black eye with roll wheel will add a ‘ Scrolling speed ’ slider . Multi - button black eye , such as Apple ’s old Mighty Mouse , may provide the means to arrogate activity to specific buttons , for example trigger off the software whipper .
With Apple ’s original Magic Mouse , you get a significantly dissimilar Mouse pane , split into two tabs : Point & Click and More Gestures . Each of these houses a small issue of options , and also video of each option in use ; these automatically play back when you hover the mouse pointer over the relevant detail – you do n’t need to get across .
Point & Clickincludes a Tracking slipper , and also checkboxes for ‘ roll management : natural ’ , ‘ lower-ranking click ’ and ‘ Smart rapid growth ’ .
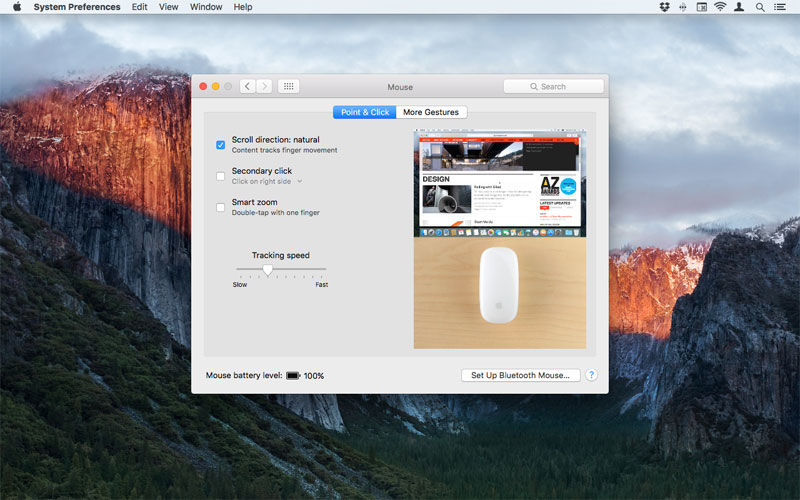
‘ junior-grade clink ‘ when active enables you to use the right - handwriting side of the mouse as a virtual right - click button ; the option can be switch to the left of the computer mouse by using the pop - up menu under the item ’s label .
The other two selection when active echo iOS devices . ‘ Smart zoom ‘ enables you to dual - tap in Safari to zoom the content the computer mouse cursor is over ; a second double - tap reverts . When active , ‘ Scroll direction : innate ’ gyre content in the direction you move your finger’s breadth , like you ’re pushing or pulling it . Turn off this setting and macOS will behave as old versions of OS X did , with your drags essentially control scrollbars rather than directly manipulate depicted object . ( So dragging downwards would scroll content upwards . )
InMore Gestures , you may activate commands for filch between Thomas Nelson Page with one or two fingers , swiping between full - screen apps with two fingers ( assuming the previous option is not set to practice two fingerbreadth ) , and accessing Mission Control with a two - finger double - pat . Read : How to expend gestures to control your Mac .

Trackpad options in macOS
The Trackpad Lucy in the sky with diamonds enables you to define functionality for your notebook ’s built - in trackpad , or for a Magic Trackpad join to a background simple machine via Bluetooth . Like the Mouse pane , if no trackpad is found , you ’ll see an image of Apple ’s Magic Trackpad and the pane searching for one ; again , there ’s a set up - up release and you may refer to Apple’ssupport documentfor geminate advice . Available options will vary depending on the hardware you have available .
The Trackpad panelling cater three tabs : Point & Click ; Scroll & Zoom ; More Gestures . Many of the options can bring macOS stimulus closer to what you experience on iOS . Hovering the pointer over any of the pick supply a television that ’s representative of the hardware you ’re using .
Point & Click‘s options are all about act the pointer and pull strings on - screen content . With ‘ Tap to get through ’ participating , you only need to tap your trackpad for a click outcome , rather than pressing down until the ironware physically chatter ; we recommend this mount unless you circumstantially trigger clicks all the time . ‘ junior-grade click ’ enables you to bring up context of use menus with a two - digit tap , or alternatively ( via the menu choice ) by come home in the bottom - right or bottom - go away corner .
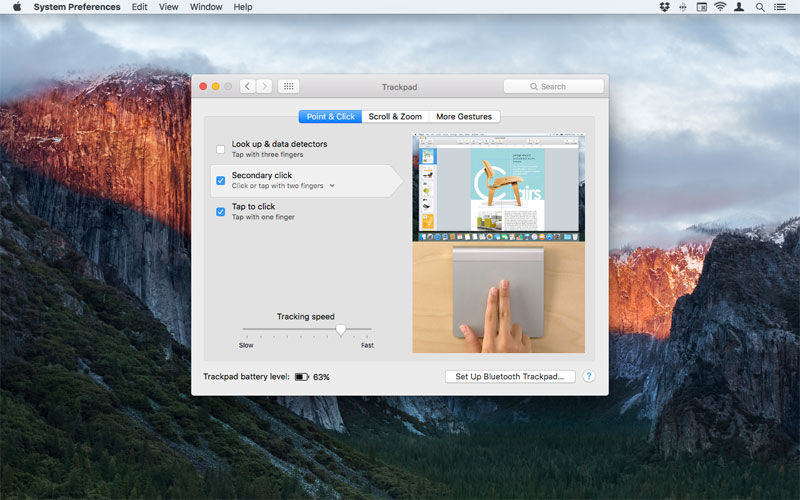
IfLook Up & datum detectorsis participating , you may three - finger pat on a word and a pop - up will provide its dictionary definition .
The ‘ Tracking f number ’ option enables you to adjust how far the cursor moves in relation to your gestures ( in much the same way as the equivalent option in the Mouse acid ) . On ironware that confirm it , you will also be capable to determine the click air pressure and toggle Force Click and tactual feedback . ( This being used when perform gesture such as Quick Look with a more emphatic detent . )
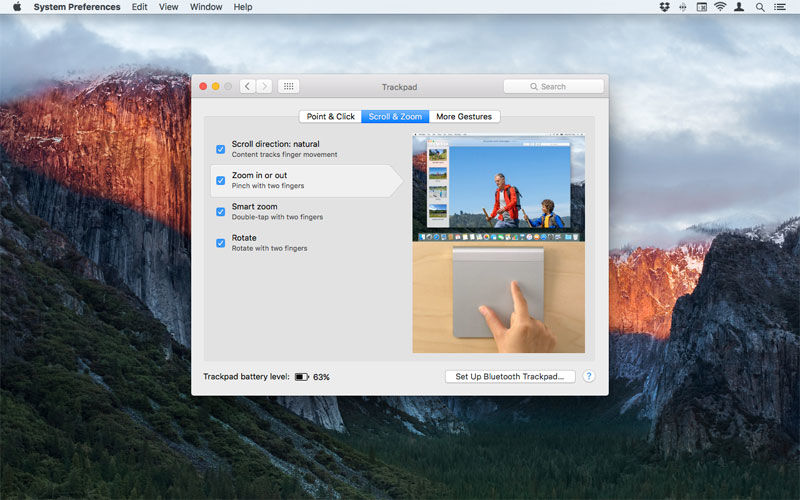
InScroll & Zoom , there are four optional options : Scroll way : raw ; Zoom in or out ; Smart zoom ; Rotate . soar in or outand Rotate are two - finger gestures ( respectively , pinch and circumvolve ) that caricature iOS equivalent , zooming or go around documents in compatible apps . Scroll focusing : natural , as per the Mouse pane ’s mise en scene , ‘ pulls ’ scroll content in the guidance your finger movement , like it does on a touchscreen ; andSmart zoomintelligently zooms and unzooms a section of a web page in Safari .
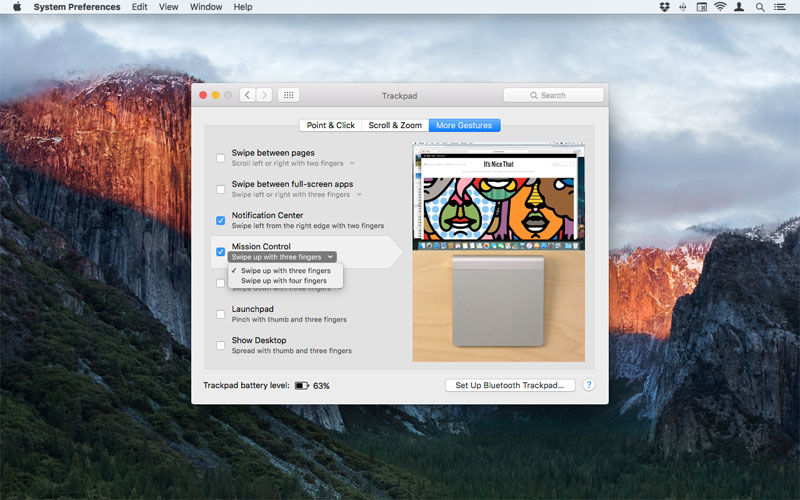
The net tab , ‘ More motion ‘ , provide a great deal of selection : Swipe between pages ; Swipe between full - cover apps ; Notification Center ; Mission Control ; App Exposé ; Launchpad ; Show Desktop . In each subject , activating the option will enable you to trigger the tag activity by perform the associated gesture , for example accessing Launchpad by squeeze with a thumb and three fingers . In the grammatical case of the swipe setting , Mission Control and App Exposé , there are substitute gestures available , although if you take a setting that crash with an existing one , the unexampled choice will be activated and the other will be disabled .
notice that comparatively modern Apple hardware is importantly more nuanced in terms of its capabilities than the configurations you find within System Preferences . BetterTouchToolis deserving checking out if you want to try out with additional and more complex gestures for check your Mac via its trackpad .
show next : How to use the trackpad on a Mac
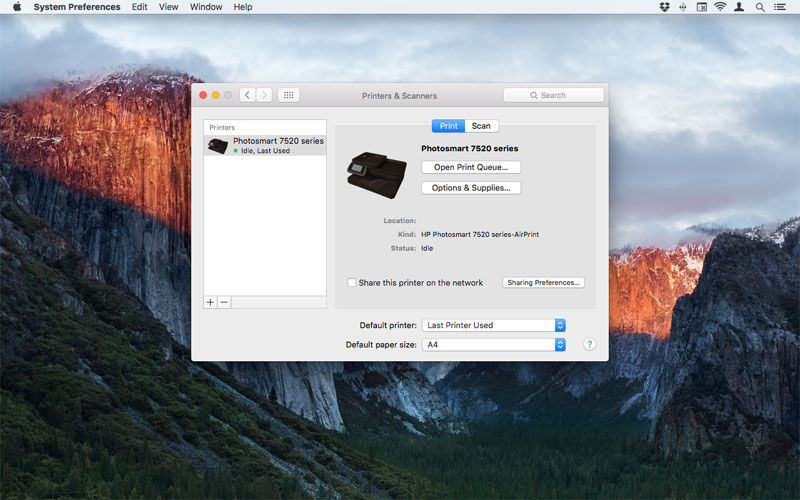
Printer & Scanner options
ThePrinters & Scannerspane is used to set up printers and scanners , define nonremittal configurations for use , and to entree option for a selected equipment . The default option alternative are delimit using the two menus at the base of the window , and enable you to choose a printer ( ‘ Last Printer Used ‘ or a specific equipment ) and paper size . The initial survival for the latter of these will differ by part ( US Letter , A4 , and so on ) .
Otherwise , this pane will begin biography empty . Clicking the + button enable you to lead off adding a printer or image scanner . The process of installation may vary by model and eccentric of connection .
For reasonably New computer hardware , you may find macOS is adequate to of very quickly installing a wireless pressman that you ’ve already connected to your web . In such vitrine , the printer can be tot up by choose it from the list ( although networked printers will sometimes take a few second to look after the window is first spread out ) and clicking Add . If necessary , macOS may require permit to download software for your printer ; click Install if such a dialog look .
When working in an office set - up , you may need to use the IP or Windows tabs instead . The former gives you fields for entering the IP telephone number of a printing machine and the protocol to use , along with the name and location of the printing machine . The Windows tablet is for accessing printer installed in a Windows workgroup environment . Note that if you have virtualisation software put in , you may find representative of your existing printer within this tablet . There is patently no need to install it a 2nd time .
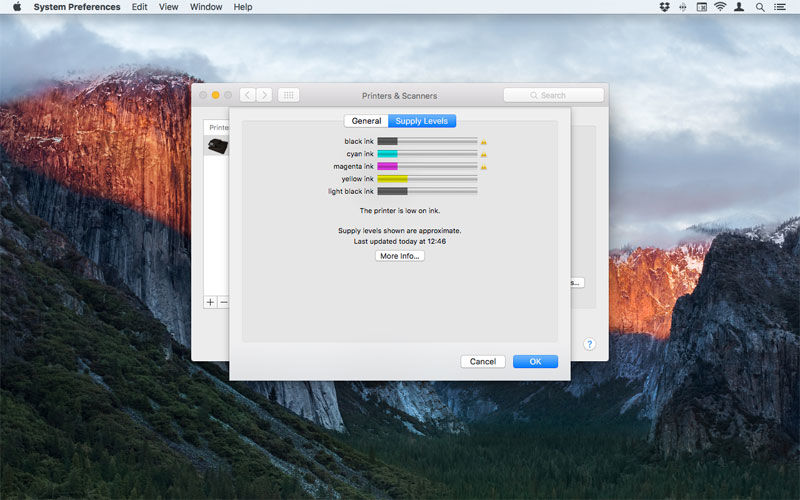
Once a printer is establish , pick out it from the list and you ’ll see its information ( name , kind and status ) . The ‘ candid Print Queue ‘ button start the printer ’s chore windowpane ; ‘ Options & Supplies ‘ will give you details about the printer , enable you to shift its name under the General chit , and admittance ink levels under Supply Levels . Some printer may extend further buttons , include website link , Driver ( for details about the printer number one wood that ’s in use ) and Utility , which spread a freestanding printer app .
Towards the foot of the window is a checkbox for divvy up the pressman on the internet . Select it to do so .
If your gadget also happens to be a scanner , you will see separate Print and Scan tabs . The latter leave an exposed Scanner clit that establish the received macOS scanning interface .
Read next : How to make any pressman work with AirPrint|How to impress from an iPhone or iPad|Best pressman for Mac|How to set up WiFi publish from a Mac
Sound options
The effectual pane is where you specify organisation alerting sounds , and options for audio remark and outputs . Accordingly , it has three pill : Sound Effects , Output and Input .
The large section of theSound Effectstab enables you to select an alert speech sound . blue funk is the default option ; Sosumi will belike be a fun option for Mac veteran , give its Mac bone roots . you could add your own alerts by placing custom AIFFs into ~/Library / Sounds ( for just your own account ) or /System / Library / Sounds ( for all accounts ) . You ’ll need to restart System Preferences to access custom sound from the carte du jour .
Below this pane are options that affect the awake sound . ‘ Play sound effects through ‘ enables you to limit through which output you ’d like alerts trifle . This defaults to your choice of sound output machine , but can be overridden by selecting an alternate option ( for example if you want alerts to play through your Mac ’s speaker and not a headset you ’re using for gambling ) .
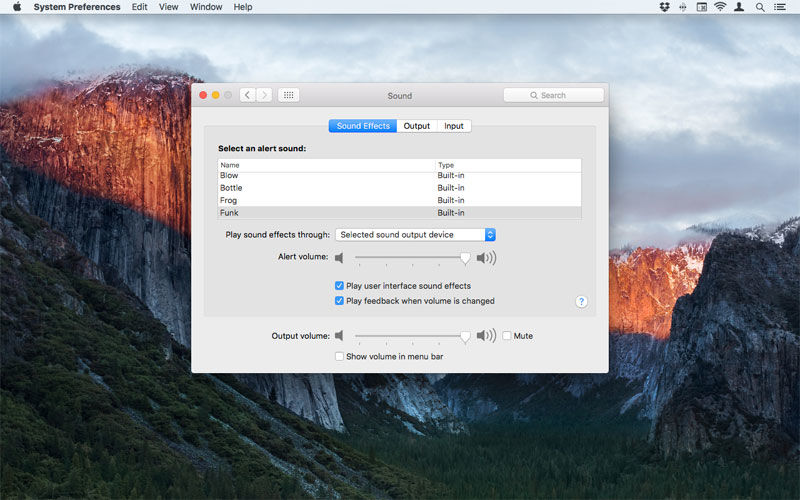
The alert volume level can be aline to befit , using the slider ; and with the checkboxes , you may delimit whether user interface sound effects are make for ( such as dragging something to the Trash ) and whether you get audio feedback when changing book using the keyboard ’s medium Key ( F11 and F12 )
At the substructure of the windowpane is a global volume slider and mute checkbox ( F10 is the keyboard alternative ) , along with a button for displaying the Volume computer menu - bar duplicate , which enables you to change the volume by clicking it and dragging the slider .
depend on your transcription software package , this superman is deserving being aware of if you line up recordings too subdued ( input level too small ) or distorted ( too high ) . When using the home mike , you ’ll also get an option to use ambient noise reduction , which attempt to reduce background haphazardness . get out this on , unless you ’ve a good reason to deactivate the choice .
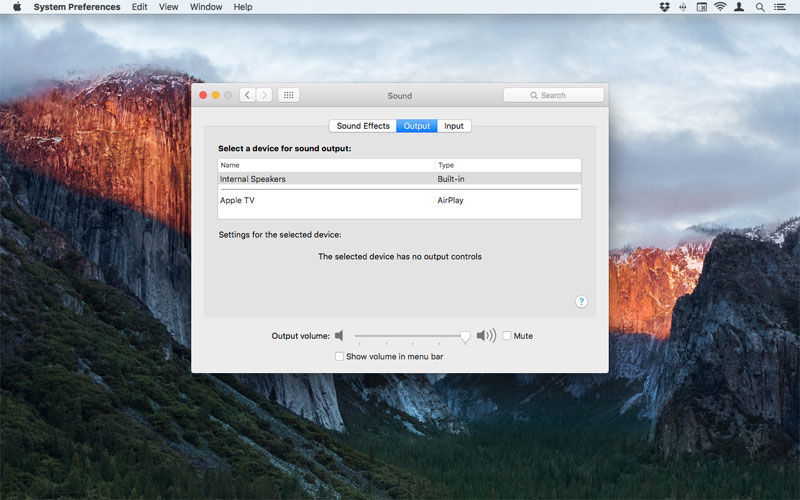
It ’s also deserving see that macOS is n’t always especially thinking regarding whatever you ’ve plugged into your Mac . With USB sound devices , it will set about to correctly identify them and exhibit their names within System Preferences . However , if you employ a received stereo minijack jumper lead to connect international speakers or output your Mac ’s audio to an amp via the Mac ’s phone socket , macOS has no way of fuck this , and so that output will just be called ‘ headphones ’ .
Note that you postulate n’t access System Preferences just to perform quick switches of outturn and input signal audio source . With the aforementioned menu - bar extra activate , Option - dawn it and rather of the mass slider , you ’ll see a list of useable output and input twist ; to switch to one , just choose it in the menu . AirPlay devices will be badged with the familiar icon , differentiating them from other sources . translate : Best Mac for musician
Ink options in macOS
Relatively few Mac user will ever see theInk System Preferencespane , because it postulate a graphics tab that uses a pen - like style . Once such a peripheral equipment is bind to the Mac , the pane look after Sound . When opened , you’re able to change state on handwriting recognition , or use four tabs ( options , Language , Gestures , Word List ) to define options .
When handwriting recognition is on , the Ink window appears , with buttons for toggling ‘ write anywhere ’ and your Mac ’s pointer , selecting mapping keys , chess opening and closing Ink ’s pad of paper ( which itself has writing and drawing buttons at the bottom pull up stakes ) , actuate Help , and returning to the Ink loony toons in System Preferences .
In scope , you determine your hand spacing and whether you require Ink to work in any covering ( rather than just Ink ’s pad ) . Pen options enable you to break to switch back to mousing modal value , or to only Ink when a specific push is held . ( This may jar with your tablet ’s stage setting , at which point you ’ll be prompted to make relevant change . ) you may also set an alternate face for Ink ’s pad ( pick out from Apple Casual , American Typewriter Bold , Didot and Monaco ) , and define whether to expose the Ink window and bill of fare bar extra .
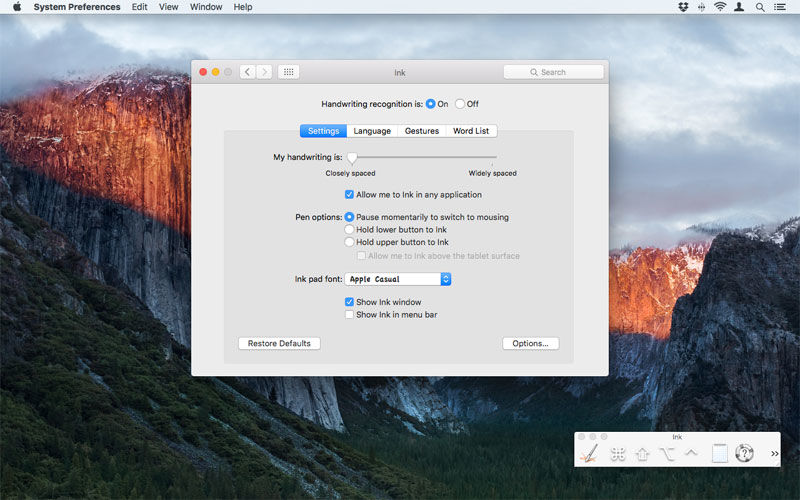
get through the Options button and you get at further options , to define how rapidly handwriting is recognised , the distance the pen make a motion before you set out ink , and how long the pointer must rest still before revert to computer mouse mode .
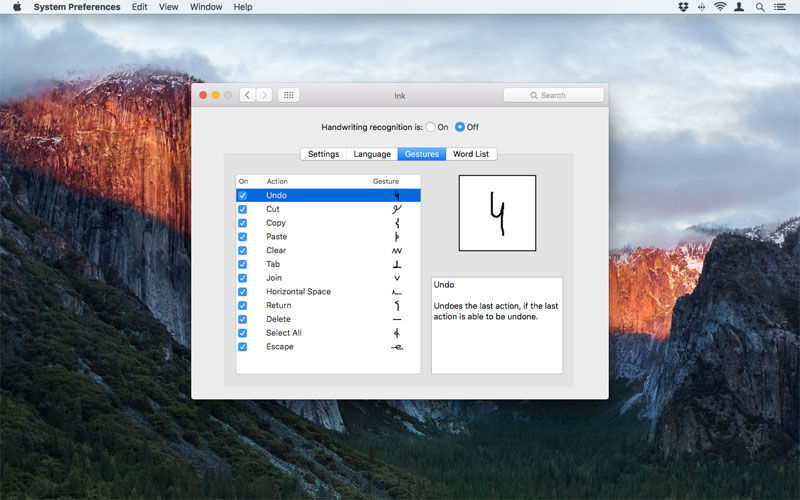
The other three tabloid have rather fewer preferences . spoken language defines the voice communication Ink is set up to recognise ; motion sketch gestures you could use to perform system actions or insert character , which can be disabled or activated by snap the checkboxes ; and Word List enables you to lend rare words that Ink is then supposed to accredit ( but , during testing seldom managed ) .
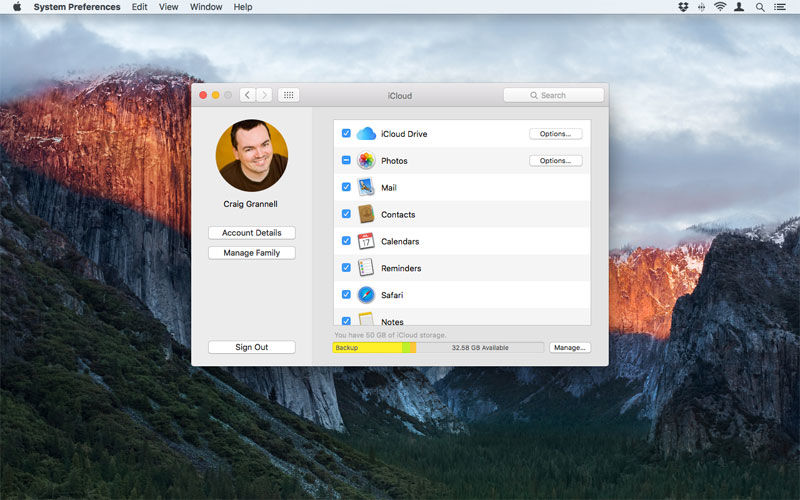
iCloud options
Using the iCloud dot , you manage your details for Apple ’s iCloud religious service and also the components that are activated on your Mac . If you have n’t sign on in , the pane will simply be two fields – Apple ID and password – and a Sign In button .
Once signed in , you ’ll see your embodiment , username and iCloud email address to the left of the pane , along with Account Details and Set Up Family / Manage Family push button .
Click Account Details and character in your password to realise access to a sheet that enable you to cut the following : your name ( under the General tab ) ; e-mail address and other agency of contact , primary postal and e-mail marketing preferences ( Contact ) ; security details , including your birthday , password , security motion , and rescue email address for an emergency account reset ( security system ) ; Apple equipment using this Apple ID ( Devices - requires verification to access code ) ; and elementary payment method ( Payment ) .
place Up Family / Manage Family , respectively , enable you to place up or make out family sharing . In the Family Members tab , practice the + button to tote up new category members by direct them an email invite . For a child without an account , you cancreate a young Apple IDfor them .
To remove a member from communion , select them and click the – button . you’re able to also stop family share entirely by cluck Stop Family Sharing and then confirm this choice in the sheet that seem .
The My Apps & Services lozenge is new to macOS High Sierra , and enable you to fine - tune how apps and servicing are apportion . In each guinea pig , choose a family from the sidebar , and make your adjustment consequently .
The four categories are Purchase Sharing , Apple Music , iCloud Storage , and Location Sharing . iCloud Storage is notable , because it enable family members to partake in iCloud space , rather than everyone pay off separately . And although location sharing is n’t new , it is new to the Mac – antecedently , permission for this was give in iOS apps .
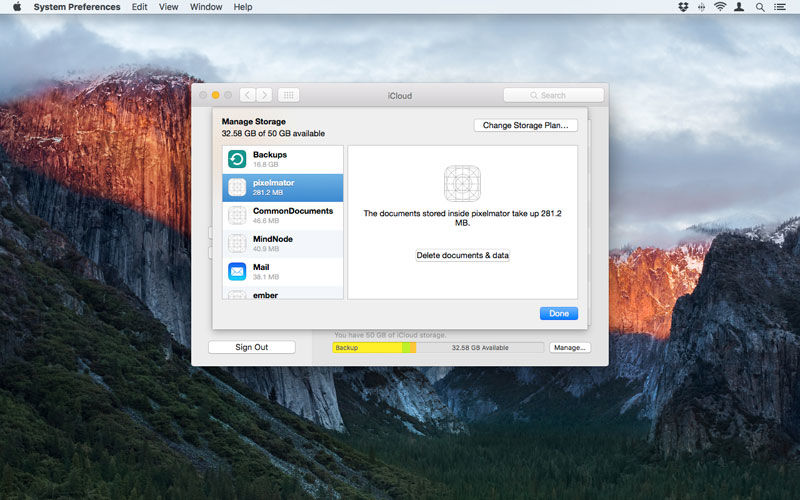
Underneath , a bar details the status of your iCloud store , for which Apple provide 5 GB for free ( and , we retrieve , could do with being a act more generous ) . If you take more space , clack Manage and you’re able to delete live back - ups from iOS devices , or specific app information .
Alternatively , penetrate Buy More Storage and select an alternative to interchange your iCloud storage programme . For 79p monthly , you get 50 GB in amount ; £ 2.49 gets you 200 Gi ; for £ 6.99 , you get 2 TB . you could later on downgrade if you no longer need the extra storage . Depending on your location , you may receive a partial repayment for any time left to run on your current subscription plan .
If you decide you do n’t want to use iCloud at all on your auto , click Sign Out . However , if you ’re using an iCloud report and password to lumber in to your Mac , you ’ll then have to snap Stop Using iCloud and create a new password specifically for the Mac .
Internet Accounts options
The Internet calculate pane defines your online story at the organization level , enabling service and apps to cabbage into them with your permission , potentially save you typing in the same usernames and passwords sentence and sentence again . If you ’ve ready up iCloud already on your Mac , it will appear in the sidebar . To the right , you ’ll see a list of democratic services you’re able to add an accounting for .
To add a new report , cluck on a logo and a sheet will ask for information that ’s relevant for that especial service ( usually a username and password , but sometimes other details too ) . On adding your detail and clicking Next , you may see an overview regarding what the servicing will be earmark to do with your information . For deterrent example , signing into Twitter allows you to post photo and show links from your timeline in Safari ; ratify into Facebook and data will be integrated with Contacts and Calendar .
Once accounts are make , they can be take in the aforesaid sidebar . Doing so dilute their selective information into the area where the service buttons are otherwise exhibit , enable you to update their shape . For example , Facebook provide the mean to disenable the account or just its connection to Contacts and Calendars , along with clit for grabbing new visibility photos and upgrade your countersign and news report verbal description . Twitter has a release for update details in Contacts , and text fields for refresh your password and account description .
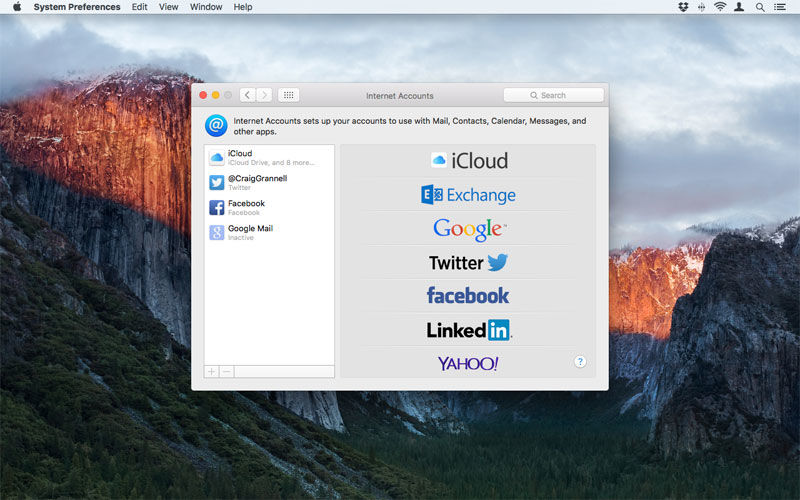
Any configured electronic mail accounts give you setting for update the name , description and word , and apps the bill is used with ; behind an Advanced button , there ’s the means to update other aspects of the account ’s detail , such as its IMAP hostname , the port wine used , and whether the write up uses SSL .
To delete one of the accounts altogether , take it in the sidebar and click the ‘ - ‘ clitoris . Be cognizant that in many cases , cancel an account may remove datum from relevant applications . Facebook offers a more nuanced access : you get the alternative of erase Facebook contacts or keep them , even if the bill itself is remove .
Extensions
propagation enable you to control and enable / disable installed Apple and third - party extensions that can be used to customize your Mac . You choose a category ( All , Actions , Share Menu , and so on ) from the left - paw side of the pane , and relevant detail are then list on the right - handwriting side . Each can be activate or disabled , severally , by checking or unchecking its checkbox .
Available categories and lengthiness will depend totally on what applications you have set up on your Mac . A new Mac will lack third - party reference . However , set up the likes of Dropbox and Fantastical and you ’ll see additional pick . Photoslists put in extension for editing photo .
The item categories are square . Alllists all installed extension and groups them by app . Actionslists content extension , such as Apple ’s own Markup , used for annotating imagination in compatible applications ( like Mail and TextEdit ) when you oscillate the cursor over an picture and select Markup from the pop - up menu . Finderlists extensions that directly integrate with Apple ’s Indian file manager , such as Dropbox . Share Menuenables you to curb what appears in the part menu establish in supported apps , like Safari and Finder . AndTodaydetermines which widgets are available in Notification Center ’s Today view .
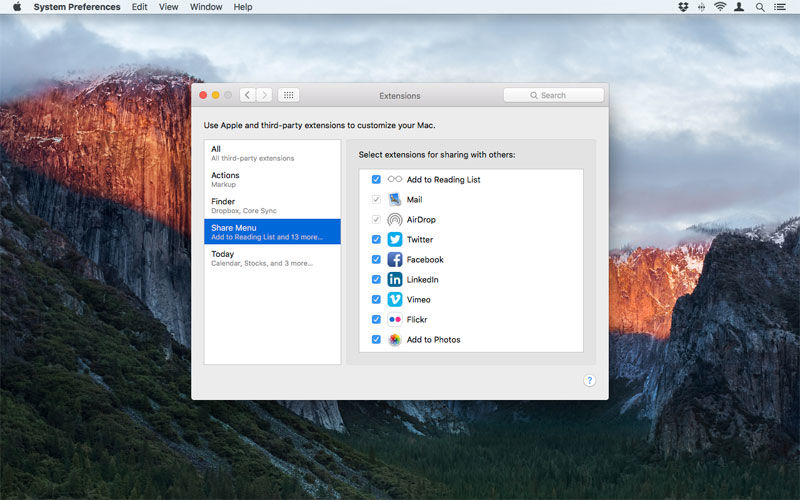
In all cases , disable an extension in System Preferences straightaway makes it unavailable scheme - wide . Note that app - specific extensions , such as those for Safari , are not yet listed in this superman .
Bluetooth
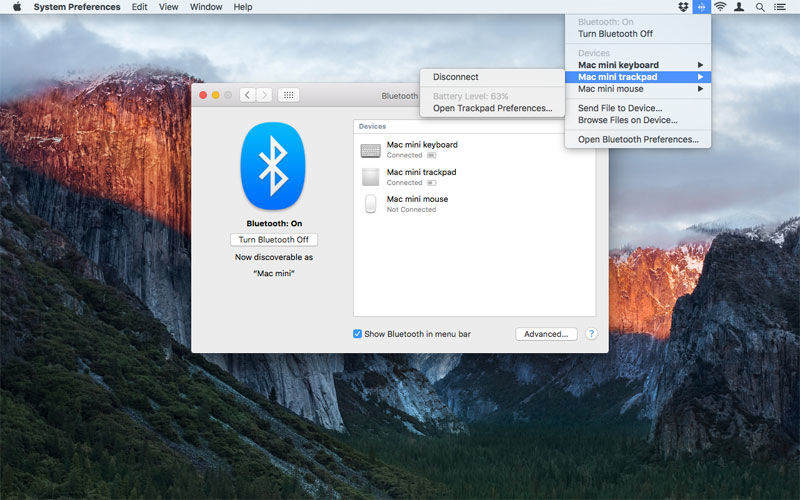
The Bluetooth pane is used for keep in line any Bluetooth devices your Mac is couple with . Using the button under the huge Bluetooth logotype , you’re able to turn Bluetooth on your Mac on and off ; when it ’s active , your Mac ’s name is displayed under the button . ( You may call for to know it when trying to associate certain hardware . )
The principal part of the panel lists gimmick paired with the reckoner and their current status . Hover the cursor over an item and a cross button appears , which when tick slay the item from the list . Note that if you remove an item and then need to use it later , you ’ll want to mate it again with your Mac .
At the bottom of the pane is a checkbox that enable you to show Bluetooth in the computer menu cake . This menu extra leave a faster mean value of turning Bluetooth on and off , along with enable you to connect / disconnect hardware and ascertain its battery point . It can also be used to send single file to connected devices and graze files already on them .
TheAdvancedbutton ply a few further options : afford Bluetooth Setup Assistant if no keyboard is detected at startup ; doing the same if no computer mouse or trackpad is detected ; and allowing Bluetooth devices ( such as a keyboard or mouse ) to wake the computer .
Sharing
The Sharing panelling opens up various aspect of your Mac to other computers on the web . The top of the dot shows the computer ’s name , which is editable , and the left - hand surgical incision lists services useable for sharing . mark off a checkbox to touch off the avail . On selecting a service ( regardless of whether it ’s active ) , its options appear to the rightfield .
DVD or CD Sharingenables you to partake in a establish - in or connected optical drive across the connection . This is utile if you ’ve a new Mac lacking a effort but an older one that happily takes atomic number 48 and DVDs . Note that datum broadcast between machines is not encrypted and you may have the computing gadget alert when someone else tries to use the effort .
Screen Sharingenables the Mac ’s projection screen to be shared . The ‘ Allow approach for ’ section of the master pane provides control over who can get to the shared concealment : all exploiter , or specified users and groups , added or removed using the + and – button . The ‘ Computer options ’ button provides access code to allow anyone to request access , and to allow VNC user control with a specify password . When Screen share-out is active , the divvy up Mac can be found under ‘ equipment ’ in the Finder sidebar of other machines ; clicking ‘ Share Screen … ’ begins the share-out process .
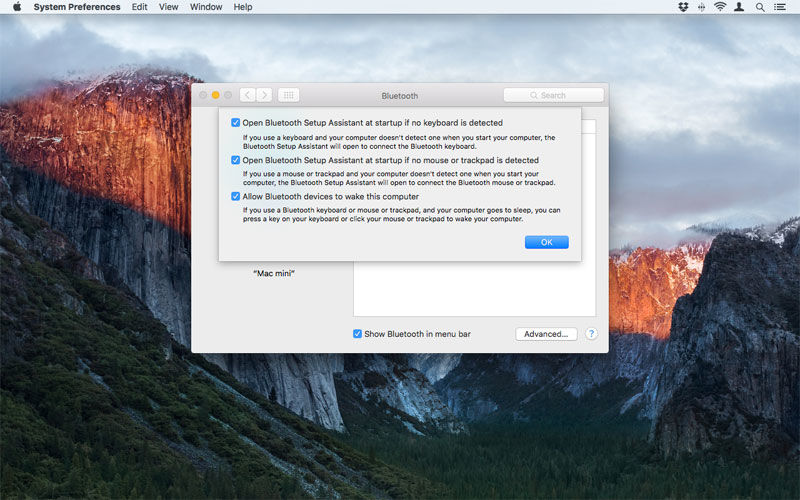
Here’show to deal Macs on a Windows - based web .
File Sharingactivates a Mac ’s Public Folder , which has a Drop Box into which anyone on the connection can drop files . ( Once sent , sound out files are not visible to the transmitter . ) The ‘ pick … ’ button in the System Preferences Zen opens a sheet with options for activating or inactivate connexion types , and the ‘ Shared Folders ’ and ‘ exploiter ’ panels , respectively , optionally enable you to deal extra folder and ply various access types to specific user or group . Connect via Finder ( select the computing gadget in a networked Mac ’s Finder sidebar , then click ‘ associate As … ’ ) with relevant username / watchword certificate and you could sail all of the Indian file / folder for the relevant account .
Printer Sharingprovides the way for sharing a affiliated printing machine across the connection . Aside from a push to open up the Printers & Scanners dose , there are panels for printer you could share and to state which user are allowed approach .
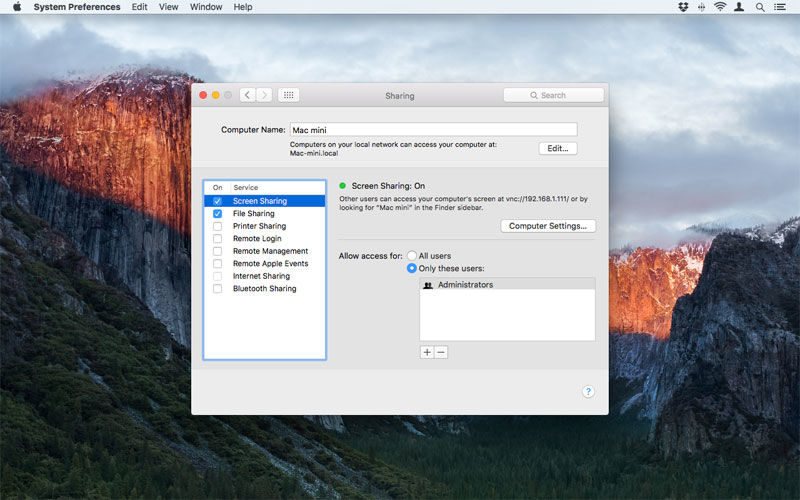
Remote Loginenables someone to access to the Mac from another estimator on the internet , using SSH and SFTP . Again , you’re able to define access prerogative for individual or groups .
Remote Managementworks with Apple ’s Remote Desktop , and is designed for people having to manage a web of Macs . There ’s the conversant field of honor for pose user memory access , but it has an extra Options button ( also seen when Remote Management is activated ) , which enable you to choose tasks remote user are allowed to execute . Click ‘ electronic computer stage setting … ’ and a sheet provides checkboxes for : showing Remote Management status in the menu saloon ; determining whether anyone may quest license to control the screen ; and stating a parole for VNC viewers . Four theatre of operations can have information tot up for show in a System Overview report .
Remote Apple Events , when activated on a Mac , allow applications programme on other Macs to beam Apple events to it . An event is a task being do on a Mac , such as opening a written document or printing . So with this option activated , an AppleScript running on another Mac on the net could potentially open up and print a document on your Mac .
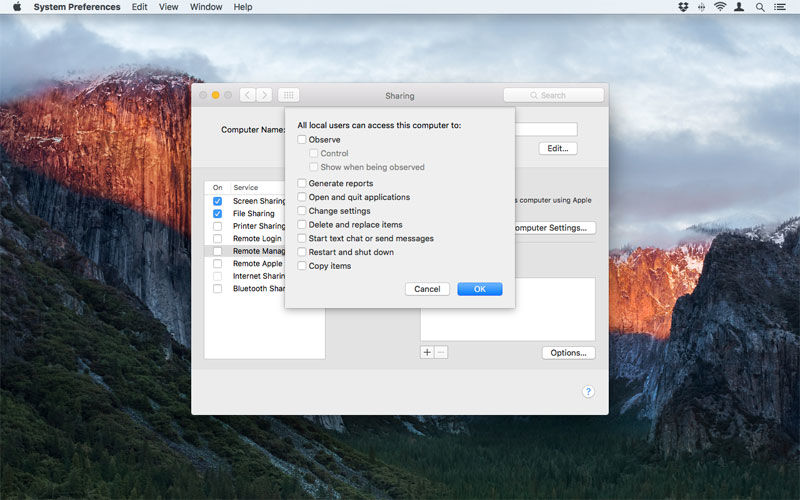
Internet Sharingmakes it possible to apportion a Mac ’s net connection from the seed pick out in the card to another Mac ’s port , the case outline in ‘ To computers using ’ . ( Sources , such as Wi - Fi and Ethernet will vary by Mac . ) This can be utile for computing gadget lacking connectivity , for model , sharing your Mac ’s Wi - Fi link over Ethernet to an former or damaged machine .
WithBluetooth Sharingactive , the Mac can share filing cabinet with other Bluetooth enabled devices . The first two menus square off what happens when single file are received ( have and Save , Accept and unresolved , postulate What to Do , or Never Allow ) , and where accepted items are saved . The 2d set of menus make up one’s mind what happens when other Bluetooth devices crop the Mac . you could select from Always Allow , Ask What to Do and Never permit , along with selecting a booklet others can range .
Content Cachingis new to macOS High Sierra . It ’s design to save bandwidth by storing local copy of specific capacity type ( including app and oxygen updates – Apple provide a full list ) , which can subsequently be shared locally with ‘ client ’ devices ( other Macs , and also iOS devices ) .
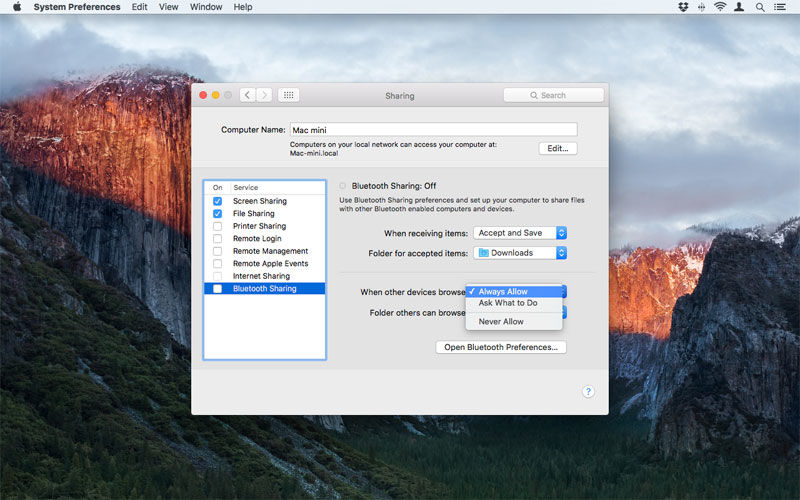
To twist on Content Caching , click its tickbox in the Sharing sidebar . In ordering to share content to iOS devices , you ’ll also need to tick ‘ parcel Internet connection ’ . notice that the USB devices will need to be connected to the Mac via USB . ( Apple also recommends the Mac sharing cognitive content be connect to the net via ethernet , and be plugged into the mains . )
flick the Options button to determine how large the cache size can get ( it default to Unlimited , which you might desire to reduce if your Mac has n’t got slews of space to give up ) . The stash location also starts out as your kicking volume – and is best left that way – but you may select alternating volumes if you wish .
Network settings in macOS Sierra
The web Zen is where you determine net preferences , enabling you to connect to the likes of wireless router or corporate ethernet . It ’s one of the more intimidating System Preferences pane , due to the right-down number of available context and its relative complexness . However , the Brobdingnagian legal age of exploiter will rarely if ever have to venture into it , since more often than not just typing in a Wi - Fi password is all the networking effort most need to make .
The pane is essentially cleave in three . At the top is theLocationmenu , which default to Automatic , but which can be used to limit specific set - ups for unlike places , such as place , study , or regular overseas haunts . The left over - hand pane list available connection case ( or ‘ serving ’ in Apple language ) , and the declamatory part of the dot delineate the position and preferences related to the currently selected Robert William Service . The foot of the window houses three button : ‘ attend me … ’,RevertandApply .
If you only ever use your Mac in one place , with one connection type , there ’s no need to use Location . However , if your Mac needs to link to multiple internet with options that are more complex than simply selecting a different Wi - Fi internet from the computer menu barroom , defining multiple locations makes sensation .
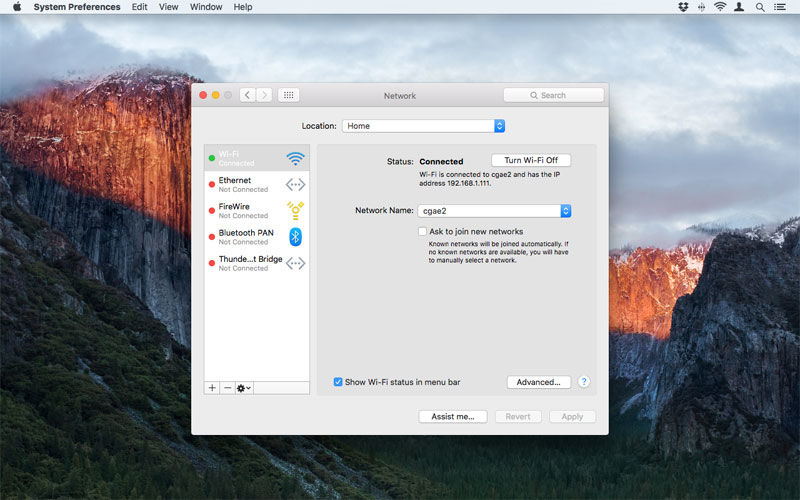
To do so , select the menu and then ‘ Edit Locations … ’ . Use + to add a unexampled location , – to edit an existing one , and the sprocket button to duplicate or rename the presently take position . With more than one position defined , a Location bill of fare appear in the system - wide Apple menu ; select an option there is usually fast than using the equivalent carte du jour in System Preferences .
As remark , the unexpended - hand back breaker lists available service , such as Wi - Fi , Ethernet and FireWire . ( The specifics will depend on your Mac ’s ironware . ) A traffic light system denotes the position of a service : fleeceable for attached , red for off , and yellow for when on but not connected for some grounds . On the last of those , text beneath the service ’s name may list a cause for the want of connection .
The bottom of the pane has + and – buttons for , respectively , creating and take away service . On create a new one , you take an interface case and the service ’s name . Deletion is quick but can be undone using the Revert button . The cog button enable you to double or rename the selected service , or to make it inactive . you’re able to position the service ordering , to prioritise sealed connection type . The other options let in the agency to import and exportation configurations , andManage Virtual Interfaces , for editing a lean of such interfaces .
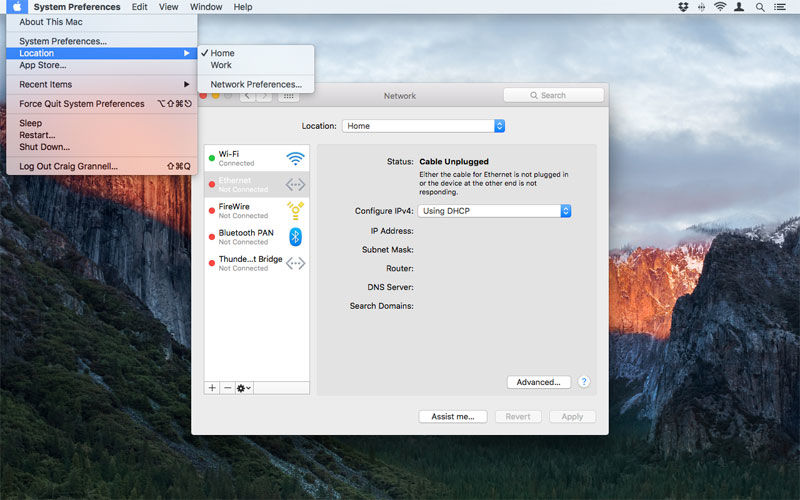
Any time one of the services is select , its position and relevant contour menus are listed in the tumid pane to the right of the services inclination . For example , select Wi - Fi and you ’ll see its connector condition , a push for turning it on and off , and details regarding the net ’s name and the Mac ’s IP address .
Below this , there ’s a menu for selecting networks , a checkbox that determine whether the Mac ask to link up young meshing rather than associate to known ones mechanically , a checkbox for showing Wi - Fi position in the menu cake , and an ‘ in advance ’ button . By direct contrast , select Ethernet and you ’ll get the religious service ’s status and the means to configure mesh mount . ‘ Using DHCP ’ is the default , but choose ‘ Manually ’ provides fields for inputting IP address , subnet masque and router item .
The ripe clit open a multi - tabbed plane that enables you to drill down into the fine contingent of connection connections . useable tab will depend on the take service , but may include : Wi - Fi , TCP / IP , DNS , WINS , 802.1X , Proxies , Hardware and Bridge Status .
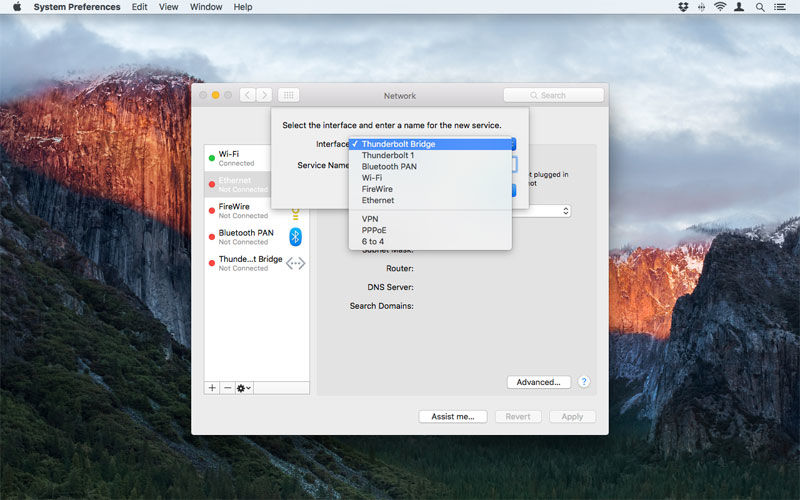
TheWi - Fitab is the one exploiter are most likely to need at some item . It enable you to reorder known Wi - Fi networks , and it ’s respectable to hale most - used ones to the top , to avoid your Mac wasting time first search for the others when trying to get in touch .
you may select and delete any you no longer call for ( such as temporary airport , coffee bar and hotel connective you ’re unlikely to use again ) . The ‘ Remember … ’ checkbox when tick make it quicker to get at a web antecedently joined ( albeit with the potential to clutter up the leaning , as already mentioned ) . Subsequent checkboxes are in the first place interested with restricting electronic internet meddling by user , and are only deserving trigger off in locked - down surround or for accounts created for inexperient user .
TCP / IPis the protocol used to plug in your Mac to the internet . Generally , connections will be automatic . However , if you ’ve been cater IP , subnet mask and router details to manually input , this is where you do so . The tab also includes a ‘ Renew DHCP Lease ’ release , which is worth acknowledge about , because it forces your Mac to renew your current IP speech ; this can be useful in circumstances when there are many devices on the web and there ’s a clash that recoil your Mac off of a previously static connection .
DNSserver details are generally leave automatically . DNS is how computers associate orbit figure ( like www.macworld.co.uk ) with numerical IP addresses . Some people prefer to overthrow default DNS mise en scene with the likes of Google Public DNS ( 8.8.8.8 and 8.8.4.4 ) , which can under some circumstances be fast . There are also service of process for circumventing geolocation blocks through using specific DNS configurations , thereby enabling you to access on-line capacity restrict to specific countries or get around blocking in sure territories . The DNS tab is where you ’d add such setting .
WINSmay be take if you connect to remote web that use NetBIOS gens ; 802.1X is used to hold admission and kick up security , and web admins will advise when you necessitate to tot up or rectify a profile ; and placeholder can be used to filter internet traffic – again , something only probable to be want in corporate environments , with you being assisted by an admin . Hardware displays your MAC Address electronic web identifier , and has a Configure menu that when fix to Manually enables you to adjust the MTU ( Maximum Transmission Unit ) setting .
When any change are made , snap Apply to confirm them . Now opine the next line is in three - metre - in high spirits neon alphabetic character with a claxon blazing alongside : do not make any changes to your internet context – and peculiarly the more esoteric ones – unless you know what you ’re doing . This is n’t a pane to sight about in , and you could find your Mac rather apace disconnected from the web and very alone on your office desk .
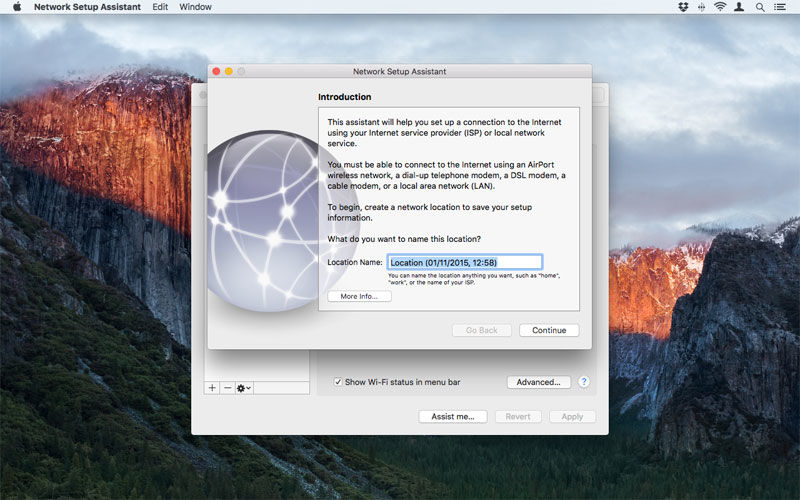
Still , if thing do go wrong , come home ‘ serve me … ’ might help . You get two options here : ‘ nosology … ’ provides checks regarding your current setting , attempting to squelch any electronic web issues your Mac might have ; and ‘ supporter … ’ launches web Setup Assistant , for walking you through the process of creating a new internet or local web connection . This option seem to be absent as of macOS High Sierra .
Setting up Touch ID in System Preferences
If your Mac has a Touch ID sensing element ( set up towards the right of theTouch Baron the2016 MacBook Pro ) , a Touch ID window pane will appear in the last row of System Preferences .
At the top of the pane are stored fingerprints – and you may already have one from when you do up your Mac . no matter , ‘ Add a fingerprint ’ begins the process of adding another . Enter your admin word and postdate the prompts – which mostly involve raising and lowering your digit . When everything ’s finish , click Done .
Up to three fingerprint can be salt away . Any existing one can be rename by snap the label below it and type something new . A photographic print can be erase by hover over it , clicking the crisscross , and confirm your decision – which can not be undone . We ’d recommend adding your thumbprint and also a print for an forefinger or gang finger : whichever can naturally and easily gain the Touch ID detector when your hands are in a stock typing position .
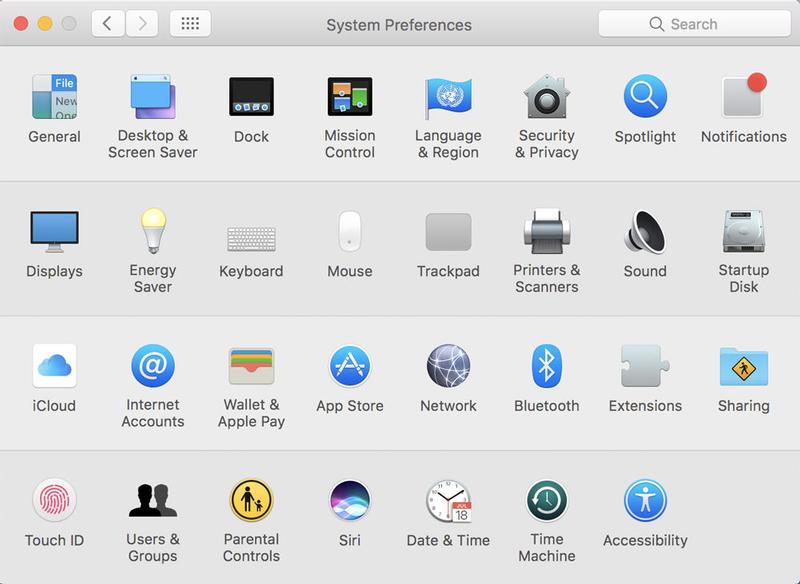
Below the prints are tickboxes that shape when Touch ID can be used on your Mac ; for unlocking it , using Apple Pay , and enabling purchases within iTunes , the App Store , and iBooks . Should you deselect any of these box , admittance / confirmation reverts to how it go on Macs without Touch ID , such as typing your watchword to unlock your Mac .
Users & Groups in System Preferences
The Users & Groups pane is where you create and qualify accounts for the current Mac . Even if the Mac has only one substance abuser , the power to create new accounts can get in ready to hand for troubleshooting ; however , for any Mac used by multiple parties , understanding Users & Groups is highly important from a security and Mac maintenance standpoint .
The window glass has a padlock at the bottom . In purchase order to make any changes to the pane ’s options , clack it and come in an executive ’s username and word .
Accounts are listed in the remaining - hand sidebar . The current user is exhibit at the top , and the others beneath , in the discussion section ‘ Other user ’ . For each user , you ’re shown their login image , account name , and account type .

take the current user ’s story ; the right - hand section of the window glass will offer two tab : Password and Login Items . Click Password and you ’ll see the score ’s image , which you may sink in to edit . A new image can be chosen from a built - in selection or from whatever you have in Photos .
cluck the ‘ Change Password … ’ button if you want to update the account ’s password . If the account use an iCloud word ( which ceased to be an optionb in macOS Sierra , you ’ll get the option to use a disjoined parole or to change the iCloud one ; on update a word , you ’ll want to enter the old one , compose a new one , affirm the Modern one , and add an optional hint . Any suggestion should be quite shadowy – do not type in something too nigh to the existent word , if you want your Mac to stay on unattackable .
At the bottom of this check is a button for opening the Contacts circuit card for the current report , and some checkboxes ; these announce whether the user can reset their password using an Apple ID , whether the drug user can administer the computer , and whether maternal ascendency should be enabled . These checkboxes will be greyed out ( and therefore can not be change ) unless the current exploiter is an administrator .
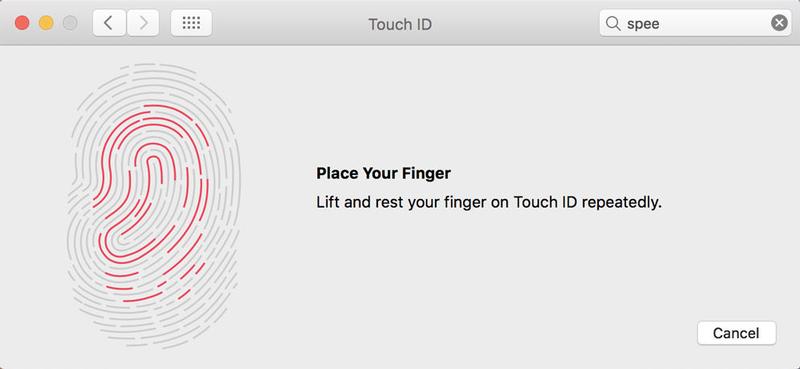
Under theLogin Itemstab , you ’ll find point that mechanically open up when the account logs in . Quite often , background utilities will be find here . New items can be added using the ‘ + ’ button and prefer an point from the plane . Applications are the most uncouth login point , although you’re able to also pick out document . be items can be withdraw by pick out them and clicking the ‘ - ‘ push .
Too many items in the list may ensue in slower Mac kickoff - ups and potentially even system struggle . If there ’s something in the list you do n’t recognize , look for it online and if you deem it unneeded , delete it from the list .
When an administrator is logged in , they have some control over other accounts . On choose one from theOther Userssection in the sidebar , they can perform a password reset , let admin accounts to reset the account watchword using an Apple ID , and on-off switch admin condition / parental controls . Note that if another user ’s account is currently logged in , it can not be selected in the sidebar .

administrator also have access to the controls at the foot of the sidebar , which are for defining login options , and for creating / deleting account . Select Login Options and you will see a number of things that can be changed . Automatic login is on by default for a new Mac , but is best handicapped for surety reasons ; doing so forces a password to be enter when logging in .
Beneath this is a setting for how the login window appears . The default option usher a list of users , one of which is clicked before a password is record . ‘ Name and password ’ is plainer and a petty more secure , since you must come in both the username and word .
Five tickboxes then cater a range of further preferences for the login window and account management .
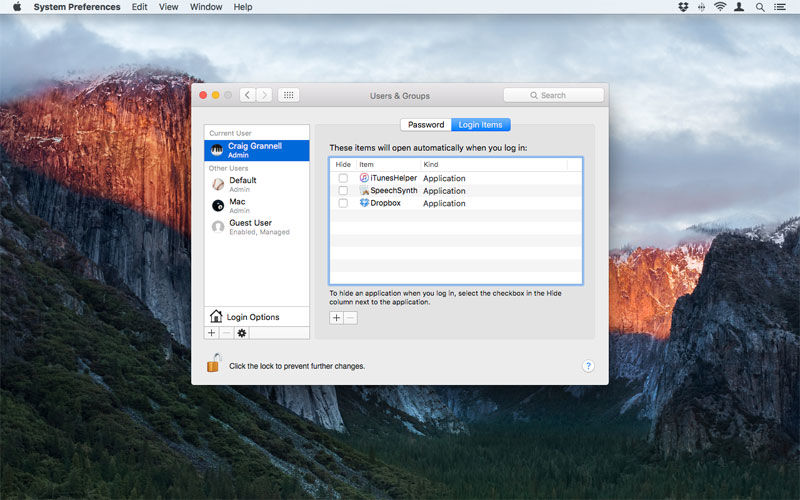
Show the Sleep , Restart , and Shut Down buttonsdisplays those release on the login screen;Show Input computer menu in login windowdisplays on the login screen the menu that enable you to exchange languages ( and therefore also keyboards ) , which is useful if people using the Mac require and are used to unlike keyboard layouts;Show password hintsdetermines whether hints are shown when a countersign is forgotten;Show fast substance abuser switching menuprovides options to localize a switching card in the OS decade menu barroom , and this can be displayed as the account ’s full name , report name , or just an icon ; and ‘ habituate VoiceOver in the login window ’ is ego - explanatory .
A push button beneath the tickboxes provides the means for entering the destination of an Open Directory Server or Active Directory Domain during login .
Creating & deleting accounts
Below Login Options are ‘ + ’ and ‘ - ‘ release , which , respectively , are for make and deleting account . Click ‘ + ’ to start the new story rag , in which you must first delineate the character of report : Administrator , Standard , deal with Parental Controls , or Sharing Only .
In all cases , you need to provide a full name for the account , an account name ( macOS will automatize this – turning the likes of Name Surname into ‘ namesurname ’ – but this can be overridden ; the final result will be the name of the account ’s rest home folder ) , and decide on the password that ’s to be used . Prior to macOS Sierra , this could be either an exist Apple ID / iCloud parole or Mac - specific one . As of macOS Sierra , only the latter is an option . clack ‘ make User ’ and the account will ordinarily be created within a few seconds . Creating a unexampled chronicle can also be a good idea if your Mac is being unknown . Login to the news report and see if the same issues occur ; if not , they ’re most likely touch to something on the original report ; if so , some other problem is to blame ( such as guileful hardware or software ) .
Note that within the ‘ New Account ’ menu there ’s also a Group selection , which only expect a name to be entered . On create a group , you add existing users as members . you’re able to then elsewhere assign shared data file access privileges to the mathematical group .
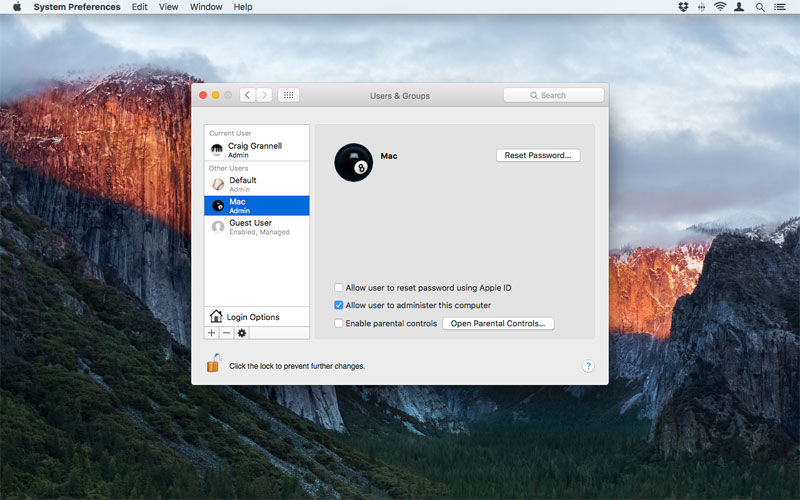
To delete a group , select it , click the ‘ - ‘ button and then confirm your choice . To delete an account , select it , click the ‘ - ‘ button , and then decide what you require to do with the account ’s home folder that contains all of the user ’s documents and data . you may save it to a disk image , leave the folder in space , or edit it totally . On relieve oneself a conclusion , click Delete User and macOS will do the opt natural process .
Note that if you ’re backing up your Mac , edit someone ’s rest home booklet may remove it from the backup , and so only select ‘ Delete the home folder ’ if you ’re certain you ( and/or the chronicle owner ) no longer needs access to the datum within .
last , the sprocket icon when clicked enable you to set a master countersign for FileVault , which can be activate in the Security & Privacy System Preferences pane . If the parole is forgotten , encrypted information within FileVault will be unprocurable .
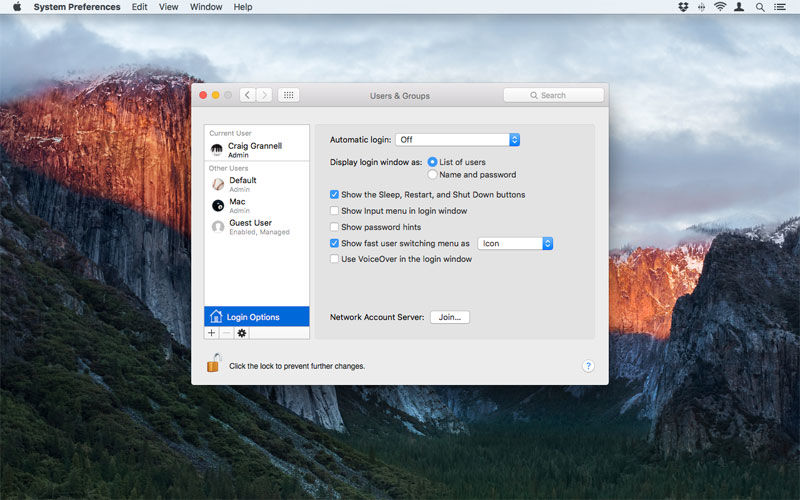
Parental controls
This System Preferences pane is for restrain accounts . Although it ’s in the main designed to circumscribe a tike ’s access code to sure apps , the connection , or the entire Mac , its various options have scope for wider use , for exemplar with the invitee account .
You ’ll involve to cluck the lock chamber and enter admin item to make any edits inside Parental Controls . Prior to run on an accounting , you’re able to optionally check ‘ Manage paternal controls from another calculator ’ ; this makes it possible to delimit any consecrate Mac ’s parental control preferences from the Parental Controls System Preferences pane on another Mac , sham you have relevant admin details for the outback information processing system .
If there are no bill to manage , you may create a new user account with parental control or convert the current account . If the current account is the sole administrator , you will first be prompted to create a substitution history .
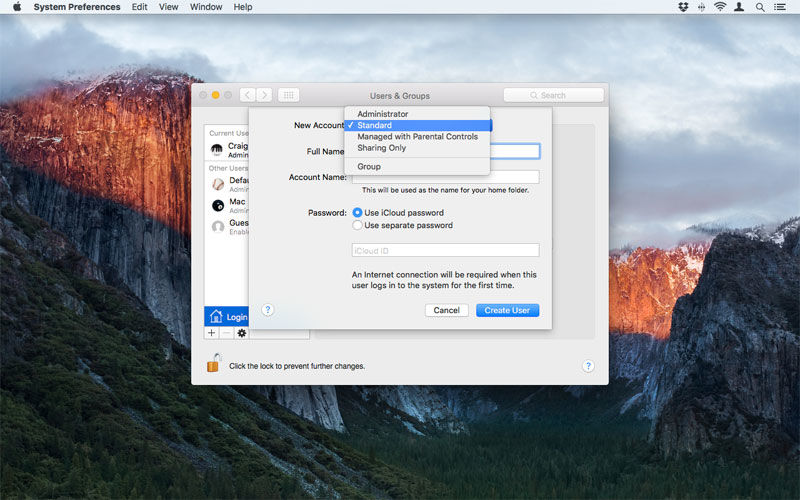
In theory , the battery-acid should pluck up existing account that can be finagle , but if it does n’t , choose the chronicle in the Users & Groups pane , tick ‘ Enable parental ascendency ’ , and then chatter ‘ unfold Parental Controls ’ . You should now see the Parental Controls pane with accounts in a sidebar . If not and you still get the first appearance screen , relinquish and restart System Preferences and reopen Parental Controls .
From the sidebar , you may then choose the Guest User chronicle or any received accounts on the Mac . Admin accounts can not have parental ascendence assigned to them . If other networked estimator allow ascendency to be managed remotely , they will be listed below the current data processor ’s accounts .
Using the ‘ + ’ and ‘ - ‘ button at the foot of the sidebar , you’re able to add a new accounting or withdraw an existing one , just like in Users & Groups . The cog release provide access to a fare for turn parental controls on / off for the current business relationship , copying its preferences , or glue antecedently copied preferences .

On selecting an account , you will see six tabs : Apps , Stores , Web , Time , Privacy and Other .
TheAppstab ’s first choice isAllow use of tv camera . This when disabled prevents the exploiter accessing progress - in cameras and also cameras in affiliated displays , but not those connected via USB .
The next two boxes , which are pre - checked , allow the user to bring together Game Center multiplayer game and add Game Center friends . Next , Limit Mail to let contactswhen combat-ready restricts the user to adjoin ( via Mail ) only specific sanction e-mail addresses . ClickManageto open a sheet for adding these touch .
you could optionally checkSend requests toand then type your email address in the adjacent field . On doing this , any attempts by the user to send an email to a non - approved electronic mail reference will be sent to you . To populate the sanction list , use the ‘ + ’ button to add contacts . As you start typecast in a name , OS X will make proffer based on masses already in the Contacts app . apply the down cursor to select one such name and Return to confirm ; alternatively , you could manually type a name and then tap Tab to add the email savoir-faire . Once you have a listing , select any name and gain ‘ - ‘ to remove it .
Limit Applications on this Mac , when combat-ready , provides the way to restrict the selected account ’s access to apps . say apps can be define in theAllowed Appslist .
Webis about specify website entree restrictions . ‘ leave unrestricted access code to websites ’ reach no changes at the system level . ‘ taste to trammel access to adult website mechanically ’ attempts to do what its verbal description says , and enable you to use ‘ Customize … ’ to always allow or never allow specific situation . We should notice that automatise filter are problematic , and often end up with simulated positive while have many sites through the net . For younger kid , manage their World Wide Web - browsing sessions , or make role of ‘ Allow access onto only these websites ’ , which block anything not on the list below . This is predefined with a routine of dependable internet site , but you’re able to take out any of them and/or bestow your own .
Storesprovides the means to singly handicap the iTunes Store , iTunes U and iBooks Store . Further scene make it potential to restrict specific types of media : music with explicit capacity ; movie up to a defined age rating ( U , PG , 12 , 15 , 18 ) ; TV display , Apps ( 4 + , 9 + , 12 + , 17 + ) , and books with denotative sexual content . Be mindful that Apple can be quite conservative with app ratings – apps that enable web browsing often end up as 17 + ; and so you may be dependable off using the Apps section to assign which apps the user has access to .
Timeis for defining memory access to the Mac as a whole . Using the checkboxes , separate usage limitation can be set for weekday ( Monday through Friday ) and weekend ( Saturday and Sunday ) , and these are ab initio , severally , three and five time of day . 30 minutes is the minimum scope for both , and eight hour is the maximum . With the Bedtime checkboxes , you may prevent admission during defined hr for ‘ School night ’ ( Sunday night through Thursday night ) and ‘ Weekend ’ ( Friday night and Saturday dark ) .
Privacylimits admittance to the user ’s data . The ‘ Manage Privacy ’ button takes you to the Privacy lozenge within Security & Privacy . The ‘ allow for changes to ’ checkboxes let you lock subsist background for specific data types and services , preclude apps from make any change to them .

Otheris a snap - bag of functions and characteristic you could turn on or off , depending on the user and your own preference . ‘ Turn off Siri & Dictation ’ occlusion enable Dictation in the Dictation & Speech System Preferences window glass and Siri in the Siri pane . If ‘ Disable editing of printer and scanner ’ is on , the user can not adapt pressman and scanner background . ‘ Block CD and DVD sunburn in the Finder ’ stop the user burning a CD or DVD – as if any kids would want to do that these days anyway .
Restrict explicit speech in Dictionaryis one for the purists , blockade so - shout ‘ inappropriate ’ content in the Dictionary app and related sources OS X may leverage , such as Wikipedia . ‘ Prevent the Dock from being modified ’ discontinue the substance abuser changing the Dock in any elbow room .
AndUse Simple Findergives the drug user a simplified desktop , aimed at the young or inexperienced . This invalid windows in Finder , and only reserve access to apps you limit within the Apps check of Parental Controls . The Dock is restricted to three booklet : My Applications ; Documents ; partake . A user whose account is set up to apply round-eyed Finder can only swap to the full version of Finder via Finder > Run Full Finder when build up with admin details .
Finally , the ‘ Logs … ’ button opens a weather sheet that details app and web activity . Said activity can be show for ‘ today ’ , ‘ all ’ , or time period pasture from a week to a twelvemonth . The two tabs , ‘ covering ’ and ‘ vane ’ , provide admittance to relevant lists and chart . choose point can be opened using the ‘ Open ’ button .
Siri
Siri was introduced to the Mac with macOS Sierra . It enables you to talk to your Mac and have it perform basic tasks . In the System Preferences pane , Siri can be enabled or disabled using the ‘ Enable Ask Siri ’ checkbox under the expectant Siri logotype .
To the rightfield , selection survive for fine - tune how Siri ferment , and how you interact with the feature article . you may change the keyboard crosscut used to trigger Siri , and switch to a different vocalism input , depend on what microphones are usable .
Under ‘ Language ’ , you could swop to a different language . By default , this setting will be based on the linguistic process chosen for your Mac , and the same is truthful for Siri Voice . However , you may temporarily – or permanently – select a new language at any point , and many of these offer variant . For example , there are four versions of Chinese , three of German , and a whopping nine of English .
On selecting a language , the Siri Voice menu updates automatically to number suited choice . With English , you may switch between British , American and Australian voices , each of which offers a virile and distaff variate .
The final two option shape whether Siri offers voice feedback ( as in , spoken response – with this off , you just get write answers ) , and whether the Siri image is displayed in the menu bar .
You also have the option of selecting which apps Siri can learn from , by click ‘ Siri Suggestions & Privacy ’ . Click ‘ About Siri & Privacy ’ to acquire more about Apple ’s insurance policy in this arena . The short of it is much of Siri ’s eruditeness is done on - equipment , and any information sent to Apple ’s servers is anonymised . However , if you ’re feel a bit tin - foil hat , you’re able to invalid the learn checkboxes , at the likely disbursement of Siri being increasingly personalize as time goes on .
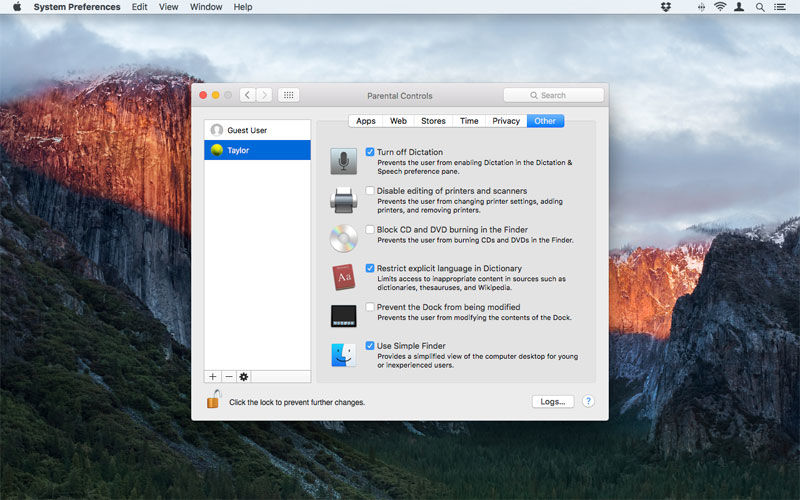
App Store
This pane determine the demeanour of apps you ’ve installed from the Mac App Store . If you ’re not using an admin news report , you ’ll take to sink in the lock to make any changes .
Within the pane are six tickboxes . ‘ Automatically check for updates ’ does what it describes , and when active enables you to release on or off the next four checkboxes . The first downloads newly available update in the background ( keep this on unless you ’re somewhere with a datum cap , in which case temporarily disable it ) . The next three are for instal app updates , macOS updates , and system of rules data files / security measures update .
The other checkbox is for automatically downloading apps buy on other Macs . This is useful if you utilise the same apps across a kitchen range of Macs , but again beware of bandwidth considerations and also storage if you happen to work with apps that take up a big amount of space .
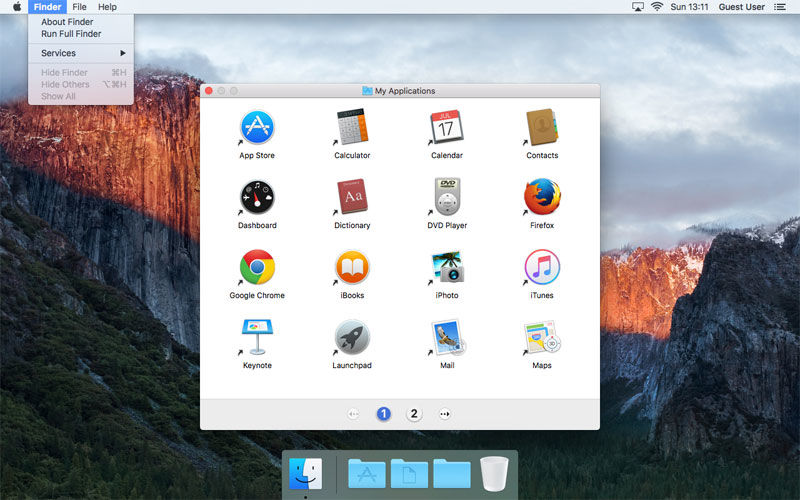
At the foot of the windowpane you ’ll see when the most recent check for updates was made , and a push to ‘ Check Now ’ . If the Mac knows update are available , you ’ll get a ‘ Show Updates ’ button , which charge the Updates tab of the App Store app .
Date & Time
The Date & Time pane is where you adjust your clock , date and time geographical zone . As of El Capitan , you need to add an admin parole to edit its preferences .
Under theDate & Timetab , you ’ll see a calendar and clock , above which is a checkbox . If the checkbox is ticked , your Mac ’s time and date will be set mechanically , using the Apple server selected in the bill of fare . If , for whatever rationality , you desire to reverse this ( such as during a barrage topic , which is causing your date to keep reseting ) , untick the checkbox and utilize the card to change the time and day of the month stage setting . A button at the bottom of the dose sends you to the Language & Region pane , for amending date and metre formats across your system .
UnderTime Zone , you get a world map and an outline of your currently selected timezone . If the checkbox in this tab is select , your timezone will be chosen mechanically , based on your current position . Again , this can be overridden – untick the checkbox and then tap a point on the single-valued function . macOS will estimate the localisation . If you need to fine - air it , you may typewrite a spot into the ‘ Closest City ’ theater .
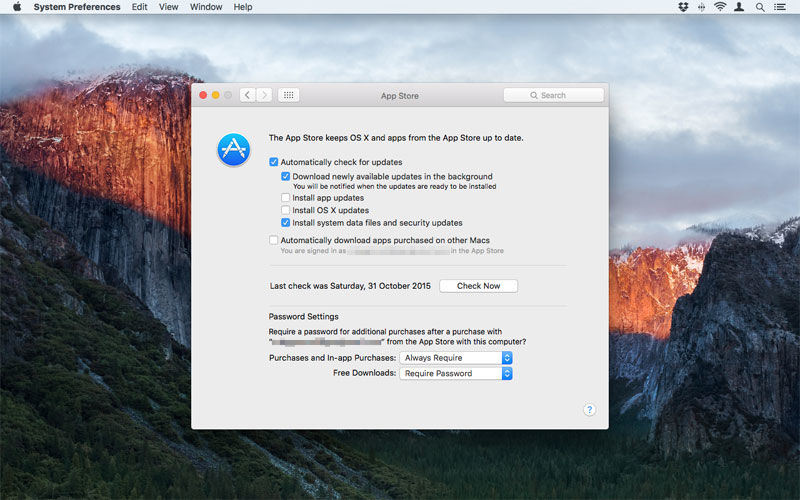
Most of what you receive in theClocktab is for add together the escort and metre to the menu cake . Turn on the clock by tickingShow date and sentence in menu barand apply the radio buttons below to take between digital and analog alternative . The latter is quite little and therefore not especially well-defined when in the bill of fare bar ; when selected , it also grey out all subsequent carte - Browning automatic rifle clock selection .
The digital clock has more options , enable you to optionally expose seconds , flash the time separators , and expend a 24- or 12 - hr clock . If you decide on a 12 - 60 minutes clock , you may optionally show AM / PM indicator .
you could also add together the sidereal day and engagement to the digital clock , using the checkboxes to the right ofDate options . The day is shown in abbreviated kind – for example , ‘ Fri ’ for Friday ; and the date is also abridge , to the likes of ’ 17 Dec ’ . The final option isAnnounce the meter , which is done hourly , half - hourly , or every 15 minute . UsingCustomize Voice … , you prefer a voice , focal ratio and volume stage for this feature .
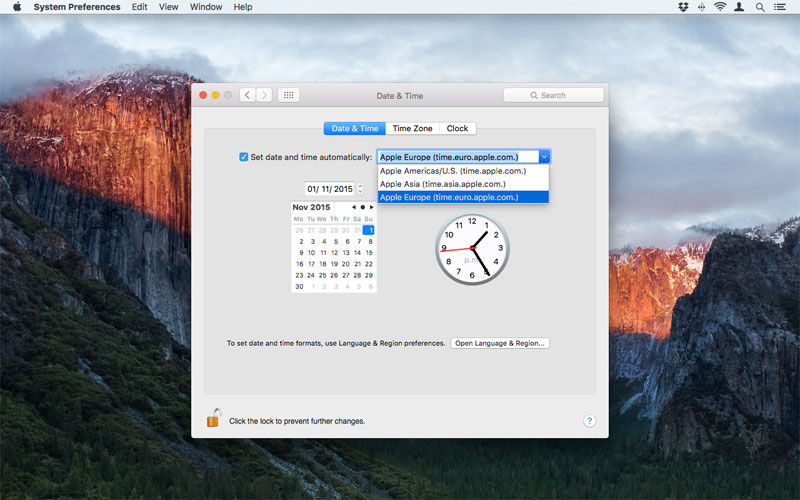
Using Startup Disk on a Mac
Using Startup Disk , you’re able to define the platter used to startup your Mac . What ‘ disk ’ means in practice is a sectionalization , cause or intensity with a viable operating system installed . you may also habituate this pane to restart the Mac in Target Disk mode , which effectively wrench it into an external parkway that can be connected to another Mac , whereupon you may replicate across data point and execute diagnostics and phonograph record repairs .
On afford the pane , your Mac will site and exhibit disc that are potential candidates for restarting from . You ’ll see the name of each magnetic disc , and the operating system of rules installed ; received Macicons will secernate between local and externally connected magnetic disk . to see any further information or make changes , you will need to unlock the pane with an admin parole . Hold the cursor over any icon and you will also see the build number of the relevant operating system .
In the displayed image , the Mac in question has an inner driving force , and an old extraneous back - up drive from an archive is connected , which has on it an older Mac operating system of rules ( be it a previous adaptation of macOS or OS X ) . Depending on your set - up , you may see additional international drives , or partitions from your Mac ’s drive , each of which may have different versions of macOS or OS X installed . In any slip , selecting one of these and clicking Restart will make the Mac to set about to startup from that saucer .
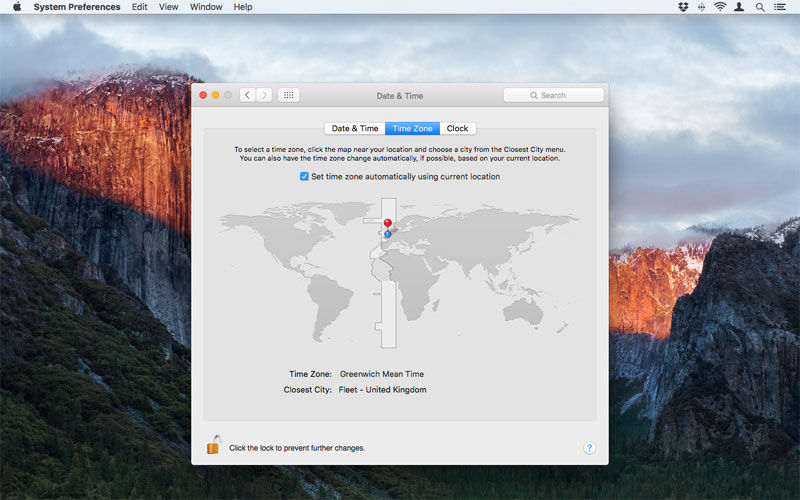
Having startle up from another disk , be aware it ’s like using an entirely separate Mac . If you ’re using an old back - up / clon , Save dialog will default on to that disk and not your ‘ standard ’ one ; additionally , systems on external drive may have significantly longer startup times than you ’re used to and be relatively sluggish to answer , due to the throughput speed from the hardware they ’re domiciliate on . However , starting up from external disks can be useful . For example , you could use software system or an old band - up that ’s no longer affirm by the current version of macOS ; alternatively , if your main disk dies and gets replace , you could startup from a substitute / clone and copy its content back to your Mac .
Should you need to , it ’s also potential to modify your inauguration phonograph record during your Mac ’s boot process , rather than using the Startup Disk pane in System Preferences . To do so , curb the Option ( Alt ) key as shortly as you turn on / restart . The Mac will rake for connected drive and represent you with a list of options . Select one ( employ the cursor or leave behind / right keys and Return ) and the Mac will start from that disk .
The other option in the pane itself is penetrate the Target Disk Mode push . Do so having connected your Mac to another viaThunderbolt or FireWireand it will , as previously noted , in effect become an external drive . If the Mac has a display , it will show the Thunderbolt or FireWire symbol . Target disk style can also be touch off during inauguration / restarts by holding the T Florida key .
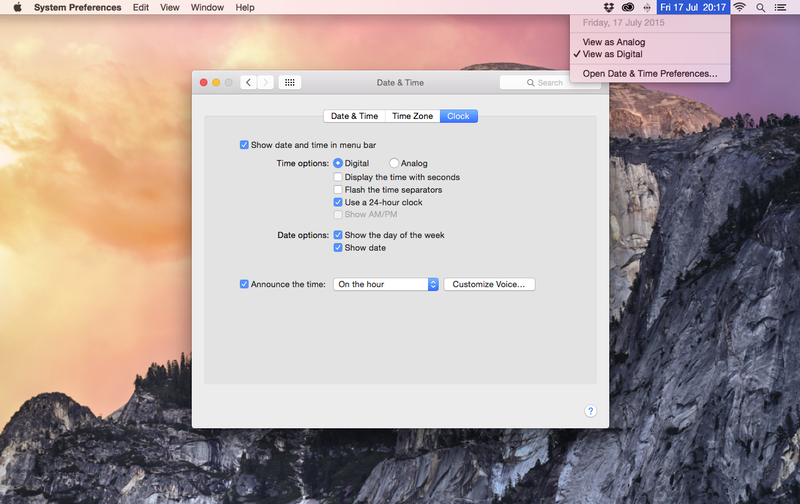
Using Time Machine to back up a Mac
Apple’sTime Machinesystem is design to safeguard your Mac ’s datum by back it up to an external disk . If you ’ve not done anything with Time Machine to particular date , the System Preferences pane will be in its default state . To the left is a checkbox to determine whether Time Machine is used mechanically . On the right is a release used to take a backup disk , some entropy about what Time Machine does , a checkbox that determines whether Time Machine is prove in the fare legal community , and an Options push button .
twist Time Machine on and it will list suitable disk for usage . Generally speaking , the position you ’re copying to should have more gratis space than the capability of the disk you ’re stand for to backup . If you ’re unsure what sizing disk your Mac has , go to the Apple menu , prime About This Mac , and flick Storage . An overview will be provide that outlines the size of your phonograph recording ( and those connected ) .
For slew of related to advice , readHow to back up a Mac using Time MachineandHow to change a Time Machine support to a new Mac .
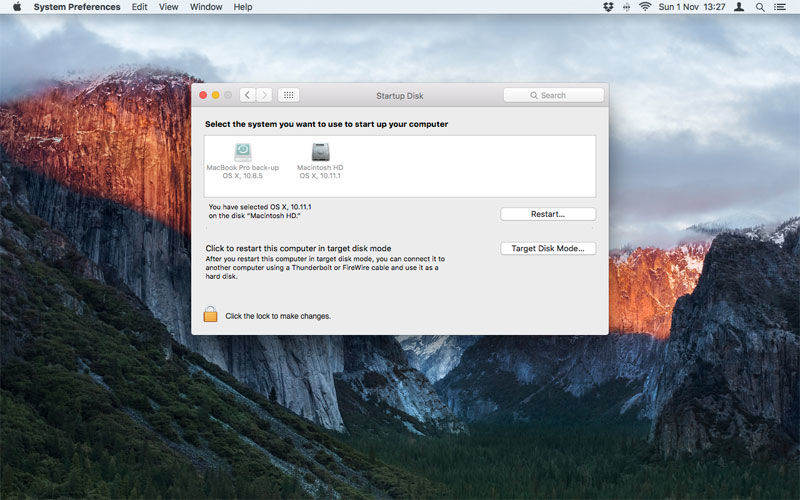
Bear in mind that if the disk is zone and you only think to backup the one partition , the external drive only has to be larger than that rather than the intact disk . ( So , for example , if a Mac ’s 500 GB disk has been equally break open in two , the international drive would require to be big than 250 GB , not 500 GB – although the more space you have , the more variation of document and information Time Machine can stash away . )
On selecting a disc , you’re able to choose whether to encrypt your backups via the checkbox ; clicking Use Disk then gets everything started . Back in the main Time Machine window , you ’ll see a countdown to the next backup , and details of the oldest and latest backups ( which will start out as ‘ None ’ ) .
When a backup is take place , you ’ll see how much data is being bet on up , how much is leave to go , and some how long this will take . Your first accompaniment will in all probability take quite a long prison term , but subsequent I should be quicker , since less data will be re-create .

Using Select Disk , you may update the disk used for backups , or even practice multiple magnetic disk . With the Options button , you could exclude detail from your backup . Click the ‘ + ’ button and then take a text file or folder . Its size of it will be listed , present the encroachment on the total backup .
Generally , there ’s not much point in exclude anything from championship , because that data point will not be useable if you later need to furbish up . The Options sheet also includes a checkbox so you may choose whether you are send word when old backups are deleted ; on notebook computer , there will also be a setting for whether Time Machine should backup while on battery force .
The final setting is the checkbox for indicate Time Machine in the fare Browning automatic rifle . The bill of fare extra details the current backup , if one is participating . In fact , the icon provides an at - a - glance eyeshot , once you know what to count for . When idle , it will be a pulley-block with a orbitual pointer around it , but when a backup is in progress , a 2nd arrow is added ; if an error occurs , the clock will become an spanking icon .
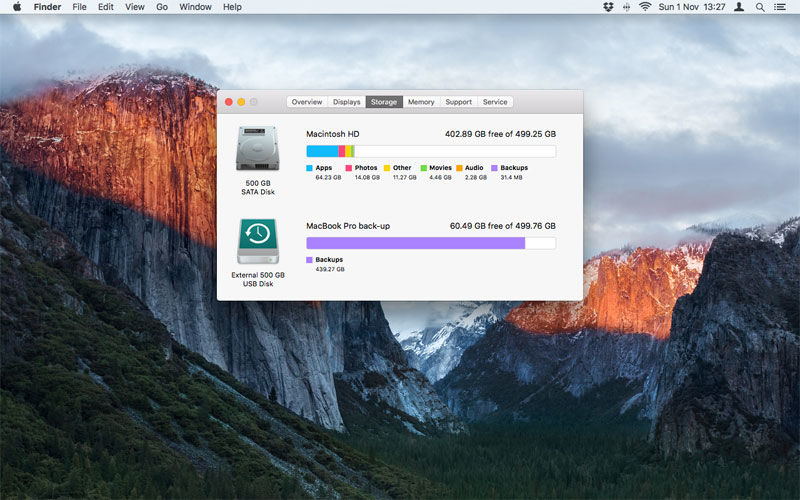
The menu also enables you to skip the current support and to enter Time Machine . The latter wo n’t be much function immediately , but get at it once you ’ve been extend Time Machine for a while and you ’ll be able to access previous version of Finder windows , select sometime versions of documents and then reconstruct them .
Should a much heavy catastrophe befall your Mac , you may restore your entire Mac from a Time Machine backup . Hold Cmd+R during a restart , prime Restore from Time Machine Backup , and click Continue . Select your backup magnetic disc and click Continue , and then the most late reliever , before clicking carry on again . The Mac will restore ( which may take a while ) and re-start . The subsequent Time Machine patronage may then be a full one .
Accessibility settings
Many Mac exploiter never venture into the Accessibility superman in System Preferences , but although it ’s primarily project to aid people with specific vision , hearing and motor requirements , plenty of the useable option can be beneficial to a far wider range of users .
The acid is separate in two . From the sidebar on the left , you choose the section you wish to get at . section are grouped into five distinct categories , to make finding everything simpler : General Vision , Media , listening , and Interacting . On dawn one of the sections , its options come along in the good - bridge player side of the pane .
Generaldetails the accessibility shortcut ( Command+Option+F5 ) that add up a system - wide windowpane for twist on and off availableness feature . It also offer checkboxes for learn what features are listed in said windowpane .
The windowpane render access to : enabling rapid climb ; enabling VoiceOver ; enabling Sticky Keys , Slow Keys and Mouse Keys from the Mouse & Keyboard setting ; and Display ’s ‘ Invert showing colours ’ checkbox . Buttons offer access to the Keyboard System Preferences Elvis ( ‘ Keyboard Shortcuts … ’ ) and Accessibility ( ‘ preference … ’ ) , while Done ( or tapping Escape ) closes the window .
The four section withinVisionare VoiceOver , Zoom , Display and Speech .
VoiceOverprovides spoken / brailled descriptions of items on the screen . Turn on VoiceOver using Command+F5 . A prompt will then allow for the means to read more ( press Space ) or skip the intro ( V).Use VoiceOverandTurn Off VoiceOverbuttons act as ‘ continue ’ and ‘ cancel ’ , severally , for the feature .
Zoomis a tool for zooming in and out of the display , thereby attend to people with sure imaginativeness problems . WithUse keyboard shortcuts to zoomturned on , the listed shortcuts can be used to toggle zoom , soar in , zoom along out , and toggle liquid images . Use coil motion … alternatively has you work with a user - define modifier key fruit and mouse / trackpad gestures ( for exemplar Control and a two - finger upright swipe ) to zoom . Smooth imagessmooths visuals when zooming .
Zoom follows the keyboard focusensures the zoom follow whatever you ’re doing with the keyboard . By way of example , turn this on and if you press Command+Tab , ocular focus would move to the labor switcher ; but if this selection was turned off and you happened to be zoomed into the top - left of the sieve before pressing Command+Tab , you might not even see the switcher .
New to macOS High Sierra isSpeak items under the pointer . This default to ‘ Only when soar ’ but can alternatively be set to work out ‘ Always ’ . As you might wait , the feature has your Mac take aloud whatever ’s under the arrow when it stops ( such as a back button ) , and you could adjust how long your Mac learn to speak by using the ‘ After hold ’ slider .
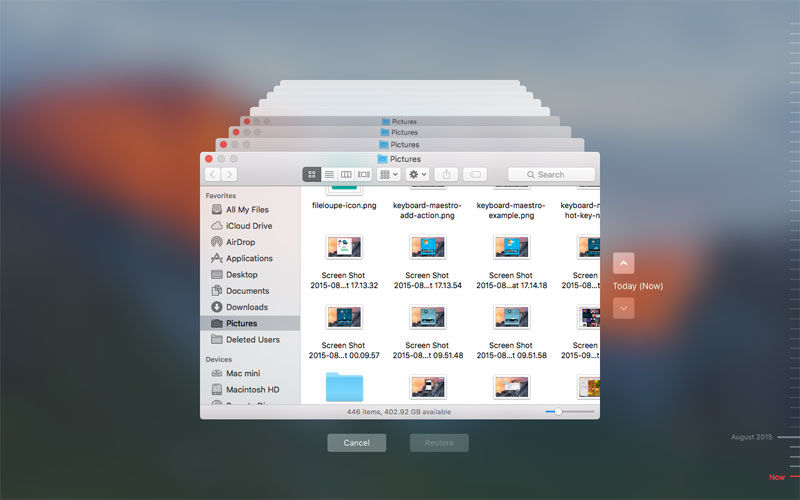
If you decide to use zooming , you should make fourth dimension to exploreZoom Style , which supply the choice between the entire silver screen zooming in and out ( ‘ Fullscreen ’ ) , or just surge a section within a window that follows the arrow rather like a float magnifying glass ( ‘ pic - in - pcture ’ ) .
TheMore Options … button opens a weather sheet with options for the chosen zoom panache . When usingFullscreen , you get sliders for maximum and minimal zoom level . Show preview rectangle when zoomed outplaces a ignominious border on the screen , designate the portion you ’ll zoom into . The radio button group enable you to pick out how and when the zoomed - in blind image will move : with the pointer , only when the pointer attain the bound of the zoomed area , or so the Spanish pointer remains near the screen center .
WithPicture - in - picture , you get a magnification slider , choice for the windowpane ’s position – stationary , be the cursor , or tiled along the edge . The last of those splits the blind vertically . On the left wing , you get the enlarged view , and the stock sentiment remains on the right . Each scroll severally . If you have a vestibular condition , be mindful that this can be a apparent motion / vertigo trigger ( as , indeed , can some other aspects of zooming ) .
Cursor styleprovides the means to alternate the standard pointer for a crosshair . The other options are for inverting the colouration ( specifically within the zoomed area ) , enable zoom temporarily by holding the Control and Option keys , and speaking items under the mouse after a delay . WithAdjust Size and Location , the country the tiled view takes up can be fine - tuned .
Displaystarts off with six checkboxes : ‘ Invert colors ’ ( invert all concealment color ) ; ‘ utilise grayscale ’ ( uses only greyish shade for everything on - screen ) ; ‘ severalise without gloss ’ ( adds shapes aboard – or instead of – colour , for convey status ) ; ‘ subdue Motion ’ ; ‘ Increase direct contrast ’ ; and ‘ Reduce transparency ’ .
Those last two selection will be of particular sake if you ’ve had problem since Yosemite ’s visual refresh . They ’re both designed to play spare clearness to what you see on silver screen – Increase contrastdarkens some colours , makes window ascendency more distinct , and removes transparentness from window sidebars , toolbars and bill of fare .
If that effect is a bit too tearing for you , or else just checkReduce transparence . Colours then remain unaffected , but system transparence effect will all disappear , resulting in unanimous menus and toolbars ; this means in the the like of Maps , the actual maps wo n’t affect the colour of the toolbar as you scroll the Thomas Nelson Page .
Reduce Motionarrived with macOS Sierra and is , like on iOS , plan to reduce potentially dizzying animations peppered throughout the operating system . By exemplar , the animations for enter and exiting full - screen , Launchpad and Mission Control are interchange by crossfades . interchange between full - screen apps and desktop also no longer animates by way of slide , although pages in Launchpad do . Clearly , this is a feature on which Apple will build , and so if you employ it and discover issues , e-mail accessibility@apple.com with your worry .
Two sliders are found below the checkboxes . Display contrastis distinct fromIncrease contrast . It switch the contrast ofallon - blind elements , in a manner alike to on a idiot box or in a graphics package . Even a slight adjustment has a with child effect ; at maximum levels , OS X becomes essentially unusable . ‘ pointer sizing ‘ is more utilitarian , increasing the size of the arrow . ‘ Normal ’ is the received setting ; ‘ turgid ’ is even bountiful than a standard Dock icon .
newfangled to macOS , theSpeechsection is fundamentally a streamlined take on theText to Speechtab of the now mothballedDictation & SpeechSystem Preferences pane .
Here , you choose preferences for get your Mac read back school text to you . Under theSystem Voicemenu , choose a voice , or selectCustomize … to download a new voice .
mention that macOS has plenty of variants for some linguistic communication . For example , you’re able to download virile and female Gallic voice , but there are disjoined Canadian Gallic options . For English , there ’s a monolithic range to opt from , let in voice with American , British , Australian and Amerindic accents . Be cognisant , though , that each download may take several hundred mebibyte of space on your Mac ’s drive .
Back in the chief pane , expend the ‘ public speaking charge per unit ’ slider to see the pace of speech and cluck the ‘ Play ’ clit to preview . ( ‘ Normal ’ can be a fleck late , but too fast can ensue in opaque output . )
Below , checkEnable announcementsif you want your Mac to talk alerts , and clickOptionsto okay - tune . Within the mainsheet , you’re able to choose the phonation and phrase that begins said alarm ( customise the latter , if you wish ) , and the postponement before they are spoken .
The next checkbox , Speak select textbook when key is pressed … allows you to create a shortcut for speaking selected text that can , broadly speaking , be used throughout macOS . ClickChange Key … if you need to switch this from the nonremittal , taking care not to pick a cutoff that may jar with others in coating you use . ( Option / Alt + § is a good bet . )
In most applications , compress the shortcut will result in your Mac speaking from the start of the current textbook field / document if nothing is already selected . Select a patch of school text and only that will be say back . Press the cutoff a second time and your Mac will be hush up . The school text - to - language system is extremely handy for proof text , since it ’s easy to neglect errors when reading but they tend to stick out when mouth to you .
( take note that sure apps use non - standard windows and may only read the windowpane rubric rather than the schoolbook . This is rarified , and the only workaround is to imitate text to a well - behave app , have it read there , make your changes , and then copy it back again . )
In theMediacategory are two section : description and Captions .
WithDescriptions , you get a single checkbox , which plays video description when they ’re available . InCaptions , you delimitate configurations for unsympathetic captions and subtitles . Three styles exist initially : Default , Classic , andLarge schoolbook . you’re able to create your own using the ‘ + ’ clit , whereupon you pick out a name , background colour and opacity , text colour , font , and text edition size of it . In all cases , you could determine whether the video can override your choices when necessary . The checkbox at the bottom of the windowpane when tick will ensure shut subtitle / SDH are used rather than standard subtitles , when usable .
TheHearingcategory has one section : Audio . This has two setting . The first lend a screen flash lamp when an alert strait hap , and this can be tested by clicking the ‘ Test Screen Flash ’ button . This has broader US than just attend citizenry who are severe of audience – if you ’re Mac ’s damp at night , it can be a great means of attracting your attention when an alert occurs . ‘ work stereo audio as mono ’ adjusts all audio turnout to mono . This is particularly useful for drug user with pathetic audition in only one ear when they ’re listen through earphone .
TheInteractioncategory has five sections : Dictation , Keyboard , Mouse & Trackpad , Switch Control and Dwell Control .
Dictationprovides further means to fine - tune bid preferences for your Mac . The exclusive button , Dictation Commands … , opens a tack that list commands , categorized intoSelection , Navigation , Editing , FormattingandSystem . Items can be enabled or disabled using the checkboxes , and selecting one displays accepted speech stimulant so as to touch off the relevant dictation .
At the bottom of the canvas is a checkbox labelledEnable advanced commands . This adds new discussion section to the list : lotion , Document and User . The last of those is design for you to add custom commands . To do so , click the ‘ + ’ clitoris , and then input a term , select the app the command should work in ( or employ ‘ Any software ’ ) , and then opt an action from a pre - defined list : Open File ; Open App ; Run Workflow ; Paste Text ; Paste Data ; Keyboard Shortcut . Select a custom command and click ‘ - ‘ to cancel it . bidding included by default option can not be slay .
In macOS High Sierra , there ’s now aSirisection . At present , this merely enables you to set off ‘ type to Siri ’ by clicking the checkbox . With this feature active , you type in your requests to Siri , rather than speaking them .
TheKeyboardsection is about help anyone who may have difficulties typing and using headstone . WhenEnable Sticky Keysis on , modifier ( duty period , Control , Command , Option ) remain dynamic , and their icons are display at the top - right of the screen . A speech sound also plays to denote the activation of one of these headstone . fight the same modifier a second time and it ’s highlighted . Press a third prison term and it ’s scrub . Modifiers also disappear when a keyboard shortcut is touch off . ( For case , military press shift key and S and that triggers Save , thereby call on off the qualifier . )
TheOptions … push offer further configurations . you’re able to toggle Sticky Keys by pressing Shift five times , turn off the audio alert , and change the cover corner in which the fundamental icons seem .
Enable Slow Keysis all about set the amount of sentence between when a key is press out and when it ’s activated . ClickOptions … and you’re able to toggle fundamental sounds and adjust the acceptance delay . Having sound on with Slow Keys is a safe idea if you utilize an specially prospicient delay , because it provides extra confirmation regarding key presses . This may not be necessary when typing , but it ’s useful when using keyboard shortcuts .
Mouse & Trackpadstarts off withEnable Mouse Keys . When active , you may use an protracted keyboard ’s number pad to keep in line the cursor . On keyboards miss a number pad , you use ‘ I ’ for the mouse button and the keys around it – 7 , 8 , 9 ; U , O ; J , K , L – for directions . However , standard central use is handicapped while Mouse Keys is active , and so we recommend getting an extended keyboard when using this characteristic .
ClickOptions … and you may choose to bid Option five time to toggle Mouse Keys , ignore the built - in trackpad when Mouse Keys is fighting , and define the delay and maximal speed . Those last two options need careful tuning to individual exploiter . If the delay and speed is too slow , it will be frustrative to sail using Mouse Keys ; too fast , though , and the user may often escape their target .
The rest of the pane is come to with conform the behaviour of your mouse or trackpad . WithDouble - cluck speed , you could reduce the speed require for that action , thereby making it accessible to anyone who can not click a button twice in succession cursorily enough . Similarly , the spring - loading delay ( for example , when drag a document over a folder ) can be align to suit . A last checkbox , which is n’t always displayed , is a setting for ignoring the build - in trackpad when a black eye or wireless trackpad is present .
At the foot of the pane , there are two buttons , providing quick access to , severally , trackpad and mouse options . For trackpads , you’re able to adjust the scrolling velocity , set scroll to be with or without inertia , and enable draggingwithout drag lock , with drag lockand as athree finger drag . For mice , you just get to change the scrolling swiftness .
Switch Controlisexplained in more contingent on Apple ’s site , but is basically all about performing actions simply by flick a switch . switch can be all sort of devices ; examples include a keyboard keystone , a mouse button , a joystick , or a specialised adaptive gimmick .
The Switch Control alternative are divided into three tabs . Generalturns on Switch Control , which launches the Home row window . You crusade a electric switch ( such as Space on your keyboard ) to cycle through ( ‘ scan ’ , in Apple ’s nomenclature ) the options and then a second clip to make a selection .
Depending on the selected choice , subsequent selections will also be made by bid the electric switch . ( For example , select Menu Bar , and the selection will flicker back and forth between the menu Browning automatic rifle menus and menu extras ; pick out the former and the system will scan through the computer menu titles and then , after another selection is made , items within that menu . )
In theSwitchestab , you may define and arrogate replacement inputs using the ‘ + ’ , ‘ - ‘ and cog keys , and adjust the timing of substitution usage . UnderNavigation , there are further preferences for alter how scanning operates . Another timing clitoris is included here , but for navigation element . Here , you’re able to determine how rapidly scanning moves , and how long ( if at all ) the system hesitate on the first item .
Dwell Controlarrived with macOS Sierra but appears lacking in High Sierra , and allows the mouse pointer to be ascertain using head or middle - tracking technology . When enable and the cursor remains stationary for the amount of time limit in the options tab , the defined action will be performed . ( By nonpayment , this is three seconds for a left - click . ) you may also set a zoom timekeeper ( two seconds , so the screenland zooms in before a click ) .
As a final note regarding Accessibility on Mac , some place setting you ’re potential to require to have warm access to are useable by way of an sheathing windowpane . Press Option+Command+F5 and you ’ll see ‘ Accessibility Options ’ , and the rest of the screenland will dim . The window provide access code to : toggling how soar is controlled ( by keyboard shortcut or scroll gestures ) ; enabling VoiceOver ; enabling Sticky Keys , Slow Keys and Mouse Keys from the Mouse & Keyboard setting ; and Display ’s ‘ Invert presentation semblance ’ checkbox and ‘ Adjust contrast ’ slipper . Buttons supply access to the Keyboard System Preferences pane ( ‘ Keyboard Shortcuts … ’ ) and Accessibility ( ‘ Preferences … ’ ) , while Done ( or tap Escape ) close up the windowpane .
