The introduction of the Touch Bar on Apple’snew MacBook Promay be receiving sundry reviews in term of its likely utility , but one aspect has elicited worldwide praise – Touch ID . With this simple summation Mac users can now lumber into their machine and even pay for products online by position their finger’s breadth on the sensing element .
It ’s a small change , but one that ’s already rise very popular in the main due to its swiftness and convenience . The arrival ofmacOS Sierrahas also introduce the feature to old Macs , as long as you have aniPhoneoriPadwith Touch ID handy .
fructify up Apple Pay on a Mac is easy , so read on to see how you could ban countersign eternally and have harness the index at your fingertip .

How to use Apple Pay on Mac: Using the Touch Bar on the new MacBook Pro
To set up the Apple Pay lineament on the newMacBook Pro with Touch Baryou’ll first need to cross-file a wit . In truth you may well have already done this during the initial setup process , but if not just go to System Preferences > Wallet & Apple Pay then clack theAdd Cardbutton and enter your card inside information . Once you ’ve completed the process and have the terms and conditions you should get a content from Apple letting you know that Apple Pay is quick to use on your Mac .
The next dance step is to scan your fingerprint , if you have n’t done so already . Open System Preferences > Touch ID , click the + icon markedAdd a fingermark , then follow the instructions . That ’s it , you ’re now ready to go shopping .
One matter to remember is that Apple Pay is only available in Safari . If you presently utilise Chrome , Opera , Firefox , or some other app you ’ll need to flip over to Apple ’s web browser to make a purchase . At the moment not all web site accept Apple Pay , so you ’ll demand to check first , but the number of participating outlets is maturate quickly . you may show ourComplete Guide to Apple Payfeature which is on a regular basis updated to keep track of those use the service .
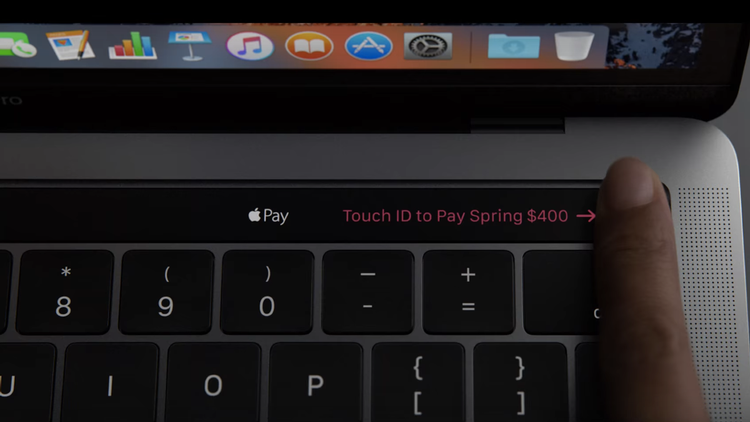
To use Apple Pay with your MacBook Pro simply shop for items on your chosen fund , remembering to use Safari , then when you strain the checkout there should be an choice toPay with Apple Payor standardized . Click this and you ’ll then be prompted to use Touch ID in the Touch Bar to complete the transaction . Place your finger on the sensing element and the payment will be made .
understand next : MacBook Pro 2016 not working : How to fix MacBook Pro computer hardware problems
How to use Apple Pay on Mac: Using an iPhone with an older Mac
Since the introduction of macOS Sierra Mac users have been able to apply Apple Pay online so long as they have a Touch ID equipped iOS gimmick and a Mac capable of Handoff . you’re able to record more about Handoff and how to tell if your gadget is compatible in ourHow to switch between iPhone , iPad , and Mac using Handofffeature .
Apple Pay can only be used in Safari and on participating websites , but the process itself is quite aboveboard . Before you begin you ’ll need to activate the feature article on your iPhone or iPad . To this go to options > Wallet & Apple Pay then become on theAllow payments on my Macoption . You ’ll also ask to ensure that your Mac and iOS gadget are both logged into the same iCloud account and have Bluetooth turned on .
Now , peruse as you unremarkably would , contribute items to your basket , then when you ’re ready to settle up go to your Shopping Basket and look for the choice toPay with Apple Payor something along those billet .

Select that option and you should see the Touch ID app open on your iOS gimmick prompt you to affirm the transaction with your fingermark .
Apply the relevant digit and your purchase will be completed back on your Mac .
That ’s it . No pother or struggling to remember if your password had a uppercase letter of the alphabet at the beginning or whether you changed it to an ampersand . Glory be . The future tense has arrived .
See also : Apple Predictions|15 macOS Sierra tips|How to use iOS 10
