Photoshop and Photoshop Elements are the ultimate re - colorizing tool because you may use them to put a refreshed coating of paint on anything . you’re able to repaint your cable car , change the colour of your cabinets , and even recolor your hair’s-breadth before heading to the salon . Here are two easy mode to get it done that work in about any version of either programme :
Using a Hue/Saturation adjustment layer
spread an range and create a selection of the target you need to recolor . If the aim has decorous contrast against its backcloth , employ either program ’s Quick Selection tool ( in element , check that you ’re in Expert or Full Edit way to see the tool ) . In either program ’s pick bar , deform on the Auto - Enhance checkbox . Now , drag the tool across the area you want to select : Use a modest brush for pick out small sphere and a big brush for take bigger orbit . To remove an surface area from your extract , selection - drag to put the tool in subtract way and then brush across that area .
When work on metallic element objects , be certain to select areas where the color is reflect . fall into place the Refine Edge clitoris in the Options bar of either programme to o.k. - line your survival of the fittest .
Next , chooseLayer > New Adjustment Layer > Hue / Saturationand click OK in the result dialogue box . In the jury that appear , drag the Hue slider to change colour and use the Saturation and Lightness sliders to adjust color saturation and smartness , severally .

The two horizontal bar at bottom are like drop color wheels . The top bar shows the object ’s original color and the bottom legal profession shows its new color beneath it ( circled ) .
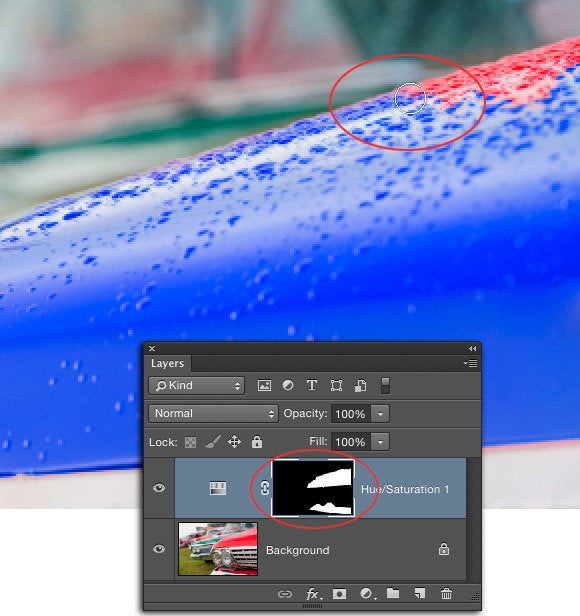
If necessary , apply the Hue / Saturation allowance layer ’s masquerade party to shroud or show the color modification in certain bit , say , if your selection was n’t stark to start with . Just flick the alteration layer ’s mask to insure it ’s alive — you’ll be capable to tell because it has a light - colored border around it . Next , press B to grab the Brush tool , and then press D to ready the people of color chip at the bottom of your Tools panel to the nonpayment of dark and white . In the kingdom of the layer masquerade , painting inside a masque with black conceals and painting with blank reveals . The mask ( encircle below ) is a toy of your picture and by peeking at the mask , you’re able to enter out which color to paint with to either obscure or show the color variety . And by keeping one finger’s breadth poise above the ex key on your keyboard , you may chop-chop change between painting with blackness to paint with white , or vice - versa . In this example , paint with white inside the mask let on the gloss change atop the car ’s hood .
When working inside a layer mask ( encircle ) , remember that painting with black conceals and white reveals . Here a snowy brush ( circle ) is used atop the railcar ’s punk to uncover the young colour .

Using a Solid Color Fill Layer set to Hue mode
This proficiency is works well for alter colouring material without changing how light or drab it is . It ’s also corking to use if the arena you require to repaint has a lot of black , pure white , or grey around it . Why ? Because this technique only affects area that are in color to commence with . So for some images ( like this lesson ) , your selection does n’t have to be as precise ( yay ! ) . Start by make a selection as trace above and then chooseLayer > New Fill Layer > Solid Color . In the ensue dialog box , go into newfangled key into the name field and modify the Mode pop - up card to Hue , and then click OK .
In the Color Picker that opens , apply the rainbow bar to piece a range of colors — don’t hassle with the large box at left because the blend modal value change rendered it useless ( that boxwood controls how light or dark the new coloration is , but it has no effect in this case ) . Click alright to come together the Color Picker when you ’re complete .
With the Hue portmanteau word modality , the new pigment sham only surface area that previously contained color .
If you involve to fine - tune the fill bed ’s masque ( say , to reveal the new key on the tyre ) , use the Brush prick set to paint with black to conceal the new pigment or white to reveal it , as describe above .
Save your master
When you ’re finished with either proficiency , chooseFile > Save Asand cull Photoshop from the Format fare to create a master file for redaction later while keeping your layers intact . To try out with a different color later on , double - click either adjustment layer ’s thumbnail in the Layers instrument panel to reopen its respective yellow-bellied terrapin .
Of course , there are other ways to modify color , too . For exercise , both programs sport a Replace Color command which you could use to severalise the program which colour you want to change and what colouring to exchange it to , but it ’s not very compromising ( you ca n’t experiment with the color alteration after you finish ) . Photoshop CC also has a Selective Color adjustment layer , which act in a similar way , though since it ’s usable as an adjustment stratum , you may experiment with different color and fine - tune the issue using the included layer mask . Photoshop CC ’s Hue / Saturation adjustment layer also includes a point registration tool that ’s ready to hand for clicking the color you need to change in the image itself . Nevertheless , the two method acting described here should keep you busy for a while .

