When you grease one’s palms a new Mac laptop computer , iMac , or Mac mini , the internal startup hard driving force is coiffe up with one segmentation — that is , one enceinte division of warehousing distance . you could use Disk Utility to partition off the startup drive ( create minor memory sections ) , even while the startup private road is being used to boot your Mac . partition can help oneself organize your data .
But before you do so , it would be wise to back up your data on the inauguration driving force by replicate it to another drive . Disk Utility wo n’t erase the information , but it does n’t injure to be train if job take place .
This instance will add a sectionalization on the startup drive of a MacBook Pro . When the process is done , the two partition will come along on the Mac desktop as two hard parkway icons . ( We also have details on how to zone an external hard drive . )

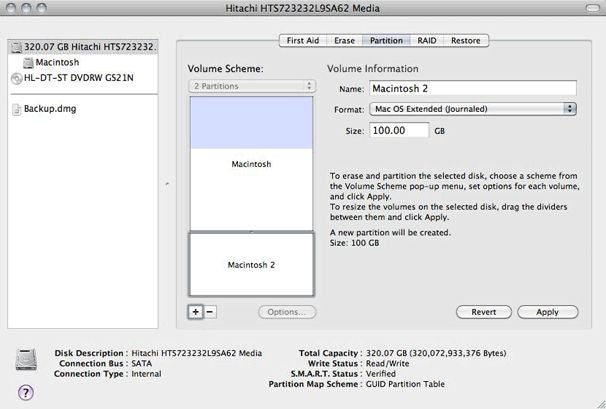
When you launch Disk Utility ( /Applications / Utilities ) , the startup drive appears in the odd column . Select the drive , and then press the Partition tab .
Under Volume Scheme , the partition layout map will show a single partition . The blue shaded area represents the amount of computer memory space that ’s currently in use . The white space comprise the unused reposition space .
Notice that the buttons and menu are greyed out , which think you ca n’t get at them . There is one button you could get at , however . It ’s the + release . The next step will show how to put the + button to utilise .

tap the + push button . You ’ll notice that the map of the single sectionalisation has split in two . This means that you have dress up Disk Utility to tally a partition on the startup drive .
To line up the size of it of the partitions , click and drag out on the dot between the sectionalization in the map . To see the literal capacity when you adjust the size , tap one of the partitions so that it has an scheme . Then you ’ll see the capacity in the Size box seat .
you could also select a sectionalization and get in the desired capacity in the Size boxful .
To add another partition ( for deterrent example , if you require to create three partitions ) , select a partition and flick on the + clit . tap the — button removes the pick out partition .
Note that in the partition with the blue shaded area that represents data point , you ca n’t make that special divider low than the outer space the data point is occupying .
You also ask to arrange the format for the new partition . Learn more about the formatting choices . In most cases , you ’ll select Mac OS Extended ( Journaled ) .
tap the Revert button any time you want to start over from the beginning .
In this example , a second partition of 100 GB will be created .
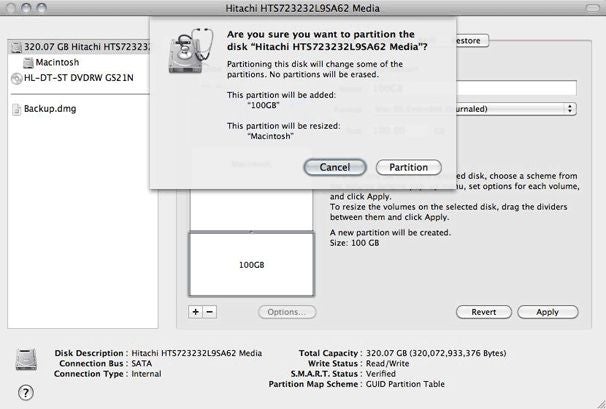
Once you ’ve pose up your partitioning , press Apply . This wo n’t bulge the process just yet .

A verification box will appear . It will give you a sum-up of the actions that Disk Utility will execute . If it front practiced to you , press Partition , and the process will begin .
It ’s best to leave your Mac alone and let Disk Utility do its matter . Do n’t do anything else on your Mac , like check your Es - ring armor , or visit a Website . It ’ll take a few minutes to partition the driveway .
Disk Utility will display a progress bar in the lower right hand of its user interface . When Disk Utility is done , it does n’t expose an alert , but your raw partitions will appear on your Mac ’s desktop . You ’re done .
