Reflectors are a portrait lensman ’s best friend . They give you the flattering result of a two - tip lighting apparatus without the disbursal of a second flash . ( For tips on setting up right lighting and taking best portraits , see the July “ Digital Photo ” column . )
The problem with reflector is that they can be unmanageable to position if you do n’t have an extra pair of hands . Well - healed photographers might want to invest in a specialized tractor trailer , such as thePhotoflex LiteDisc Holder , which make it easy to place the LiteDisc ( or whatever case of reflector you ’re using ) at a variety of angles . But these accessories are n’t trashy . The pedestal alone will be you around $ 60 .
However , you could accomplish the same task for much less money by building your own tractor trailer . Here ’s what you ’ll necessitate :
Framing shop class are a peachy beginning for cheap froth burden . Just necessitate if they have remnants usable . Sometimes they ’ll even part with a square for free . you could pick up A - clamp at any local hardware store . My favorite type is thePony 3201 clamp . you’re able to tell apart them easily by their distinctive orange handles . They usually be around $ 3 each — and they ’re worth every penny . In fact , I recommend get four of them because they ’re so darn handy .
you may find light source stands online for around $ 30 . If you do n’t experience like invest even that much , then hit the swap meets , service department sales , and classifieds . you’re able to usually observe a serviceable luminousness stand for less than $ 10 . This will bring your entire investment for this rig to less than $ 25 . And you ’ll practice the Pony clamp and lightheaded standstill for lots of other photo tasks too .
Building Your Rig
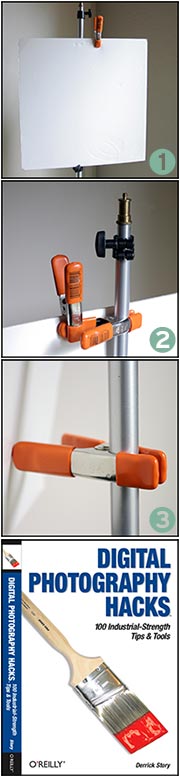
get together your reflecting telescope carriage takes about 30 seconds . Extend the leg on the light stall ( photo 1 ) , then pull up the midsection of the nerve center pole to about 6 feet . seize one A - clinch towards the top of the pole to attend as your cross art object . Then seize the reflector to the cross piece with the 2d A - clamp as shown here ( photo 2 ) .
you’re able to raise or get down your reflecting telescope by extend the center pole upward and downward . Remember , you require to lay the reflector so it ’s rebound light on to the model ’s brass . If you need to vary the erect angle of your reflector , add a third Pony clamp to the celestial pole near the bottom of the reflector . Swivel the clinch toward the reflecting telescope to push the bottom of the table farther away from the stand as call for .
If a breeze kicks up , you may stabilize your reflecting telescope frame-up by using the quaternary Pony clinch ( photo 3 ) to fix the bottom of the reflecting telescope the same elbow room you used the two clamps on top . Set your camera bag on one of the legs of the unaccented stand to keep the frame-up from bumble over .
When you ’re finished shooting , just move out the reflecting telescope from the viewpoint , fall in the centre pole , shut down the legs , and bind the Pony clamps to the light stand so you do n’t miss them .
[ Derrick Story is the writer ofDigital Photography Hacks , release by O’Reilly Media . ]
