The fresh iPad ’s Retina display is sensational for photo exposition . If you require to maximise this special hardware ’s photographic potential and manage how much space your figure take , here are a few mind for preparing the photograph on your Mac before transfer them to the iPad . The result : Major Wow for whomever you show them to .
The basic whole step to do this are : prepare your impression so they look good using your favorite image editor program , move them to the iPad , view , and revel . You could use the standard workflow of syncing double from an Aperture library via iTunes to transplant them to the iPad . And if all the variables are localise aright , such as using a bombastic enough preview size in Aperture , this can work very well .
But what if you change Aperture libraries , practice Lightroom , or a variety of other exceptions ? The watch over approaching tackles this process differently . You ready the images in any photograph practical app , export them to a leaflet , then upload them to the iPad using a transfer app such as PhotoSync . This method supply more flexibility and more control . you could set the accurate resolution and file size instead of leaving it up to iTunes to make those decisions for you . Let ’s take a flavor at it to see if this proficiency might work for you .
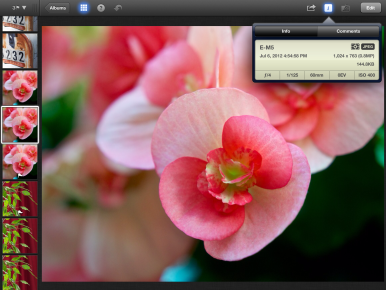
Here are 3 screenshots of the same image on the new iPad. The photo was saved at 3 different resolutions. I recommend using 2048 resolution for most photography
Oh, what size?
The high definition presentation on the new iPad packs more pixels into the 9.5 - in screen than its predecessor . The declaration is 2048 - by-1536 pixels at 264 pixel per inch ( ppi ) . That ’s higher density than the iPad 2 that weighed in at 1024 - by-768 pixels at 132 ppi . To take advantage of the new iPad ’s increased resolution , consider preparing your image with 2048 picture element on the longest side .
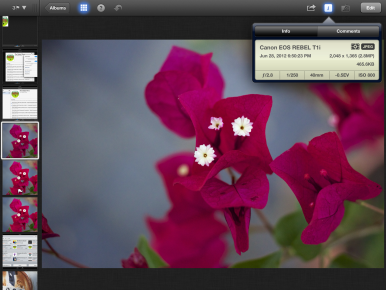
Here are 3 screenshots of the same image on the novel iPad . The exposure was saved at 3 dissimilar resolutions . I advocate using 2048 resolution for most picture taking
you could use practically any trope editing app to get your pictures ready for the new iPad . We ’ll pore on iPhoto , Aperture , and Lightroom because of their popularity .

iPhoto vs. Aperture or Lightroom
The bottom line of descent here is that Aperture and Lightroom are better puppet than iPhoto for exporting pictures . They offer more control over the procedure itself , especially concerning the pixels - per - inch setting . In our examination , both coloring material and detail were noticeably good from Aperture and Lightroom yield , than from iPhoto .
prepare in iPhoto .
train in Aperture .

Here are 3 screenshots of the same image on the new iPad. The photo was saved at 3 different resolutions. I recommend using 2048 resolution for most photography
Aperture
To export from Aperture , lead off by drop dead to File - > Export - > Version . Then , in the Export duologue loge , press the Export Preset popup carte . You ’re going to create a raw preset specifically plan for iPad output . Go all the mode to the bottom of the menu and prefer Edit . The dialogue corner that follow will provide you to make the raw preset .
cluck on the + symbol in the lower left corner and give your new preset a ordered name , such as JPEG-2048×2048 for iPad . Then use these context :
Image Format : JPEG ; Image Quality : 9 ; Size To : Fit Within ( Pixels ) ; Width : 2048 Height ; 2048 DPI : 264 Color Profile : sRGB IEC61966 - 2.1 Check the box for Black Point Compensation
Prepared in iPhoto.
Aperture export preferences
Click alright to expire the setup and come back you to the normal Export dialog box . Make certain that your young circumstance are select in the Export Preset pop - up menu . Once you ’re quick to go , click the Export Versions button in the lower correct corner to start out the process . Aperture will create Indian file to your specifications that will look beautiful on the fresh iPad .
Lightroom
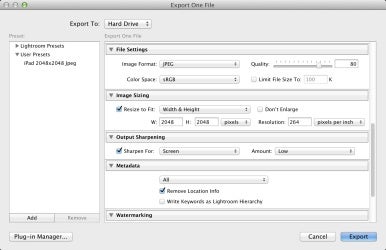
Once you ’ve selected the image in Lightroom , go to File - > Export . The areas you need to voyage to in the Export dialog are File options , Width & Height , and Output Sharpening . Use the same options here that you did in Aperture , except for JPEG Quality amount , which is 80 for Lightroom . This give you some the same timber and file size as 9 does for Aperture .
Lightroom export preferences
iPhoto
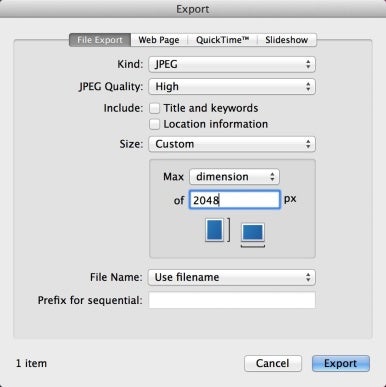
If you do n’t have approach to Aperture or Lightroom and must depend on iPhoto , then use these circumstance . First , go to File - > Export . In the dialog loge that appears , make certain your are in the File Export tab . Then choose these parameters :
Kind : JPEG ; JPEG Quality : eminent ; Size : Custom Max : dimension of 2048 pixels .
iPhoto exportation for iPad

Prepared in Aperture.
Click the Export clitoris . Since you do n’t have any control over output resolution in this dialog box seat , the file will most belike have the default 72 ppi scene .
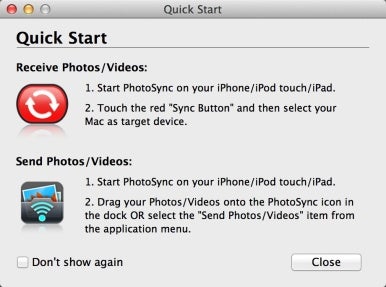
Transfer from the Mac to your iPad
You now have a set of images cautiously crafted to your spec . My favorite app for propel them to the iPad isPhotoSync($1.99 in the iTunes App Store ) . It wirelessly receives image send from the Mac to the iPad . ( There ’s a free fellow Mac version in the Mac App Store that you use to send the pictures . ) Your picture appear unchanged in the Photos app on the iPad and in its Camera Roll . They can now be accessed by other applications on the iPad , such as your favorite portfolio app or iPhoto for iOS .
PhotoSyncHere are some display options for your beautiful pictures .
Apps to show off your pictures
The canonical Photos app does a ok task of displaying your picture . you could look at the images one by one , or use the slideshow player . There are five changeover to prefer from . And you may select a Sung dynasty from your iTunes library to go with the presentation . It ’s detached and comes loaded on every iPad .
iPhoto for iOS ( $ 4.99 ) has a in effect slideshow function that let for more customization than the Photos app . pink the Share button on the top right side of the port , then solicit the Slideshow ikon . First pick out the images you require in the presentation via the four options : Selected , Flagged , All , or Choose .
Next you have eight cinematic themes range from Ken Burns to Sliding Panels . They come with their own musical composition also , or you may pick a song from your iTunes library . The total impact can be very in effect .

Aperture export settings
Photo Manager Pro($2.99 ) for the iPad can handle both file cabinet transfer and the image presentation ( although I believe PhotoSync is easier for transportation ) . you may nobble from picture to picture and twitch to enlarge . Or you’re able to typeset up a slideshow that provides options for slide length , transition style , music , legend , repetition , and shuffling . It ’s a great all around organizer and demonstration tool for the iPad .
Photo Manager Pro
Portfolio Pro ( $ 9.99 ) is a full - fledged presentation app that provides many option for organizing groups of exposure and showing them . you could create unique gallery , tally your own branding , choose from a variety of customizable theme , and of trend show slideshows . bully for photographers who ask a flexible , powerful app for client presentation .
Lightroom export settings
Beyond the basics
If you like to “ pinch - zoom ” your trope for a tight look at the details , you might want to add together a few picture element to your images while preparing them on your Mac . I had good fortune double the firmness numbers from 2048 - by-1536 to 4096 - by-3072 pixel . This allow me to overdraw the figure of speech more on the young iPad for a closer look . But keep in idea that the file size of it goes up too .
My begonia image at 2048 - by-1526 ( 3.1 megapixels ) took up 662.6 KB on the iPad . When I increased the image resolution to 4123 - by-3072 ( 12.7 megapixels ) , the file size of it uprise to 2.3 MB . That ’s a middling gamey damage to pay for a little extra zooming capacity .
By the way , files at the old 1024 - by-763 resolution wo n’t zoom at all . But they look signally good at 100 per centum on the novel iPad . Like I said , the display is somewhat good .
iPhoto export for iPad
So it really fare down to how important subtle detail is to you , how much you want to zoom along in , and how much storage place you ’re uncoerced to sacrifice to do so . My recommendation is to take advantage of the Retina display ’s packed pixels and start importing your images at the 2048 - pixel width . And unless you have exceptional needs for extended zooming , I see no indigence to go beyond that resolution .
[ Senior Contributor Derrick Story learn digital photography onLynda.comand run a virtual tv camera club atThe Digital Story . ]
iPad (third generation) family
Photoshop Lightroom 4
Aperture 3.3
PhotoSync

Photo Manager Pro
