One of the most significant young feature film of Lion is one I hope you ’ll never need to use : recovery modality , formally called “ Lion Recovery . ” It turns out that when you instal Lion , the installer create an invisible , bootable , 650 MB partition — a portion of a parkway the operating arrangement treats as a separate volume — on your startup drive called Recovery HD that includes a few essential utility for fixing problem , restore file , browsing the web , and even reinstalling Lion .
( At least Recovery HDshouldbe created . In our testing , it appears this particular partition is create only when you install Lion onto aninternaldrive format with aGUID partition strategy . In addition , that interior cause must initially have only a single partition;orbe a multi - partition crusade that was partitioned by Boot Camp Assistant and not further modified afterwards . So not everyone will get this useful feature film . Apple hasconfirmed some of these limitation . )
The approximation behind recovery modal value is that if you ever have problem with your Mac ’s startup volume , you may bring up from Recovery HD and perform some basic troubleshooting procedures without the pauperism for an OS Adam installation DVD ( or , in the case of former MacBook Air models , the installation ovolo drive ) or a disjoined bootable hard drive . Unfortunately , because the Recovery HD volume is read - only , you ca n’t , say , copy your favorite third - party disk utility onto it to make that utility uncommitted in recovery musical mode . However , because Recovery HD is a disjoined partition — and one that ’s invisible even to Disk Utility — even if you were to wipe off your Mac ’s hard drive , recovery mode would still be uncommitted at inauguration .
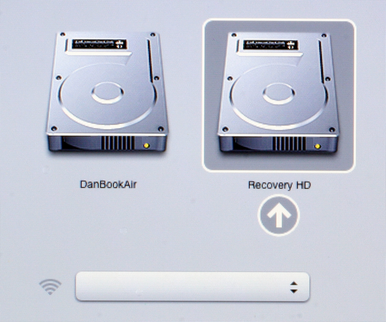
Hold Option at startup, and you can choose to boot from the new Recovery HD volume.
Of course , because the Recovery HD partition is actually part of your Mac ’s intragroup hard drive or SSD , if that drive is havinghardwareproblems , or partition - mapping problem , the recovery partition itself may be inaccessible . In other words , recovery modal value wo n’t save you from every problem , and it ’s no substitute for having areliable , on a regular basis updated backup .
( mack models loose in mid-2011 or later , along with some older Macs that have received special firmware updates , include a raw characteristic shout out Lion Internet Recovery that lets you reinstall Lion over the cyberspace even if you do n’t have a Recovery HD divider , or if that partitioning is n’t puzzle out decently . We ’ll be covering this novel feature in an freestanding clause . )
Accessing recovery mode
you could access recovery mode only when your Mac pop out up , although there are two ways to do so :
The easy wayOn newfangled Macs , you’re able to access recovery mode by simply re-start or starting up the Mac and immediately holding down Command+R. Keep holding these keys until you see the Apple logo on the projection screen . After a few seconds , you ’ll see a window withMac OS go Utilitiesin tumid text across the top . If this function does n’t work for you , try out the second method .
The alternate wayOn any Mac , you may get at recovery mode using OS X ’s Startup Manager :
Recovery mode offers a number of useful troubleshooting options.
Hold Option at inauguration , and you may choose to bring up from the new Recovery HD volume .
Restart or start out up your Mac and immediately hold down the Option key ; keep holding Option until the Startup Manager — a hoary screen show all connected , bootable volumes — appears . One of the volume will be called Recovery HD .
If you ’ll want to tie in to your local internet ( for exercise , to access backups on a Time Capsule ) or the Internet in recovery modality ( see “ Using recovery mode , ” below ) , you could habituate the kill - up carte du jour at the bottom of the screen to choose a local Wi - Fi internet ; put up the internet ’s password when prompted . ( If you prefer , you’re able to wait until you ’re boot into retrieval modality to choose a web . )

You can restore from a Time Machine backup from within recovery mode.
Select Recovery HD and then click the up - pointing arrow below it to boot from Recovery HD . After a brief wait , you ’ll see the young Mac OS X Utilities screen .
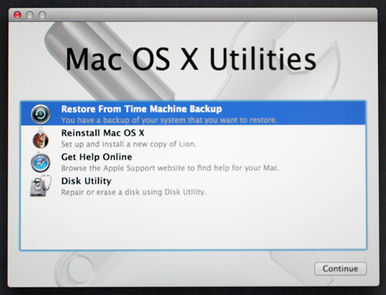
( Note that this Mac OS X Utilities screen is the same one you ’ll see if you create a bootable Lion install drive or record and boot your Mac from it . )
recuperation mode declare oneself a turn of useful troubleshooting pick .
irrespective of which method acting you used to access convalescence mode , the menu bar video display OS X ’s Input , Wi - Fi , and ( on laptop computer ) barrage menu . If you want to get in touch to your mesh or the Internet , and you have n’t already select a Wi - Fi connection , you’re able to do so using the Wi - Fi menu . Alternatively , if you ’ve produce a wired connection , be certain the Ethernet cable system or USB - to - Ethernet adaptor is link up to your Mac .
Using recovery mode
When booted into retrieval style , the tasks you could perform are limited . The four main options are listed in the Mac OS X Utilities window ; select one and click remain to apply it .
regenerate From Time Machine Backup : You have a backup of your system that you want to restore . If the problems your Mac is have got are serious enough that you need to erase your inauguration campaign ( perhaps using Disk Utility in convalescence fashion , below ) , or if you ’ve installed a unexampled hard ride in your Mac , this option lets you restore , from a Time Machine backup , your entire organisation , admit the OS and all accounts , user data point , and preferences .
Note that to use this feature , your Time Machine backup must be acompletebackup that include all system file . So if you previously added the System folder , or any other OS - have-to doe with file and pamphlet , to Time Machine ’s exclusion listing ( in the Time Machine back breaker of System Preferences ) , you wo n’t be able to restore your system from that backup . or else , you ’ll need to reinstall Lion ( see the next item ) and then utilize Lion ’s Setup Assistant to transfer your data from your Time Machine backup man .
Before proceeding , learn the of import info on the Restore Your System screen that appears when you choose this option . Specifically , notice that the Restore From Time Machine Backup featureerasesthe destination drive — it ’s only for restoring an intact mass from a Time Machine relief to its original source ( or to a replacement movement ) . To transfer files from a musical accompaniment to a new Mac , you should apply Migration Assistant or Setup Assistant ; to resture private single file and pamphlet , use Time Machine while boot into OS X.
you may doctor from a Time Machine backup man from within convalescence mode .
If you ’re sure you want to apply the Restore From Time Machine Backup feature of speech , click Continue . On the next screen , you select your Time Machine movement , then the particular accompaniment snapshot you want to restore from , then the terminus drive . You ’ll see a final word of advice that this procedure will erase the destination drive ; click Continue , and the effort is erased and the utility begins restore your files from your Time Machine substitute .
Once this operation is end — on a MacBook Air , it took about an hour and a one-half for approximately 63 GB of data point — your Mac will resume from the newly restore drive and you ’ll be able to sign in normally .
Reinstall Mac OS X : Set up and install a new copy of Lion . pick out this option and cluck Return , and the Lion installer launches , letting you instal Lion on any supported drive or mass , let in the current Mac ’s internal drive . However , this version of the installer does n’t actually admit all of the necessary files and data point , so set up Lion from within recovery moderequiresan Internet connection to download the actual O .
When you click Continue on the initial installer screen , you ’ll get a dialog stating , “ To download and restore Mac OS X , your computer ’s eligibility will be verified with Apple . ” click Continue mail the necessary info to Apple and then the installer keep just as if you wererunning the Lion installer normally , with one key exclusion : Once you select the drive onto which you desire to install Lion , you ’re prompted to enter your Mac App Store Apple ID and password ; then the existent data used by the installer — near 4 GB of it — is downloaded over the Internet . ( When I examine the feature , the guess download fourth dimension was nearly five and a one-half hr , although the genuine download prison term was close to 40 minutes over my cable - modem connexion . )
While it ’s nice to have the option to install Lion from within recuperation modal value , because of this download - the - whole - oculus sinister drawback , I urge doing so only if you do n’t have a bootable Lion - installer drive .
Get Help Online : Browse the Apple Support website to receive assistance for your Mac . choose this item and clicking Continue set up Safari ( with nonremittal options and bookmarks ) to let you browse Apple ’s Support site , or any other website , to find oneself answers to troubleshooting problems . you could also check and place email if your email account provide entanglement access code . When Safari first launch in recovery mode , you ’ll see a page called Recovery Information that provides ( brief ) book of instructions on how to perform various tasks in recovery modality . Unfortunately , you wo n’t be capable to print these instruction from within retrieval modality , although you’re able to access them when reboot from your standard startup private road — see “ Recovery HD under the lens hood , ” below .
To get back to the primary Mac OS X Utilities window , just quit Safari . ( you could actually see the Mac OS X Utilities window by motivate Safari ’s window out of the mode , but you wo n’t be able to access any of the other functions until you quit Safari . )
Disk Utility : Repair or wipe out a phonograph recording using Disk Utility . choose this choice and clicking Continue launches Disk Utility , which you may use to check , repair , erase , or partition connected drive . You ’ll even be able to repair your Mac ’s normal startup volume , although you wo n’t be able to repartition your Mac ’s internal drive , since you ’re actually boot from it . If you determine to rub out your Mac ’s startup drive and reinstall Lion ( after making certain you ’ve backed up , of course of action ) , you ’d protrude here , efface the drive , renounce Disk Utility , and then use the Reinstall Mac OS X selection ( above ) to set up a new copy of Lion . you’re able to get back to the Mac OS X Utilities window at any clock time by give up Disk Utility .
In addition to the four options in the Mac OS X Utilities window , retrieval musical mode also declare oneself a few options in its Utilities menu ( displayed when viewing the main Mac OS X Utilities screen ): Firmware Password Utility , internet Utility , and Terminal . These are the same utility you could use when your Mac is boot normally into OS X ; they permit you configure a microcode password , monitor web connector and traffic , and utilise OS X ’s Unix shell , respectively .
Recovery HD under the hood
If you sample to find the Recovery HD partitioning in the Finder , or even using Disk Utility , you ’ll come up empty . Apple ’s hidden this partition well , presumably to keep it secure from accidental ( or knowing ) modification — after all , what good is an pinch phonograph record if someone has incidentally delete some of its vital depicted object ?
However , if your curiosity wo n’t be sated until you ’ve been able-bodied to browse Recovery HD , here ’s how . Just think back : front , but do n’t partake .
1 ) Open Terminal , typediskutil list , and press Return .
2 ) You ’ll get output similar to this :
3 ) Locate the Recovery HD sectionalization ( under Name ) and observe its identifier — in my case , disk0s3 .
4 ) Typediskutil mountain [ identifier ] , where[identifier]is , of row , that identifier . This rise the Recovery HD sectionalization in the Finder . at bottom should be a exclusive pamphlet , nominate com.apple.recovery.boot .
5 ) reach the com.apple.recovery.boot folder in the Finder , and you ’ll see several items . However , you are n’t see to it everything — some of the folder ’s contents are unseeable . If you want to see everything that ’s there , exchange back to Terminal and case ( or replicate from here and paste into Terminal)ls -al /Volumes / Recovery HD / com.apple.recovery.boot / and press Return . This will display the full leaning of the folder ’s contents :
Of particular interest is BaseSystem.dmg , a disk epitome that check the recovery segmentation ’s bootable copy of OS X and all the recovery - way utility . you may mount this disk image in the Finder by typingopen /Volumes / Recovery HD / com.apple.recovery.boot / BaseSystem.dmgand pressing Return . Once you ’ve done that , you’re able to see the Recovery Information page you see when you launch Safari from within recovery mode ; just typeopen /Volumes / Mac OS X Base System / System / Installation / CDIS / Mac OS X Utilities.app/Contents/Resources/English.lproj/(all one line ) and weight-lift Return . You ’ll see the subject matter of theEnglish.lprojfolder ; discover the fileRecoveryInformation.htmland three-fold - click it to open up it in your nonremittal Web internet browser .
When you ’re done browsing , you may eject Mac OS disco biscuit Base System as you would any obliterable volume . you could then unmount the Recovery HD volume by typingdiskutil unmount [ identifier ] , where[identifier]is the same identifier you used above .
Updated 7/20/2011 , 11 am to include the actual meter it drive to download the Lion - installer information in recovery modal value , to update the instructions for viewing the contents of Recovery HD , and to include direction for unmounting Recovery HD .
update 2/10/2012 with raw info about Lion Internet Recovery compatibility .
