If you work only with basic Holy Scripture processing or school text documents , then the Print dialog in Mac OS X is really simple : just tell it which pages to impress , how many copies you want , and which printer to print from . slowly . And perhaps also tell it to surmount the page to fit the theme . Still easygoing .
But if you turn with a complex screen background publishing app such as Adobe InDesign or QuarkXPress , there are dozens of choices based on what you ’ve created , the variety of printing machine you ’re using , and the process that will be used to produce your final printed product .
Here ’s a down - and - dirty overview of what you ask to know — and what you’re able to ignore — in InDesign ’s Print duologue . ( I ’ll cover QuarkXPress in a subsequent story . )
InDesign’s Print dialog has eight separate panels to control output.
Adobe has done an admirable job of not only grouping the printing options into lucid panels , but ready those choice context - sensitive . Thus , they change accord to the printer you ’ve choose . So , if you opt a background inkjet printer , your options will be different than those available for a PostScript optical maser printer or imagesetter .
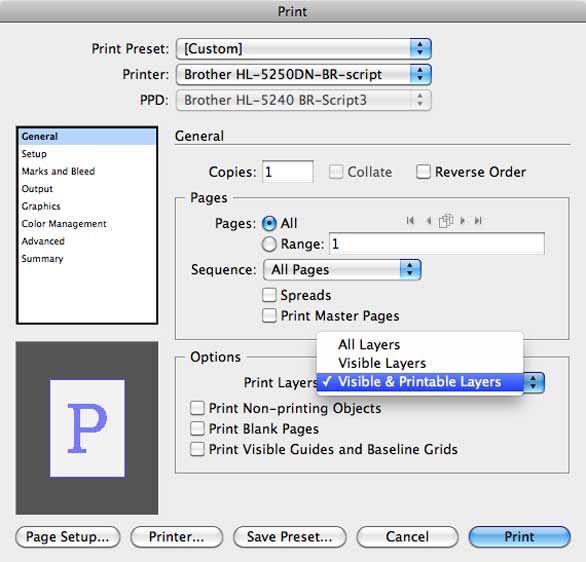
General panel
The General instrument panel is fairly ego - explanatory — you’re say InDesign which part of your document you want to impress . If your written document is designed like a cartridge , with left and correct pages , the Pages section lets you print them side - by - side on the same sheet of theme — but you may need to scale the pages to fit on the paper . If you ’ve used InDesign ’s Master Pages to structure your papers page , you could print those varlet from here as well .
The Options section lets you overrule any object - specific or layer - specific printing or profile options you ’ve made on the page , and forces all the objects or layer to print . This also where you’re able to force InDesign to print any vacuous Page in your document ( normally InDesign saves theme by ignoring blank pages ) , and to impress the page grids and guide you ’ve used . Printing the guides can facilitate a colleague realize a document ’s pageboy social organization when you hand off a project to them .
InDesign ’s Print duologue has eight separate panel to control output .
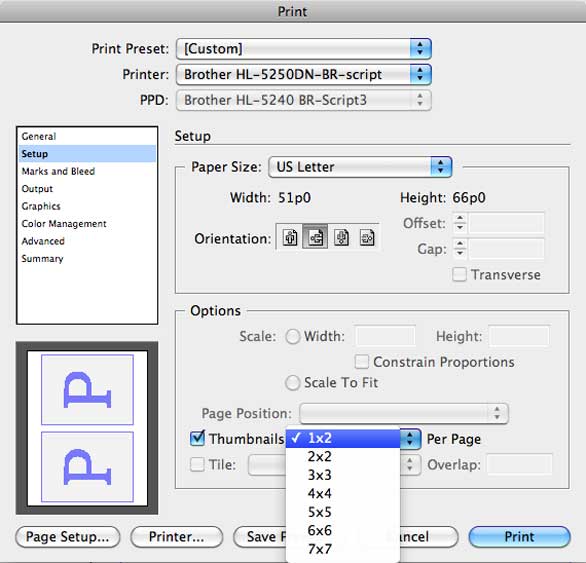
The Setup panel controls sizing and orientation. Here, we’ve told InDesign to shrink its pages to print two per sheet of paper.
Setup panel
The Setup board is also pretty obvious — you’re able to descale a varlet to fit the paper in your printer , control where a small page will print on the paper ( concentrate on is often helpful ) , print multiple tiny thumbnails of your page on each mainsheet , or burst up a large Thomas Nelson Page so that it prints on multiple smaller sheets that you’re able to tape together ( call tiling ) . The Preview windowpane at the bottom go away is hugely helpful for seeing when you ’ve made a terrible mistake , such as typeset a vertical pageboy to print horizontally .
The Setup panel controls sizing and orientation . Here , we ’ve told InDesign to shrink its pages to publish two per sheet of newspaper .
Marks and Bleed panel
The Marks and Bleed panel is useful if you ’re going to be printing a small pageboy onto larger paper and desire to see where the Thomas Nelson Page edges are , or if you require to quickly check that objects you intend to string up off the edge of the page ( bleed ) in reality do . Some of the Printer ’s sucker are principally utilitarian for offset press — you ’ll likely only want craw marks .
The Marks and Bleed instrument panel lets you add crop ( clipping ) marks and print any object that extend off the edge of the page . mention the helpful Preview windowpane indicating that our choices are expectant than our paper .
Output panel
The Output control panel is mostly used by printing professional , but a couple of options are useful for mere soul . If for some rationality you desire to print your colour Thomas Nelson Page in grayscale , apply the Color popup computer menu . If you ’ve used coloured text edition but ask it to print as black , use the Text as Black checkbox — utile when faxing a substantiation to a customer .
The Output board can be useful to force colors to print as grayscale , or text to print as black .
Graphics panel
The Graphics panel should only be used by professionals for controlling the path image data is sent to an output equipment . The Images discussion section has alternative to subsample each image to send only what ’s needed by your pressman ; to send just the on - screen preview to the printer ( useful for warm proof print when image quality is n’t crucial ) ; to leave the word picture box seat blank ; or to send all data point for all prototype to the pressman . This sometimes gives you the highest timber print , but can take longer to process . The Fonts incision rent you control whether InDesign sends the entire font for every face used in the papers , or only the type used in the written document ( Subset ) , or no case at all . If your fonts are already downloaded to your printer , or are located on a hard driving attached to your printer , you could choose None .
The Graphics dialog box is for professional only .
Color Management panel
The Color Management jury also control pro - unwavering control , but if you ’re work in a color - managed workflow , you may utilize your desktop pressman to see an estimation of how your people of colour may appear on your final output equipment . Just click the Proof tuner button .
The Color Management jury is useful in color - managed workflows .
Advanced panel
The only thing to say about the Advanced panel is that if you do n’t know how to use it , last out away from it . Advanced is for graphics pro who typically work with prepress operation and have a deep noesis of print engineering . If that ’s not you ( and , if you ’re read this it probably is n’t ) , then it ’s one less affair to worry about .
The sophisticated panel is normally used by output signal professionals to contain how linked artwork files are handled , and for troubleshooting difficult filing cabinet .
Summary panel
The Summary panel is , as the name entail , the total of all the scope you ’ve used to correct up the printing for a written document . It list all of your choices from all of the other panel in one plaza .
The Summary panel display all the pick you ’ve made in the premature panels .
Bottom buttons
The Page Setup … button at the bottom of the dialogue window normally is n’t used because its controls are duplicated in other areas of InDesign ’s Print duologue . But the Printer … button takes you to the familiar Mac OS X Print dialog that contains the options for your specific printer , such as theme treatment , duplexing , medium type , screen pages , scheduling , and color direction in the printer . Do n’t be fool around by its button at the bottom for give a PDF or to Preview your printed document — they wo n’t do anything .
Instead , always habituate InDesign ’s built - in PDF generator under File- > exportation or File- > Adobe PDF Presets . ( By the way , it ’s possible to generate a PostScript file cabinet from your written document by choosing PostScript from the Printer popup menu in the Print dialog … just be sure you know what you ’re doing and why . )
The Save Preset … button lets you redeem your chosen combination of options as a preset that you may choose from the Print dialog ’s top popup bill of fare later on — so you do n’t have to go through all these choices again . you could oversee your presets and export them to partake with others by choosing File- > Print Presets .
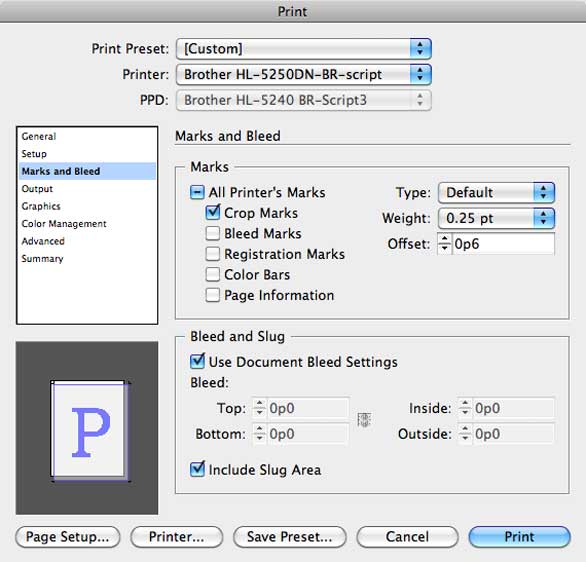
The Marks and Bleed panel lets you add crop (trim) marks and print any objects that extend off the edge of the page. Note the helpful Preview window indicating that our choices are larger than our paper.
The various button at the bottom of InDesign ’s print dialog do a variety of tasks from taking you to the OS X mark dialogue to saving your mise en scene as presets .
All things considered , those are a flock of option ! But your project will dictate which ones will be meaningful for you , and usually you wo n’t be using too many of them simultaneously .
Most people have only one or two printer , and you belike only print a few kinds of undertaking , so once you ’ve found the compounding of options that act upon for your project , just salve them as presets and you wo n’t have to think about them again .
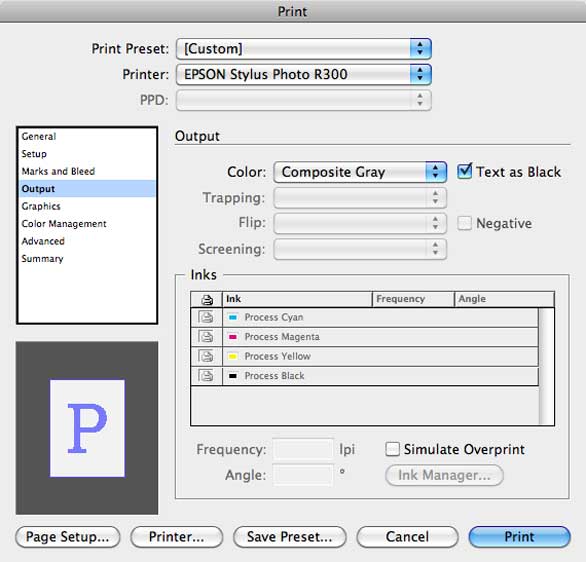
The Output panel can be useful to force colors to print as grayscale, or text to print as black.
[ Jay J. Nelson is the editor program and newspaper publisher ofDesign Tools Monthly , an executive sum-up of graphic design news program . ]
InDesign CS5
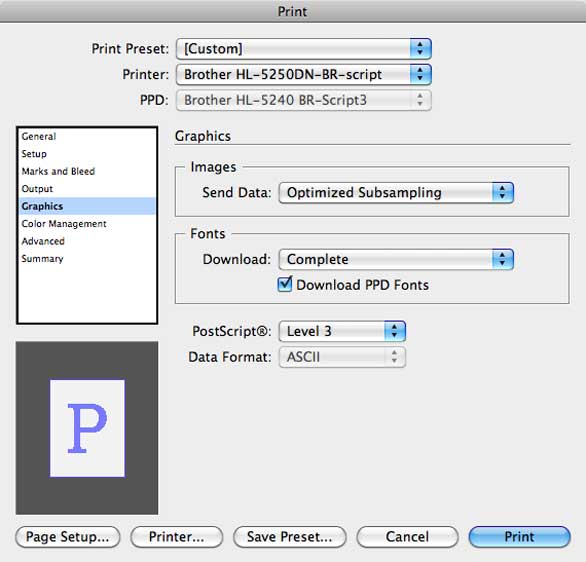
The Graphics panel is for professionals only.
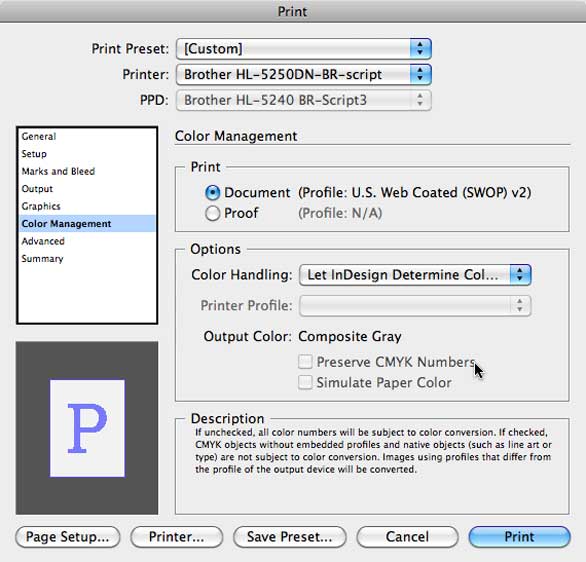
The Color Management panel is useful in color-managed workflows.
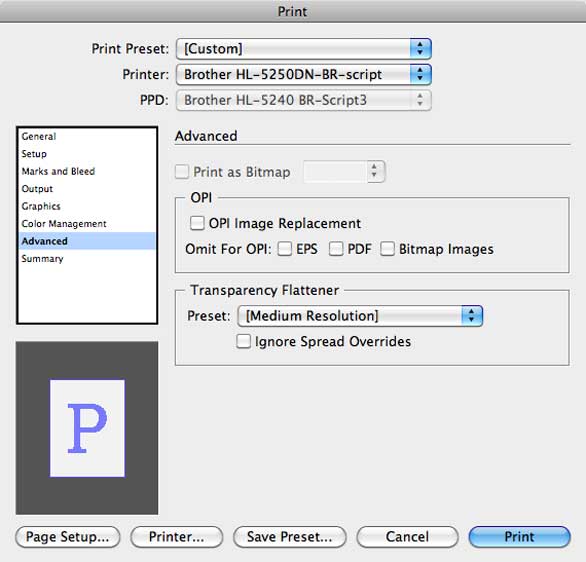
The Advanced panel is normally used by output professionals to control how linked graphics files are handled, and for troubleshooting difficult files.

The Summary panel displays all the choices you’ve made in the previous panels.

The various buttons at the bottom of InDesign’s print dialog do a variety of tasks from taking you to the OS X print dialog to saving your settings as presets.
