Photoshop Lightroom 2.0 has been out for less then a day , and I ’ve already heard from a number of people need about the Modern edition released Tuesday . A few current users have inquire if it ’s deserving the $ 99 ascent from Lightroom 1.0 ( ) . Others who have been on the fencing about investing in a $ 299 photo workflow tool have asked about what Adobe did that make Lightroom 2.0 an improvement over the initial handout . ( I ’ve also gotten a couple of the inevitable , “ Which do I choose : Aperture or Lightroom ? ” doubt , to which I say , download the 30 - day demos and see which one feel right-hand to you . )
I ’m currently working onMacworld’sreview of Lightroom 2.0 , but here ’s a fast summary of five cardinal enhancements that I think make it a compelling raise .
Selective editing
One of the problems with the first version of Lightroom was its deficiency of selection - establish registration . Any changes you made to a photo were applied to the entire image . For many exposure , this was n’t a trouble — changing the vulnerability , color balance , or other tonal setting throughout an effigy made sense . But , if you had an image that had a perfectly expose sky and an underexposed foreground , for example , you could n’t selectively change the foreground without making the sky look spoilt .
To make those types of changes in Lightroom 1.0 , you needed Photoshop or another figure of speech - redaction diligence . You would edit the image out of Lightroom , and then have to deal with a 2nd variant ( or third or fourth , depending upon how much you edited it ) of a photo in your Lightroom library .
Lightroom 2.0 ’s Adjustment Brush tool addresses that shortcoming by get you produce mask that change only the office of a exposure you desire to neuter . With the light touch , you take the eccentric of sweetening you desire and whether you need to increase or lessen the effect ; then , only “ paint ” with your shiner over the domain you want to change . If you brush a little sharply in places , you could hold down the Option cay and sweep the orbit you do n’t desire stirred . In the persona shown below , I ’ve used an Exposure - based Adjustment Brush to darken the domain around my case . ( The area in red is the real masked area — Lightroom lets you toggle that overlay persuasion on and off when you are paint an effect . )

The Adjustment Brush work with the primary Lightroom figure of speech - adjustment controls — Exposure , Saturation , Brightness , Contrast , Sharpness , Clarity and Color — and you may mix and pit those controls on any mask region . you could also salvage a specific group of configurations as a preset , and Adobe include a Soften Skin preset that works surprisingly well .
And , if you need more than a brush , Lightroom 2.0 let in a Graduated Effect puppet that work in a similar manner , letting you supply an event that gradually increases or decreases across an area you choose .
Better filtering tools
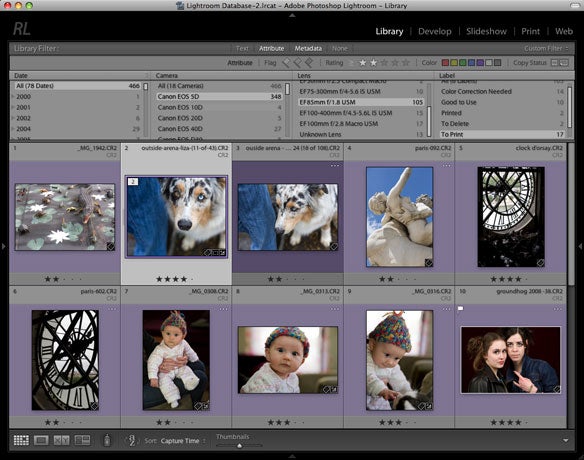
Finding images in your catalogue with Lightroom 1.0 was n’t the most straightforward process , although , once you got the hang of the program ’s foible , it play . With variation 2.0 , encounter and separate out your images is much well-heeled , via the fresh Library Filter bar , which puts all of the master search options right at the top of the filmdom . From that one locating , you may look for for text associated with your photos ( Indian file name , keywords , caption , and so forth ) ; attributes like rating , colour label , and flag ; and any camera metadata lay aside with an prototype .
The great affair about the Filter bar is that it quickly and easy lets you get to a mathematical group of look-alike based upon multiple standard . In the screenshot below , I was capable to quickly select all effigy shoot with a Canon EOS 5D and the 85 mm f/1.2 lens that had a minimum rating of two stars and had my “ To Print ” label lend oneself . It was potential to get to this refined group of images with Lightroom 1.x , but nowhere well-nigh as rapidly . As an append bonus , I can now save my filters as presets .
Smart albums
Apple ’s Aperture , iTunes , and iPhoto have had them for years , and Adobe finally has Smart Album tegument in the biz with Lightroom 2.0 — they’re just call Smart Collections . As is the vitrine with Apple ’s apps , you may create a compendium ( Lightroom ’s term for a photo record album ) of photograph using a set of touchstone ( identical to that used in the Filter bar ) , and then save it as a set that automatically update as you add and edit image in your library . It ’s a lowly , but extremely welcome , sweetening .
Multiple monitor support
A major productivity enhancer that both Photoshop and Aperture have — support for more than one display — is now part of Lightroom . Many lensman work in the champaign on a portable , and then have a second display in their studio , which pay them much more infinite to liken , sort , select , and edit images . Again , it ’s a little affair , but for many of us , it will make Lightroom a much more powerful creature .
Better Photoshop integration
Lightroom does n’t pretend to be an all - thing - to - all - multitude type of practical app , and it lacks the cryptic compositing and editing functionality that you find in a curriculum like Photoshop . Version 1.0 had the capability to export photos to Photoshop , letting you make adjustments and hold open your edits back in Lightroom as a written matter .
With Lightroom 2.0 , Adobe has made it a scrap easier to “ rotund - trip ” your photos with Photoshop . There are menu choice for automatically creating panoramas and mellow dynamic grasp ( HDR ) images from a selection of photos , and you may also open up up a Lightroom image as a Smart Object level in Photoshop , which allow you continue change made in Photoshop in Lightroom . This latter feature is enormously important if you want to make further change to a photo that has already been edited ; your changes are preserved when you return to Photoshop .
There are a few more change under the hood , but these five are the ones that have made the most impact on me as I ’ve been working with the Beta and the concluding release of Lightroom 2.0 . abide tuned for the final review .
[ Rick LePage is a formerMacworldeditor , and die hard the photo printer sitePrinterville . ]
