Upon receiving a Mac miniskirt yesterday — Macworldhas bought quite a few of them , oddly enough — my first inclination was to walk around with it . Just insert it under my arm and take a promenade . My 2nd inclination was to plug it in and put it through its pace — and it worked capital .
My third inclination was to take it apart to see what made it click .
And so last night , after carrying it home in my packsack , I set about disassembling the Mac miniskirt . After all , better I risk the spirit of a single one of Macworld ’s Mac mini than all of you put on the line the lives of your cool new piddling computers , fresh off the truck .
So with the lives of your Mac minis in judgement , I began the dismantling of mine .
break the case . The first step was to protrude the case . As our own Dan Frakes andthat Kyd ’s webloghave both detailed , the pecker of choice is the putty tongue . If you ’re not a homehowner , you might not have one of these . Me , I just used mine to spackle a twosome of holes in my lav last hebdomad . So I scraped off some dried - up spackle , inserted the putty knife in one side of the Mac miniskirt ’s undercarriage , and popped it up with a blue coating of force play . I restate that on the other side and then was able-bodied to lift the Mac miniskirt out of its blanket .
An important bank note : if you value the pristine appearance of the Mini ’s shiny white plastic top , do all of your employment on a really , reallysoft Earth’s surface . Because that thing scratch more easily than an iPod .
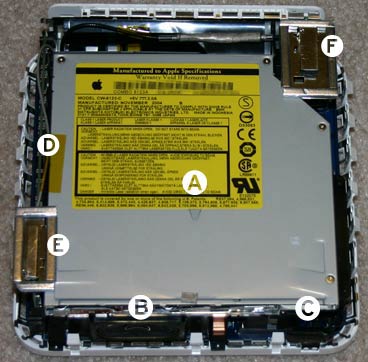
Once the Mac mini ’s protective candy coating has been abstract forth , we ’re left with a well-defined view of the top side of the computer . The optical drive is on top ( A ) , and right on below it on the front face are a small utterer ( B ) and the computer ’s business leader / sleep light ( C ) .
On the odd side is the organisation ’s one RAM one-armed bandit ( 500 ) ; rest right on above it , clipped on to the optic drive , is the Bluetooth antenna ( E ) . In the back right-hand corner , attached to a plastic Wiley Post and tap to the optical driveway , is the AirPort antenna ( F ) . Both antennae ’s cable television be given back behind the ocular driving force to the wireless daughtercard that ’s located down in the computer ’s depths .
If you just want to set up RAM , this is where you may turn back . pop out off the Bluetooth antenna , pop out the RAM , and bind in a new DIMM . But in the interests of science , let ’s move on .

The optical drive . At this point I decided to take out my arrangement ’s included ocular drive , although as it turn over out that you could extend with disassembling a Mac miniskirt with the opthalmic thrust still in place — it ’s just a little spot hard to do .
transfer the optical drive is gentle . There are six Phillips screw , place on the drive ’s remaining , right , and back . In a heavy system , inserting and absent screws can be tricky because they run to strike into scary places inside the computer . The reward of the Mac miniskirt ’s size is , you could just pick it up in one hand , tilt it in the proper direction , and use gravitational attraction to help you keep the screws in the correct place .
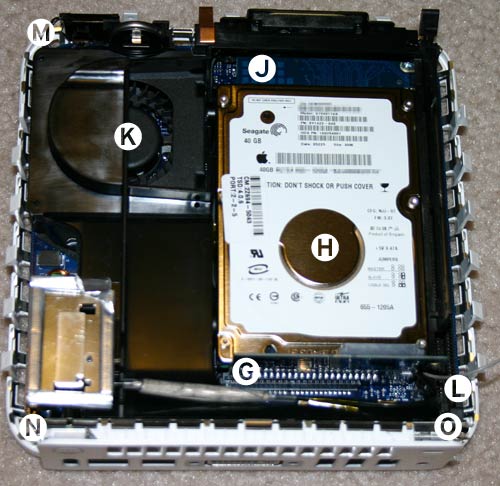
The Mac miniskirt ’s optical drive connects to a small daughtercard ( G ) that ’s also connected to its hard drive and to the main motherboard below . There ’s no cable ; the optical drive attache directly to a connector on the card .
Once I removed the ocular drive , more of the Mac mini ’s insides come into opinion : right below is the laptop hard crusade ( henry ) , at the far front is a glimpse of the computing machine ’s motherboard ( J ) , and off to the side you could see the Mini ’s cooling fan ( K ) . Because the Bluetooth transmitting aerial was tap to the optical parkway , I had to get rid of the tape ( L ) before removing the drive .
The hard campaign . At this point you ’d think you could remove the Mac miniskirt ’s strong drive . At least , that ’s what I thought . But it ’s not lawful . The drive is attached to the Mac miniskirt ’s plastic living accommodations — a black faculty that also holds the optical driving force and fan — by four fucking , two each on the left and correct sides . The job is , the two screw on the right side ( when view from the reckoner ’s front ) are obscured by the devotee and the plastic cover that go over the processor ’s heat cesspit . Presumably if you get rid of the housing , you could get at those screws , but I did n’t try in this attempt .
transfer the housing . The Mac miniskirt ’s pliant trapping is attach to the motherboard in four place : the front correct niche ( M ) and the rearward right field and left corners ( N , O ) via Phillips screw , and now to the motherboard via the daughtercard ( G ) that also connects to the optical drive and concentrated private road .
Once removing the three screws , I was ready to bring up the housing up . But first , I had to do some careful placement of wires — not only removing the AirPort antenna from its office , but taking attention not to rip out the wires carry to the power / sleep lightness in the front correct corner ( which tends to coil slightly over the niche of the lodging ) or the power clitoris in the back right corner . Then I gingerly pull up on the housing , including the daughtercard , which came barren of its expansion slot on the motherboard .
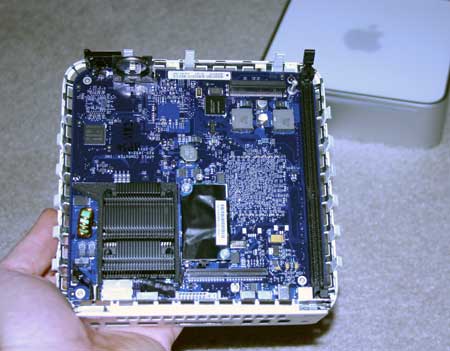
What lie beneath . With the trapping go , the motherboard was generally exposed :
From here you could see the central processing unit ’s heat sink ( P ) , the expansion slot that the caparison ’s daughtercard was bind to ( Q ) , and the card ( R ) which is home to the Mac miniskirt ’s AirPort Extreme card and Bluetooth mental faculty .
At this point , removing the wireless daughtercard is a breeze — two Phillips screws and it ’s out .
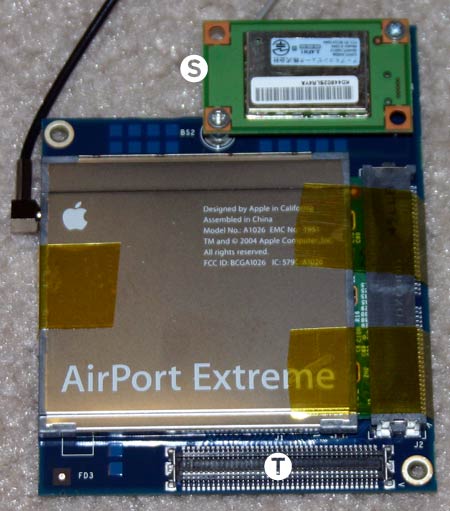
Although taped down to view as it firmly in plaza , this AirPort Extreme card is model A1026 — the stock AirPort Extreme scorecard . Above it is a smaller Bluetooth module ( S ) , make love to the daughtercard . At bottom you could see the connector ( T ) that attach this card to the Mac miniskirt ’s motherboard .
Putting it back together . yield the Mac mini to its original land is n’t actually too hard , but it ’s of import to take care . I cautiously reseat the wireless daughtercard and interchange its screws . I then threaded the wireless feeler through the appropriate touch in the plastic housing and reattached the trapping by enter its daughtercard into its time slot on the motherboard , then regress the fucking . Then came the optic driving , as well as returning the wireless antennae to their rightful places . Finally come the RAM module . Then with a few suction stop , the Mac mini had been returned to its protective shell .
in conclusion came the second of truth — had I passed the three primal trial of any hardware - disassembler ? Step one : no blood on the case . deterrent . Step two : no extra nookie left over . gibe . Step three : scheme work OK once it ’s put back together . It worked like a magic spell , which was a relief . Although I was willing to sacrifice a Mac mini for science , I ’m happy I did n’t have to .
But I ’ll always remember the meter that I held an exposed Mac mini in the palm of my hand …
( Get more on Mac miniskirt at our particular Mac mini varlet . )
