If you ’re like me , you spend a lot of time using your Mac , extend everything from piece of work to take on . In my sheath , my machine not only help me create my variousMacworldfeatures , but it also pays the bills , compose letters to friends , updates our family ’s website , and can once in a while be found drive a race car or sneaking in a virtual cycle of golf .
pass how much prison term all of us spend on our Macs , it makes sense to make that sentence as enjoyable and productive as possible . After all , there ’s no law that says you have to use your machine exactly as Apple delivered it , right ? From customizing your Mac ’s visual aspect , to teaching it some novel tricks , to increase your productivity , there are a number of things you could do to get the most out of your time with it .
The followingVisual Tweaks , System Enhancers and Productivity Boosters are exemplar of some of those things . You credibly wo n’t follow up everything , but this collection of tips and prank should supply a safe sense of those thing you’re able to do to customize your Mac and improve your productiveness .
Visual tweaks
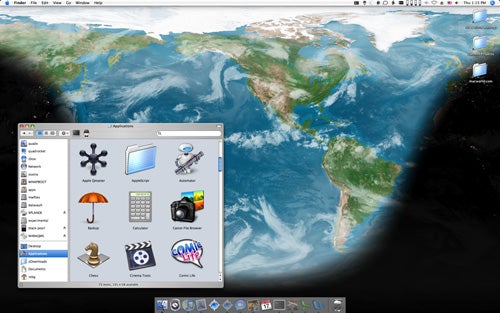
Keep an Eye on the PlanetIf you work in a windowless square block , deeply within the bowels of an anonymous bureau tower , there ’s no understanding why an entire study 24-hour interval should go by without you ever laying eye on the great outdoors . Your Mac can help you get a glimpse of the bountiful , wide world that ’s out there .
If you desire the high - level thought of things , installTerraVista . This spare app places a floating range of Earth on your desktop , reflecting the current sunlight coverage on the major planet — and even optionally showing cloud cover . You might also likeGary Martin ’s EarthGlobe(also free ) , which does something similar . You ca n’t use as with child an image of Earth , nor can you see current cloud natural covering , but an Info windowpane gives you some interesting worldly concern and sun data . If you ’re more of a Moon fan , try another destitute Gary Martin offering call MoonDock ; It does interchangeable things , but with the synodic month instead of the sun .
Using EarthDesk , you may turn your desktop into a practical orbiter aspect of the planet — Clarence Shepard Day Jr. and Nox boundaries and cloud cover are both updated regularly .
Xeric Design ’s EarthDesk($20 ) offers a more detailed solution , wrench your desktop simulacrum into your windowpane on the world . Instead of your normal desktop flick , EarthDesk offers a matte acoustic projection of Earth ’s Earth’s surface , complete with cloud cover ( updated every three hours ) and dark and loose geographical zone that update as the twenty-four hours progresses , The programme lets you add together custom emplacement , which you may jump to subsequently to see their current conditions . you may select from 11 different methods of ejection — that ’s the method acting by which the pear-shaped Earth is transferred to a flat mathematical function — and view either a traditional satellite figure of speech or one demonstrate state and country edge . you’re able to even pick out to apply EarthDesk images in your screen recoverer .
Make Your laptop computer ’s Screen TransparentWell , notactuallytransparent — but you’re able to make the screen look that way with a number of optic trickery . First take a picture of the area behind your laptop , from an region near where you ’d be looking at the screen . Open that file in an image editor , and work it to on the dot your concealment dimensions—1440 - by-900 on the 15 - column inch MacBook Pros , for representative , or 1280 - by-800 on a MacBook . Use the Desktop & Screen Saver System Preferences panel to set up this image as your background . Finally , carefully position your laptop so that the image appears continuous with the literal background signal behind it .
In drill , this does n’t work nearly as well as it looks in still photo — such asthese in a popular Flickr group . As you work and your mind moves around , you ’ll probably regain the mismatch between your desktop and the actual background to be deflect . But it ’s a nifty fast one to use if you ’re extend to take the air by from your desk for a couple minute .
Beautify Your Screen SaversOS X include a dozen screen savers in the Desktop & Screen Saver System Preferences instrument panel . But what you see there is just the tip of the crisphead lettuce . There are many sources for extra silver screen rescuer , most of which are innocent . you could find more screen door rescuer onApple ’s own site , for instance . There ’s also afairly detailed listavailable on pure-mac.com , and if you ’re run for Mac OS X 10.4 , you may download your favourite fromthis awful collectionof Quartz Composer screen door saver .
But even if all these choicesstillfail to thrill you , control outShuffleSaver(free , though a donation is requested ) . ShuffleSaver can load your favorite image from iPhoto , or for a truly dynamic screen saver , Flickr.com . For instance , you’re able to specify what tags to look for on Flickr , and ShuffleSaver then link to Flickr and displays images that meet your chosen tag . A monition , however : Since you ’re never sure what images ShuffleSaver might find on Flickr — and how appropriate they may be — this might not be an ideal choice for your computing gadget at work .
Brighten Things Up with ColorWhile too much colour can be overwhelming — Brady Bunch , anyone?—a splash of color here and there can really make matter stand out .
Take the Finder . There are a couple ways to use color to near gist to make it easier to find things . First , you ’re believably familiar with labels — Control - press any item in the Finder , then peck one of the seven colors in the Color Label section . Presto — instant attention grabber . practice this feature of speech sparingly , and authoritative feature will leap right off the filmdom at you . Overdo it , though , and your Finder windows will start looking like someone got loose with a multi - colour key triggerman . You want to employ labels only on those thing you necessitate to abide out , not everything in sight .
Customizing the color and the label of key file cabinet and folders helps make important items easier to find .
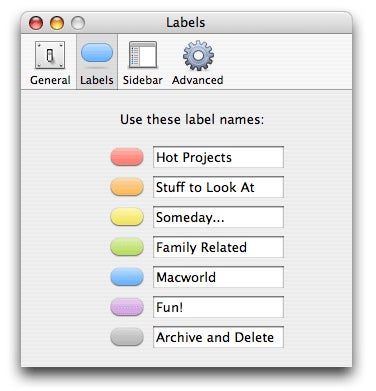
you may also customize the recording label assigned to each color in the Finder ’s Preferences . chatter on Labels , then transfer each of the semblance name calling to something more relevant to you . On my car , for instance , Red became Hot Projects , Orange turned into material to take care at , and Gray is Archive and Delete .
The second option for using color in the Finder involves coloring the background of a leaflet ’s window — as long as that windowpane is in icon view style . ( leaning and pillar persuasion window are adhere with white backgrounds . )
To hold gloss to a Finder windowpane , verify the window is frontmost by clicking on it , then select View - > Show View Options , or press Command - J. When the View Options palette appears , verify that the This Window Only radiocommunication button is checked — unless you really want to utilize your changes to all folder . In the Background segment , fall into place Color then select the small white swatch that appears . Pick your colour , then snap OK .
you’re able to even put an image behind your icons , if you wish well . In the View Options palette , click Picture and navigate to the image you ’d like to use . For legibility ’s interest , you ’ll want a more often than not dewy-eyed moving-picture show , and one large enough to cover the windowpane at the largest size at which you ’ll use it — otherwise OS X will tile your picture , which looks really bad .
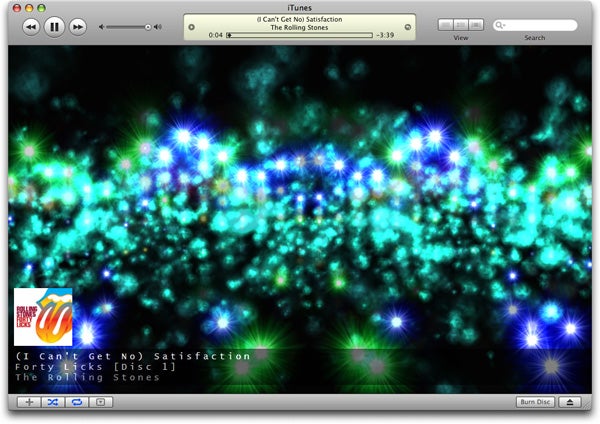
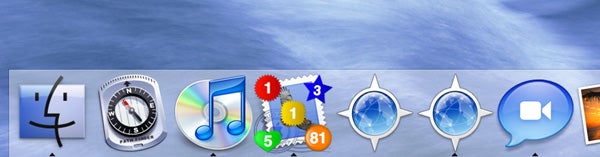
Use Different iTunes VisualizersiTunes default visualiser — the eye candy you could watch via the View - > Turn on Visualizer menu — is moderately nice . However , it ’s not your only visualization choice ; there are a identification number of third - party iTunes visualizers useable that install easy and are full support within iTunes .
If you determine the work up - in iTunes visualiser somewhat dull , try one of the many devoid or gloomy - cost third party alternatives . Here Eyephedrine Visualizer couch on a dazzling light show to a Rolling Stones classic .
Two of my favorite free visualizers areGaslight , a spectrum analyser with some lovely presets , andiVisualize , which utilise Apple ’s Quartz Composer and provides more visualizers via download .
If you ’re willing to spend a bit of money , $ 8 gets you the amazingEyephedrine Visualizer , which include 75 with child appear visualizers .
If that ’s not enough for you , you could find many more via aMacUpdate searchon “ visualizer . ”
System enhancers
interchange Your IconsWhile the received OS X icons are quite lovely to see at , you may want to freshen affair up every now and again . Or you may want to use icons on certain folder that advantageously accommodate their purposes — a flaming hot folder for your Hot Projects folder , for example .
Thankfully , replacing icon on OS X is as easy as written matter - and - spread . take File - > Get Info for the icon you want to employ , click once on the icon in the Get Info box , and press Command - C to copy it . Then open up the Get Info window for the political program , folder , or file whose ikon you ’d care to alter , press the small image , and strike Command - V to paste your newfangled icon .
But where do you get raw icons to use?Apple ’s screenland saver linkalso includes some icons , or you’re able to visit two well - cognize online picture repositories : InterfaceLIFTandThe Icon Factory . Download from their huge categorisation of loose icons , and transcript - and - paste to your meat ’s content .
If nothing online exactly matches what you had in judgment , and you ’re very artistically talented , you could try designing your own . The $ 15 shareware programIconographeris an excellent picture editor in chief . Keep in mind , however , that this computer program aid you plan icons from scratch , and that may not be something you ’re concerned in doing .
Alphabetize System PreferencesThe System Preferences program groups panels by case — Personal , Hardware , etc . If you have hassle remember whether Sound is in Hardware or Personal , though , this organizational strategy can be frustrative , as your heart searches for the mark in the various groups .
If you ’re well-worn of play the category guessing game , there ’s a simple fixture : select View - > Organize Alphabetically , and you ’ll see a simple-minded alphabetised transcription instead . ( This layout is also belittled than the standard setup . ) To return to the class prospect , select View - > Organize by Categories .
You also can take any individual orientation panel you wish by typing a few letters of its name — just press Tab headstone to verify that Appearance is highlighted , then start type . Sha , for example , will let you leap to the Sharing System Preferences panel .
make New LocationsIf you often move your laptop Mac between various blank space , each of which requires unlike connection preferences , consider using OS X ’s location feature of speech to ease the task . start the web System Preferences jury . clack the Location drop - down , and select New Location from the computer menu . Give your unexampled location a name and then snap OK . you may now move through each of the internet interface configuration screen door ( Ethernet , Bluetooth , AirPort , etc . ) , coiffe things as you call for them .
When you move the Mac to another place , do the same thing again , create a new location . In the future when you move from one point to another , you’re able to switch to your save up placement through the Apple menu ’s Location incoming .
As a actual - world example , if your dwelling house electronic internet uses stable IP addressing , you might require to make a “ traveling ” location that uses dynamic information science addressing — thereby enable your Mac to get an IP savoir-faire when you relate to distant system .
you may also create a especial “ not connected ” location . After creating a newfangled location , click the Show drop - down menu , choose web Port Configurations , and turn each user interface off . When you ’re done , you ’ll have a “ disturbance destitute ” location created — free from the temptation of the vane , the break of iChat , and the endless stream of inbound atomic number 99 - post .
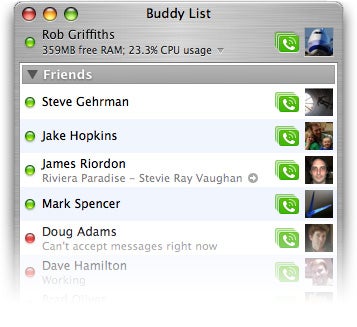
Using iChatState , you may put any number of motorcar - updating messages in your iChat position line . Here you may see my political machine ’s detached RAM and mainframe utilization , though I could just have easy show load averages , iTunes selective information , how many unread e-mail I have , and more .
Upgrade Your iChat StatusThe iChat condition message , which appears just below your name in the Buddy List and nonpayment to Available , is visible to all your buddies . While you may find it sufficient to type in a short but sweet manifestation , you may do more with the status subject matter . Download the freeiChatState , for instance , and your status substance can show iTunes song and creative person information , a countdown timekeeper , your Mac ’s free RAM , uptime , and CPU incumbrance , the active software , and much more .
If you ’re more of a ocular sort , you might prefer the freeDuckCall , which will use your iSight to take a picture every 30 seconds , and then coif your iChat picture to that image . The software ’s a short raspy , but it work .
Get More Mail Info in the DockIf you like Mail ’s unread substance indicator in the programme ’s Dock icon ( the crimson badge with snowy textual matter ) , you ’ll love the $ 8DockStar . With this programme installed , you may have up to five separate mailbox tracked in Mail ’s Dock icon . You master the shape and color of each indicant , as well as what it counts — show the full enumeration in your “ To Do ” postbox , for instance , instead of “ unread . ”
DockStar have you track electronic mail counts in Mail ’s Dock image for up to five different report . As ensure here , you’re able to change the colour and shape of each status index number , making it easier for your brain to commend which badge go with which mailbox .
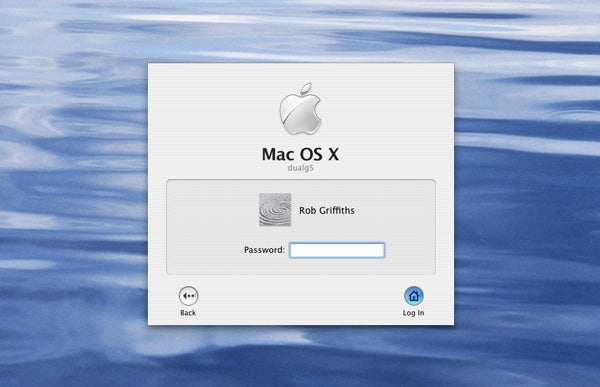
custom-make the Login Screen BackgroundWhen your Mac is sit down at the login screen , you ’re looking at something experience as “ Aqua Blue , ” one of Apple ’s standard screen background paradigm . Because it is one of Apple ’s standardised image , you could easily replace it with one of your own choosing . Perhaps you want to interchange it because you ’ve seen enough of Aqua Blue , or because you have a nicer image you ’d like to use . Another practical reason , though , is to include some contact info — in case your laptop is ever lifted by a “ everyday ” thief , some decent phrase text on the login window may advance the political machine ’s secure take — something like “ This machine earphone home every 10 minute and reports its location ” may do wonders to the casual thief ’s conscience .
To replace the picture , navigate to /Library - > Desktop Pictures in the Finder . Drag Aqua Blue.jpg to the Desktop ( or other location in your user ’s booklet ) to create a backup of the file . Now all you have to do is come up a JPEG trope you ’d like to use — make it the same sizing as your machine ’s aboriginal resolution — and name it Aqua Blue.jpg . Drag and drop it into the Desktop Pictures leaflet , and supply your parole when prompted .
With a simple file substitution , you’re able to change the screen behind the login windowpane . I ’ve chosen one of Apple ’s stock paradigm in this screenshot , but you’re able to practice anything you like . As a fooling theft handicap , consider add together your name and contact entropy ( and “ Reward ! ” ) to the chosen image .
That ’s it ; you ’re done — the next time you logout , you ’ll see your new desktop screen background . To revert to the normal image , just drag in the backup copy of Aqua Blue.jpg that you make as the first stride here — this will overwrite the customized image you antecedently make . ( You ’ll need to supply your password when prompt . )
Productivity boosters
Open Your Often - Used Applications at LoginMost OS ten exploiter I screw follow the same pattern . In the morning , they login and then pass a few minute of arc launching their most - used programs . This requires lots of Dock clicking , or scroll about in the diligence folder , neither of which is a productive exercise of anyone ’s clock time .
Instead of working the mouse so apace after login , let OS disco biscuit do the work for you . In the Accounts System Preferences dialog box , you may create a set of Login Items that run when you lumber in . press your write up in the lean of account , then penetrate the Login Items tabloid . There will probably be several things already list , even if you ’ve never gossip this tab before . That ’s because many syllabus add their background knowledge tasks to this screen , so that they ’ll run when you login .
To add your own program to the collection , get across the positive sign below the list of programs . When the data file web browser app opens , snap on the program you ’d like to run at login and click Add . ( you’re able to add more than one at a metre — just make Command while clicking to mark multiple programs . )
you may also spread out documents — say you have a budget spreadsheet that you forge with every sidereal day . Add it to your list of login items , and Excel will found and launch the worksheet for you .
All of this will tally some meter to the login process , but in the ending , it ’s faster than doing it yourself . Since you wo n’t be deadly reach for the mouse and keyboard right away , you may use that clip for productive job , such as finishing your threefold Grand Half - Lite Superccino Latte with Extra Foam .
Open Often - Visited Web Sites on LoginIn plus to paying aid to your “ real ” body of work , of course of instruction , you also have an entire Earth Wide World Wide Web to monitor . Safari will let you make a appeal of sites in a leaflet and then , by enabling the Auto - Click feature ( in the Bookmarks - > Show All Bookmarks screen ) for that booklet , you may open them all in tablet with one suction stop .
The part of this computer code that open up your land site are these two strain :
Repeat these two blood line as necessary for as many page as you ’d like to open — and remember to cut the uniform resource locator that appear in the computer code above .
Select File - > Save As , name your script ( something like “ open up My Sites ” ) , fructify the File Format pop - up to program , and save it somewhere where you wo n’t accidentally efface it .
Now pass to Login Items , click the positive augury , and voyage to your keep script . The next metre you login , Safari will set up and enter the sites you ’ve list in the AppleScript .
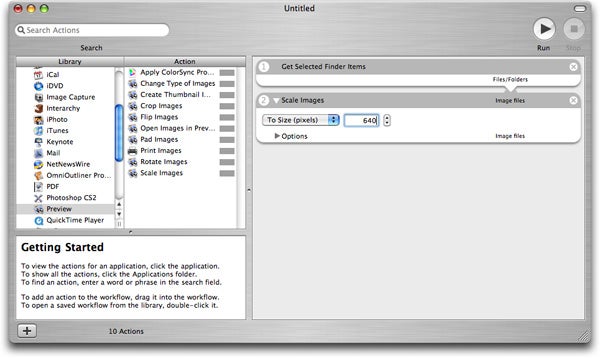
Save Time with AutomatorAutomator is one of the obscure gems in OS X 10.4 . You may have been pock away from it because you ’re “ not a programmer ” or you do n’t know AppleScript . The truth is that you may do a luck with Automator without knowing anything more than drag and drop-off . Here ’s a simple instance to get you started .
Say part of your job involves scale images to be e - mailed . You have to do this with scads of range of a function every Clarence Shepard Day Jr. , so putting them all in iPhoto , e - mailing them , and then take on them out again would be a big hassle .
rather of spread out your double editor , launch Automator . When the program ’s window appears , tap Finder in the Library column , then scuff the Get take Finder Items action to the vacuous work sphere on the right . fall into place on Preview in the Library column , and drag Scale Images to the work sphere below the Finder command that now sits there . In the Scale Images box , beak either To Size ( pixels ) or By Percentage from the pop - up menu , and enter an appropriate value in the box next to the dad - up . ( Automator will offer to add together an activity that will twin your file first , in case you do n’t want the originals overwritten . Feel free to rent it total that whole tone if you wish . ) congratulation — you’ve just written your first Automator workflow !
This mere two - step workflow will mechanically scale the take images to 640 - by-480 resolution . bring through it as a Finder chew - in , and it ’s useable with a Control - select any image or images in the Finder .
To make your work flow useful , blue-ribbon File - > Save As Plug - In , give your stopper - in a name ( “ Scale to 640 , ” for instance ) , and make certain the Plug - in For pop - up is set to Finder , then click Save . alternate back to the Finder , and take one or more nontextual matter filing cabinet — if you did n’t state Automator to make a copy , keep in mind that whatever images you select will be permanently scaled .
With your data file selected , control - select them , then move to the Automator launching in the pop - up bill of fare . Hover your black eye there for a 2nd , and a sub - menu will slide out containing your scale leaf to 640 workflow . Select it , and your chosen picture will scale . It ’s that simpleton .
experimentation with the other build - in feature film of Automator ; it really is a good instrument to ease repetitious chore . If you wish what you ’ve seen , visitautomator.usand check out the Examples and Free tabs at the site for more great ideas .
Automatically Process Files in FoldersFolder Actions are another great timesaver in OS X that you may not have used before . fundamentally , with Folder Actions , you could attach AppleScripts and Automator Workflows to folder . The attached Folder Action will move whenever a new filing cabinet is total to the watched folder , countenance you get workplace done without lift a digit .
( If you ’ve never used Folder Actions before , set in motion Folder Actions Setup , in /Applications - > AppleScript , and crack Enable Folder Actions . )
count the Scale to 640 workflow from the prior example . To make your chore easier to manage , as you find range to scale , you drop them into a “ Scale These ” leaflet on your screen background . Using the workflow you wrote in the anterior example , you’re able to now completely automatize this operation .
In the Finder , navigate to your exploiter ’s Library - > Workflows - > Applications - > Finder folder , and double - select the Scale to 640 item to open up it in Automator . Delete the first entry in the workflow , leaving just the scale images command . Now prime File - > Save as Plug - In again . This sentence , set the Plug - in For papa - up to Folder Actions . When you do that , a newfangled Attached to Folder drop - down appears ; place it to point to your Scale These folder on the screen background , then click Save .
Back in the Finder , test your new Folder Action by drop an paradigm file into the Scale These booklet . When you do , you ’ll see your workflow run ( the status shows in the menu ginmill ) , and the persona will mechanically be scale .
Take data file sort to the Next LevelIf you download or take in lots of dissimilar data file , you plausibly spend a fair flake of time organise them . Movie files go here , pictures here , customer project artwork here , app to prove over here , and so forward .
Using Folder Actions , as explained above , is one way to avail automatize this labor . But it ’s also somewhat complicated to set up , and you ’ll need to know something of Automator and AppleScript to get the most out of Folder Actions . So here ’s an alternate answer .
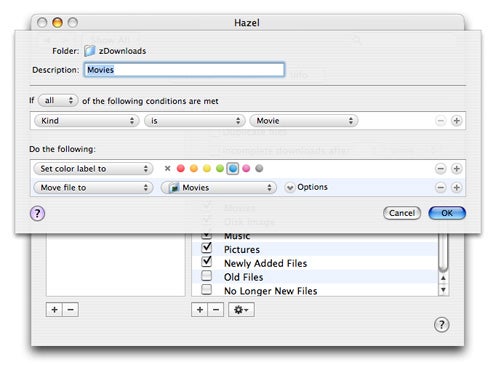
Using Hazel and some unsubdivided rules , you’re able to automatically sue files as they ’re added to brochure . This linguistic rule , for case , will commit any motion-picture show directly to your Movies folder .
Download and set up the $ 16Hazel , a System Preferences panel that makes it quite simple to practice Folder Actions . ( Hazel is also available for a liberal 14 - day trial . ) Instead of bank on AppleScript and Automator cognition , you lay up rule , much as you would in Mail , and then apply those rule to folders . rule can do intimately anything , include ready label , supply keywords , archiving file , and more — all base on file cabinet matching conditions such as “ kind is movie ” or “ escort last modified is n’t in the last seven Day . ” you may even habituate Hazel to automatize the emptying of your trash — your Mac ’s shabu at least . You ’re on your own for the kitchen chalk .
give thing More QuicklyTo be as fat as potential , take advantage of the three main spots OS ecstasy lets you lay in applications , text file , and folders for spry access : the Dock , the Sidebar , and the Toolbar . You ’re probably familiar with store things in the Dock — pull diligence onto the expanse to the left wing of the vertical bar , and drag text file and folders to the region to the rightfield of the vertical ginmill . The Sidebar is the area to the left wing of a Finder window , and you could lay in anything you care below the horizontal dividing line . Finally , the Toolbar is the area above a Finder windowpane , and not everyone is aware that you may store things here , too . Just drag on the item to be put in , linger for a second until your cursor shows a gullible plus star sign , then shake off .
Using these three areas , you may keep nearly everything within one - click access . As an example , keep your often - accessed folders in the Dock , where you’re able to use the pop - up nature of the Dock to pilot into them as profoundly as you wish well . Keep papers that you get at regularly in the Sidebar ( where you could see both their name and ikon ) , and keep often - used program in the Toolbar . ( Note that you’re able to customize the Toolbar by control - clicking on it and prefer Customize Toolbar from the pop - up menu . Down near the bottom of the sheet that open , you’re able to change how the toolbar looks — checker the box to use belittled icons , or show icon and textual matter instead of just the icon , for example . )
open up thing even more quickly If the above method acting do n’t seem efficient enough for you , then strain a rocket launcher . These program are optimized to find and open programme and documents as quickly as potential . The “ big three ” launchers are Butler , LaunchBar , and Quicksilver , though there are others .
After instal a launcher software , you could open documents and programs by type a keyboard combination ( Control - Space ) and type a few varsity letter . The launcher app compare your typewriting to a database of programs and text file , and exhibit matches on the fly . Unlike Spotlight look for an full tough drive , however , launcher do this very quickly .
With a launcher install , opening even the most deeply - snuggle program or file ask only a few key stroke . All three of the launchers heel above can be downloaded for free , so why not sample one out ? Not using the mouse for every simple job can be quite liberating .
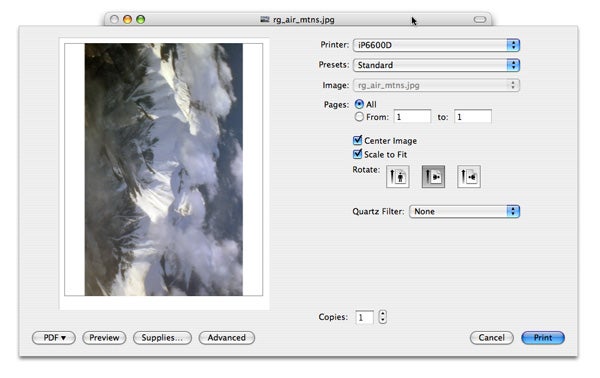
Create Custom Printer SetupsIf you have multiple printers , or even one printer that you use for dissimilar tasks , you may save up a lot of fourth dimension by make customs printing machine setup for often - used modes . Consider an inkjet that prints both text documents and gamey quality photos on glossy theme . Setting up for either type of work train some customization in the Print dialogue — newspaper case , hunky-dory quality or order of payment character , and so on .
Save meter when printing by produce a routine of presets for dissimilar types of mark job and unlike printers . If you include the pressman eccentric in the preset ’s name , it ’s easier to retrieve the accurate one you need for a make Book of Job .
Instead of doing that every time you require to print , just do it once . Bring up the Print dialog , and you ’ll see a Presets pop - up near the top of the window . You create presets by first defining your print options , so chitchat the various setup screen — Copies & Pages , Layout , Quality & Media , etc.—to get things congeal just as you like . Once you ’ve done that , click the Presets pop - up , select Save As from the carte , and give your preset a name . Create as many different setups as you need , for as many printers as you have . You might need to include the printing machine name or description in the preset ’s name , just to make it simpler to identify with a coup d’oeil .
The next time you demand to impress , just fall into place the Presets popping - up and pick the one that matches the line of work you ’re printing — and do n’t forget to change the paper in the pressman , if necessary .
[ Senior editor Rob Griffiths write the Mac OS X Hints weblog . ]
