If you ’re like most digital lensman , a very modest per centum of your photos will ever escape the confines your computer . After all , there are only so many places you could hang a picture . But if you think that 4 - by-6 - inch photographic print are all your photo are good for , it ’s time to call back outside the bod .
This holiday time of year , why not dig out some of those photos fade in your iPhoto library and put them to good economic consumption as photo gifts ? From calendar to retention box seat to personalized nappy bags , there are piles of originative way to use your favorite photos .
Want to really put your photo to work ? One thing you may do is produce a 20 - by-30 - column inch poster containingseveral dozenphotos . If corralling all those photos sounds like a lot of work , do n’t vex . OS X 10.4 ’s Automator will do much of the employment for you .
What you’ll need
Before you could get started , you ’ll require to have iPhoto 5 running on OS X 10.4 ( Tiger ) .
Automator Action and WorkflowBecause get together photos by hand would necessitate a slew of tedious work , I ’ve provided an Automator activeness that does the job for you .
You ’ll need to download theThumbnail Poster action and the fill out Automator workflowfor this labor . On your Mac , find the downloaded Thumbnail Poster Installer Indian file and double - select it to instal the action in Automator . When you set up Automator ( it ’s in your Applications folder ) you ’ll find the action at law in the PDF section of the Library pane .
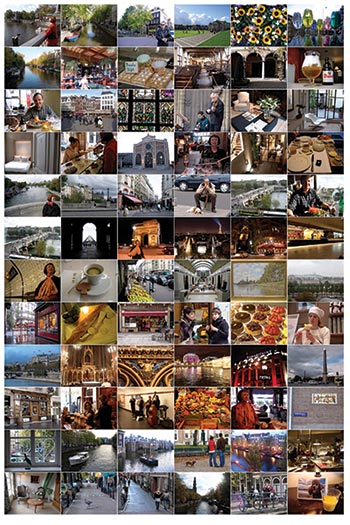
All Together NowForget demonstrate off one picture at a prison term . This poster display 72 of your favorite horizontally orient rectangular photos at once . you could also create a poster that admit 96 cropped straightforward photos .
Hard - Drive SpaceThe persona single file that this workflow create isbig — a few hundred M . To help the workflow run efficiently , verify you have at least a gigabyte of free record space on your Mac .
Step 1: Plan your poster
The first thing you require to do is gather the photograph you need to use into a newfangled iPhoto record album .
Make the SelectionTo fit as many image as possible into your poster , the workflow gives you the choice of cropping 96 photos into squares . This think of that you ’re free to mix horizontally and vertically orientate photos in your poster . ( Do n’t worry , your original photos wo n’t be vary . )
If you ’d prefer to not crop your images , you could employ only horizontal or only vertical shooter . Because the look-alike will be larger than snip square image , you wo n’t be able to fit as many of them on the poster — you’re confine to 72 photograph . However , the work flow will run much quicker , since iPhoto wo n’t have to go to the trouble of cropping .
engineer the PhotosAfter you ’ve added 96 blastoff ( or 72 if you ’re going with all horizontal or all vertical pic ) , arrange them in the parliamentary law in which you need them to come out on your poster . A 96 - shot posting will contain 12 rows of photo , with 8 photos per words . ( A poster of 72 horizontal images comprises 12 rows of 6 pic , and a set of upright image will be in 9 rows of 8 . ) You could pick out to devote each row to a specific theme or you could take a calendar month - by - calendar month feeler . You could also predate precise planning and just mix and correspond your best-loved shots .
To see an estimation of how each row of photograph will look , use the size of it skidder in the crushed right box of the iPhoto windowpane to resize the pic thumbnail so that eight thumbnails appear from leave to right .
hint : The square thumbnails create by the workflow may cause some undesirable cropping . you may crop each of the 96 images manually , using iPhoto ’s Crop prick with the Constrain fare lay to Square . If you do this , double every pic first — cropping a photo changes its show everywhere .
Step 2: Run the workflow
Once you ’ve opt and sequenced your exposure , choose them by choosing Edit : Select All ( or pressing Command - A ) . Switch to the Finder and open up the Thumbnail Poster Files folder . Double tap the data file named Create Thumbnail Poster.workflow .
The work flow will open up in Automator and then scan your iPhoto library . If you ’re running it on a slower Mac and you have a large iPhoto subroutine library with a lot of album , you ’ll see the spinning beach ball for a few minutes — be patient .
With the workflow open in Automator , turn up the 2nd action ( Create Thumbnail Poster ) and select the eccentric of images you want from the Thumbnails pop - up menu ( if you ’re using 96 image , select Square ) . In the Import Photos To iPhoto activeness , stipulate where you desire the finished post horse to appear — in a specific iPhoto album or in the general iPhoto library .
clack on the Run button in the upper right corner of the workflow window . Your Mac will process each photo , crop them if necessary , supply them to PDF file , and generate the placard image .
Step 3: Order your print
After the work flow run , you ’ll observe your post-horse range in your iPhoto library ( and in a specific record album if you chose one before move the workflow ) . Before ordering your print , you’re able to , of form , modify the picture using iPhoto ’s Adjust control panel , Photoshop , or Photoshop Elements . For deterrent example , you might require to put a colored border around the montage .
To order a print of your poster , select the post horse in iPhoto and tap the Order Prints clit . The Automator workflow creates an paradigm whose proportions fit those of a 20 - by-30 - inch print . If you arrange a different size , some of the photos will in all likelihood be trim off .
Other photo-mosaic ideas
Do n’t desire a 20 - by-30 - inch poster of images ? There are plenty of variations on this proficiency .
Use iPhoto Contact SheetsYou can create lowly photo mosaic with the help of iPhoto ’s Contact Sheet print style . First , undetermined iPhoto and go to File : Page Setup to specify your hope page size of it . pick out the photos you need to impress , and then take File : Print . Set the Style menu to Contact Sheet . practice the Across yellow-bellied terrapin to specify the act of photos you need to appear in each row . press the Save As PDF release to create a PDF of your arial mosaic . If you utilize Tiger , you may have your Mac create a PDF of the contact sheet and then mechanically add it to your iPhoto library . In the Print dialog box seat , tap the PDF button and prefer Save PDF To iPhoto .
Use FlickrIf you ’re part of the on-line photo - sharing serviceFlickr , you could employ John Watson’sMosaic Maker siteto create photo mosaics from photos post by Flickr member . The result Mosaic do n’t have a gamey enough resolution to produce a gamey - quality print , but they ’re keen for Es - posting or posting online . With Flickr ’s new impression services , you’re able to also enjoin a13.5 - by-19 - in notice .
EDITOR ’S NOTE : require more digital photo tips ? We ’ve created a PDF file collapse with advice about every aspect of digital photography . And so we ’re proud to annunciate the release of the Macworld Digital Photography Superguide , which features material from an all - whiz cast of writers .
