One of the hard thing to accomplish in transmitter example is a halftone , which is a way of reproduce a monochrome prototype using only dots of varying sizes . Halftones are specially important for pictorial artist working with a limited identification number of color ( in bill poster or t - shirt aim , for example ) , because they give refinement to otherwise flat artwork . Moreover , transmitter halftones can be scaled to any size without showing pixelation .
In this tutorial , I ’ll show you how to create a grayscale object and turn over it into a transmitter halftone . These step are written for Adobe Illustrator CS5 , but the cognitive process is very exchangeable for previous versions of Illustrator .
Step 1: Prepare your document
It ’s important that your new document has a large canvas . prefer File - > New . Once the New Document windowpane appears , enter an appropriate name ( i.e. Halftone Object ) . select Web from the New Document Profile pop - up carte du jour and then lend in a width and height of 1800×1800 px . Now click very well to produce the document .
You ’ll need to tweak one more mise en scene before you could lead off , though . take Effect - > Document Raster Effects preferences . Under solvent , snap Other and enter 288 ppi . Illustrator habituate the standard screen metric function of 72 ppi , and by choose a raster setting that is a multiple of 72 , you ’ll get better solution when trace . To go on , click OK .
lay a comparatively high solvent for the document ’s raster effects allows you to get good results when tracing your halftone .
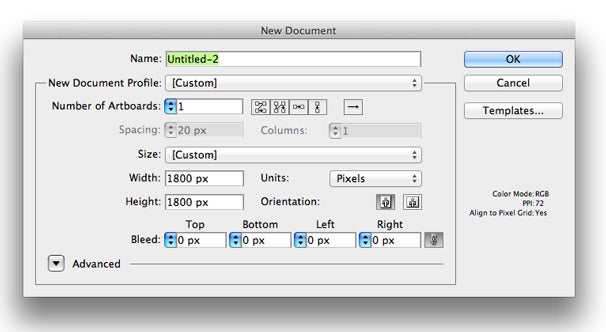
Setting a relatively high resolution for the document’s raster effects allows you to get better results when tracing your halftone.
Step 2: Create your object
You ’ll now take to produce a simple-minded object with a greyscale gradient . This can be accomplished in a number of ways — stock gradient , gradient mesh and blend — but for now , get ’s create a blend with a wizard - shaped aim .
Choose the Star Tool from the toolbar — you’ll find it in the same place as the Rectangle Tool — and create a star shape that fills most of the document . ( Or , prefer the Star Tool and click the center of the canvas . This calls virtuoso configurations windowpane . Enter Radius 1 : 800 , Radius 2 : 420 and Points : 5 , and then cluck OK . )
take the star and then prefer File - > Copy , followed by File - > Paste in Place . This glue a transcript of the star on top of the subsist lead , and for the moment , it ’ll look as though there is still only one star on your canvas . take Object - > Transform - > Scale . A exfoliation window appears , allow you to incisively scale the physical object you ’ve just pasted . Click Uniform , enter 25 % and then click OK . You ’ll see a lowly principal sitting atop the original big one .

Once you’ve set the colors for each star, you can create a soft gradient between the two using Blend.
Now you ’ll need to correct to color for each star . prefer Window - > Color to call up the fill and stroke people of color control board . You ’ll see two boxes in the top leave behind , which symbolize the color of the filling ( the solid square ) and the stroking ( the square with the square hole in it ) . Clicking either square toes brings it to the front , provide you to change the color of that dimension . take the small lead , bring the stroke solid forward ( if necessary ) and then remove the fortuity by clicking the white box with the violent line through it , constitute in the bottom left of the coloring jury . Now bring the filling square forward and set the filling color to a dark grey ( for good example , enter an RGB note value of R=77 , G=77 , B=77 ) .
Repeat this process for the large star , removing its stroke but this time setting the fill color to white ( RGB R=255 , G=255 , B=255 ) . When you tap the canvas , the large whizz will vanish — no indigence for concern .
take Select - > Select All , followed by Object - > Blend - > Make . Instantly , you ’ll see a subdued gradient seem between the two mavin .
Applying the Color Halftone filter changes your object to a black-and-white halftone—but for the moment, it’s a bitmap.
Once you’ve set the colors for each star, you can create a soft gradient between the two using Blend.Step 3: Apply Color Halftone filter
Once you ’ve got a object with a smooth gradient , you could convert it into a halftone . At this point you ’ll actually convert the transmitter artwork into a bitmap , but do n’t interest , you ’ll bring it back to transmitter mode before you ’re done .
Select the star and choose Effect - > Pixelate - > Color Halftone . The first subject field in the Color Halftone window ask you to opt the maximal r , a setting that controls the proportional size of the halftone Zen . Enter 96 into this field . The next four field demand you to set the the screen angle for four different channel . come in 128 in each field . Click OK to continue .
The conversion to halftone is a processor - intensive undertaking and may take few second and you will see a progress bar . Once it ’s complete , you ’ll see that the physical object is now composed of black dots . If you are n’t glad with the size of these halftone dots , choose undo and repeat the process . go in a different number for maximal radius : a larger number yield you large dots , and a small number stand for smaller dots .

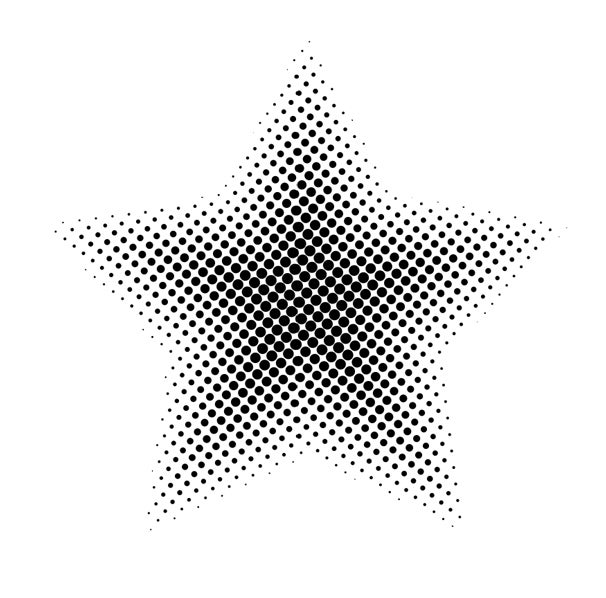
The completed vector halftone can be changed into any color you wish.
use the Color Halftone filter changes your object to a black - and - white halftone — but for the moment , it ’s a bitmap .
Step 4: Trace your halftone object
In orderliness to turn your novel halftone graphics into a transmitter object , you ’ll require to use Illustrator ’s Live Trace .
Select the halftone artwork with the Object Selection Tool and choose Object - > Expand Appearance . pick out Object - > alive Trace - > Tracing Options .
In the top left of the Tracing Options window , you ’ll see a pop up - up menu for Presets . Choose Simple Trace and then clack Trace . The trace process may take up to a minute , calculate upon the density of the halftone engraving dot .
When the trace is complete , choose Object - > Expand . A down - up window will tender you a few options for the procedure , but you do n’t demand to transfer anything . Click OK , and you ’ll see that your halftone has indeed been turned to vector . ( The tracing process yields slightly weak circles , but they ’re for sure sufficient for a photoengraving . )
you’re able to change your new halftone to any colour you bid — just select the physical object and piece a coloration !
The complete transmitter halftone can be changed into any color you wish . you’re able to now use your slick new halftone object in a t - shirt design or poster , knowing that it will descale to any size without degrading . You ’ll chance this halftone engraving technique works well on grayscale photos , too — give it a try !
[ Chris McVeigh is an source , illustrator and miniature photographer who hold up in Halifax , Nova Scotia . ]
