You ’ve seen sentence - oversight video footage . You ’ve believably image High Dynamic Range ( HDR ) digital photography too , even if you did n’t recognise it . For the preceding distich of yr I ’ve been combining these two second of digital photo nerdery into one consequence — HDR clock time - lapse . Below are some example of what I ’ve produced and how , all with a digital still camera .
HDR shooting
HDR picture taking has been all the techie rage for the past few old age . This clause is really about how to tear it for time - lapse , so mark out a majuscule blog calledStuck In Customsto learn the bedrock of HDR shot . This Website has several how - to articles on shooting HDR still with a digital camera that supports automatic bracketing — the power to blast a normal exposure , then also automatically shoot additional frame that are over and underexposed .
By using software package such asBracketeer($30 ) orPhotomatix Pro($99 ) , you may coalesce those bracketed shots into a undivided image that contains the shadow detail from the overexposed nip and the highlight detail from the underexposed shots all in one frame . This pop the question more shadow and high spot particular ( also known as increase dynamic range ) in the last mental image .
Pangeasoft ’s Bracketeer is simple and inexpensive but slow to sue spate of frames into HDR look-alike . just choose a folder where your source bracketed frames are , and it is off and running .
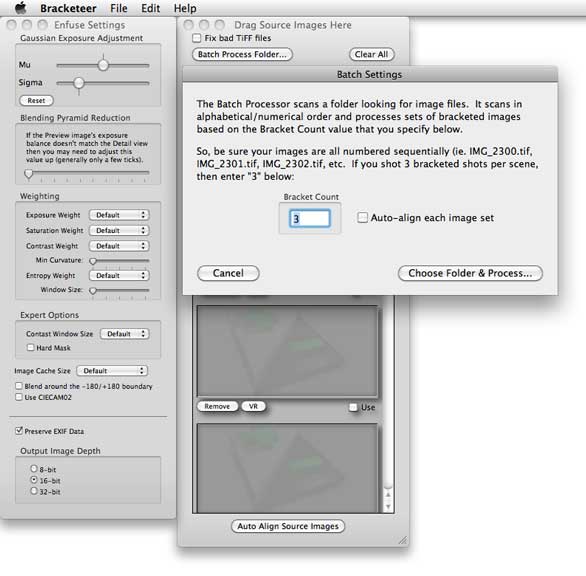
Pangeasoft’s Bracketeer is simple and inexpensive but slow to process batches of frames into HDR images. Simply choose a folder where your source bracketed frames are, and it is off and running.
Time-lapse shooting
To hit time - reversion , you ’ll call for an intervalometer — a gadget that takes a picture ( or a bracketed series ) at regular interval . If your camera does n’t have one built in , there are ironware intervalometers that stop up into many cameras ( about $ 40 and up ) . There ’s also software for the Mac , such as Canon ’s EOS Utility that come up free with your camera , that associate to and control the television camera via USB . Nikon offers Camera Control Pro 2 for about $ 150 , but it has a 30 - Clarence Day free trial . Breeze Systemsoffers auto bracketing clock time - relapse software for many Nikon and Canon DSLRs that lack those features . For extra nerdy points , BlueSLRmakes a nifty bluetooth dongle that allows for iPhone remote ascendance , and it plans on tote up time - lapse capabilities .
Camera setup
Every camera is a trivial unlike , so here are some universal steps found on how I rig up my Nikon D300S.
1 . Set up the makeup and focus for the shot .
2 . Set the camera to full manual control ( blank balance , exposure , f - stop , focalize ) .

HDRsoft’s Photomatix Pro is costlier and faster than Bracketeer, and offers a wealth of different algorithms and fine tuning controls to adjust the look of your final HDR images.
3 . Turn off any image stabilization — you’re on a tripod ; you do n’t require it , and it ’ll introduce its own misalignment .
4 . Set baseline picture , knowing that bracketed shots will pull together more highlighting and shadow point .
5 . Set the shot way to Continuous High , meaning it will rattle off the bracketed shot at its fastest 8 frames per second .

By shooting bracketed sets of regular, under, and overexposed still frames at set intervals, you can create time-lapse footage with increased dynamic range, revealing detail that would be impossible to capture in a single image.
6 . go under up the intervalometer appropriately ( see below ) , commence it up , and keep out of the shot !
HDRsoft ’s Photomatix Pro is costlier and faster than Bracketeer , and offers a wealthiness of different algorithmic rule and all right tuning controls to adjust the look of your final HDR images .
Frame size and format
The camera bare-assed data format provides the unspoiled looking image , but it take up the most blank and takes the long to tape to the card . JPEG data formatting can be humble in pixel dimensions as well as file size of it , fit more build onto your image carte faster — just for more bracketed shots per set and longer last flick . Unless you ’re a pro , you ’ll belike be quenched with JPEGs — even at roughly 2000 pixels across , that is pot of resolution to make a decent looking 1920 - by-1080 HD television .
How many shots should you bracket out and how much exposure version should you utilise ? Most cameras that bracket only allow for three dig , and most will allow two or perhaps three stop of latitude at most between each scene . Two stop consonant is unremarkably a pretty in force spatial arrangement if you’re able to only take three shots . More shot mean more and finer dynamic range capture .
I ensure to specify my shot interval for long than it shoot to scud and register each set of bracketed frames to the tv camera ’s card . This is important because if the next set of shots start before the last set is done transcription , Things Go Wrong . So use a stop watch to fourth dimension how long it takes to burgeon forth and finish recording a bracketed stage set , and then set the time interval to something longer than that . Also , it ’s essential to adjust the shots per specify to the same routine as in the bracket controls , otherwise you ’ll end up with a mess of misbracketed , mismatched shots .

To convert a folder of images into a single movie, first Open Image Sequence in QuickTime Player Pro 7 (not QuickTime X!), and then select the first frame of your processed HDRs.
How long should you set the interval for ? The shorter you specify it , the slower the subject ( such as the sun or cloud ) will move through frame of reference . The longer an separation , the faster the subject will move across the chassis , and the curt your final movie will be .
By shoot bracketed sets of unconstipated , under , and overexposed still frames at position intervals , you may create time - relapse footage with increased active ambit , revealing detail that would be impossible to bewitch in a exclusive image .
Making HDR frames: Batch time!
OK , now you ’ve got a big voltaic pile of bracketed stab — what do you do with them ? Batch ’em ! After you separate out your bracketed shots into their own booklet on your Mac , both Bracketeer and Photomatix Pro allow pile mode cognitive process . In peck mode , you tell the software system how many shots in each wall bracket , betoken it to the leaflet where the frames are , tweak your stage setting , and the computer software will crank out HDR commingle shot . easy . I often operate these overnight . Bracketeer is filth simple , inexpensive , put up satisfactory resolution , and is a skillful place to start — but it is very , very obtuse . Photomatix Pro is more expensive , but it ’s faster , offers far more options and control , and if fine-tune correctly , can engender decent looking results .
Making a movie
Either way , you now have subfolders with a gang of still range . There are many ways to become those stills into a QuickTime flick , but here ’s two to start .
Easy : In QuickTime Player Pro 7 , take File - > Open Image Sequence . specify a skeleton rate for playback , and once opened , you could Export As QuickTime Movie in the sizing and codec you want .
To exchange a folder of image into a exclusive movie , first Open Image Sequence in QuickTime Player Pro 7 ( not QuickTime X ! ) , and then select the first form of your processed HDRs .

You can export to any QuickTime file format and size you desire.
Advanced : Bring the shots into Adobe After Effects as an Image Sequence . Then place the sequence in a 1080p HD timeline to scale , crop , zoom , and/or pan as desired . Then render out to ProRes4444 ( lossy video compression formatting ) or whatever format you desire for further work in Apple ’s Final Cut Pro and/or Color , or instrument of your choice . If you jazz how to use Apple ’s Motion , you may do the same kinds of things with that program .
you could export to any QuickTime file data formatting and sizing you hope .
From there , edit and colouration correct your creation to your atonement . I ’ve been doodling with this technology for a while . To get an mind of what you may do with it , match out my video recording below .
Mike ’s 10 - 25 - 2010 HDR timelapse reelfromMike CurtisonVimeo .
[ Mike Curtis has been pushing picture element for a livelihood for more than two decades , and currently consult on Final Cut Studio and other post production issue in Santa Monica , California . He indite for Macworld , his ownHDforIndiessite , andProVideoCoalition.com . ]
