We ’ve previously written abouthow to rive DVD and convert other files into data format that will play on an iPodand even how to make those video look best when played through the iPod on a TV . But you may also convert these video into Apple television receiver - compatible files that you may savour from the ease of your couch in the best possible quality .
Rip DVDs
Let ’s say you ’ve buy a movie on DVD , and you need to catch it on your Apple TV . You could buy a electronic computer - friendly written matter from the iTunes Store — if it ’s useable , that is . Or you could save some cash and pull that DVD to your reckoner , and then transfer the video to your Apple TV . But before you dive in , recall that this is a gray country , legally speaking . Because ripping commercial-grade videodisc outwit the transcript - protection organisation hire on these discs , it ’s confutative as to whether the use of this type of software is effectual — even if you own the DVD and are ripping it only to watch it in another form . You ’ll have to assess the risks yourself ; if you make up one’s mind to take the dip , translate on .
Step 1Start by downloadingMediaFork 0.8.0 beta 1for PowerPC and Intel , OS X 10.3.9 or by and by . Note that the next beta translation will again be called HandBrake , and will let in new features such as presets for Apple TV and iPod changeover , as well as the ability to embed chapter markers in your file .
MediaFork gives you an easy way to turn your collection of DVDs into Apple TV files .
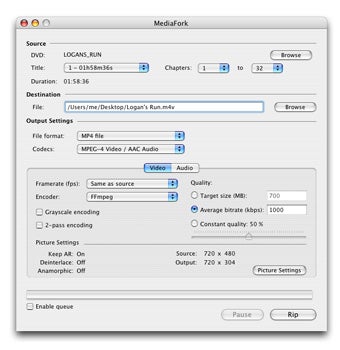
put in your DVD , launch MediaFork ; by nonpayment , the app will show the name of the DVD in the bulge out - up computer menu next to the Detected Volume . tap Open to skim the disc , then choose the tenacious claim on the platter from the Title pop - up menu . To make it easier for iTunes to accept your file , you may also want to open MediaFork ’s preferences and select the Use iPod / iTunes Friendly ( .m4v ) File Extension For MP4 Output Files option .
If you see the message “ No Valid Title Found , ” that mean MediaFork ca n’t read the phonograph recording . ( This sometimes come with recent DVDs that have particular written matter protection . ) If that encounter , download a copy ofMacTheRipper , which is more skillful at bypassing DVD copy protection . Once you ’ve used MacTheRipper to pull an unencrypted adaptation of your DVD to your knockout drive , launch MediaFork . In the sheet that appears , take the DVD Folder / Image option . Navigate to the VIDEO_TS leaflet of the disc you ’ve extracted and select Open to proceed as above .
footfall 2According to Apple ’s specification , Apple idiot box - compatible file have dissimilar limits based on the encoder used . H.264 filing cabinet can be up to 5 Mbps using the Progressive Main Profile ( CAVLC ) with AAC - LC audio up to 160 Kbps . The maximal resolving is 1,280 - by-720 pixels at 24 fps , and 960 - by-540 pixels at 30 Federal Protective Service . MPEG-4 files can be up to 3 Mbps using the Simple Profile with AAC - LC sound recording up to 160 Kbps . The maximum resolution is 720 by 432 pixels at 30 Federal Protective Service . ( In our tests , we ’ve gotten files with even higher glasses to play on the Apple TV , so practice the following as a guideline . ) Although you ’re unlikely to come up against the resolve limit for MPEG-4 files , you should choose H.264 , since it gives you more tractableness in term of data rate and generally looks skillful than MPEG-4 . So jell MediaFork ’s File Format toss off - up carte du jour to MP4 File and its Codecs bill of fare to AVC / H.264 Video / AAC Audio .

With the Video tab selected , you ’ll see several video options . Framerate ( FPS ) should default on to Same As Source , and Encoder should default to x264 ( H.264 Main)—if not , set those option as such . In the Average Bitrate ( KBPS ) field , enter 2500 . You should n’t need to line up the output background .
Now press the Audio tab and select your language from the Language 1 pop - up menu ( currently , MediaFork mixes multichannel soundtrack down to stereo ) . The other audio recording should be fine as is .
You ’re now ready to rend . Enter a file destination and name in the File field near the top , and press Rip . Depending on the length of the movie and the speed of your computer , this can take a few time of day . If you ’re not slaked with the quality when it ’s done , you could increase the bit rate , or you could enable 2 - Pass Encoding , which analyzes the TV and adjust data rates according to the complexness of especial scene . If you ’d like to prove out several different preferences without encoding an entire movie each clock time , test them on just one chapter . To do so , pick the same phone number in the Chapters area — for exercise , Chapters : 3 to 3 . You ’ll even see the duration of the chapter so you know how recollective of a section you ’re encode .
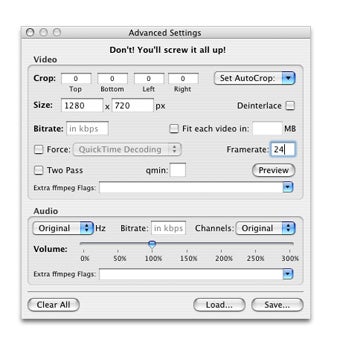
VisualHub can handle almost any video single file you bedevil at it …
… and can do HD encryption as well .
TV episodes
If you require to rive several elements from one DVD — TV show episode , for illustration — select the Enable Queue choice in the bottom leave corner of MediaFork . Now adjust your setting as you ’ll require them for all episode and find all of the titles that are like in distance ( around 22 min for a half - minute show and 43 minutes for a one - hour show ) . Then piece the first title you want , name the filing cabinet , and select the Add To Queue button at the bottom ; repeat this for each episode . When you ’re done adding them all , tap Start ( the name of the Rip push changes when you start the waiting line ) .
Convert hard-drive videos
Of naturally , videos are n’t just circumscribe to videodisc . If you may afford a file in QuickTime , you may use the Movie To Apple TV export command in QuickTime Pro 7.1 or later to make a video that will take on on an Apple TV .
But such a conversion can be passing slow . Another selection is for Mac users is Techspansion ’s $ 23 VisualHub 1.23 ( ) , which now let in an option for Apple TV encryption .
Launch VisualHub , get through on the iTunes button in the To : division at the top , then take the loge next to Apple TV and the box next to H.264 Encoding . ( Otherwise , it ’ll be MPEG-4 ) . Now drag a Indian file or number of files into the main windowpane under where it says Drag The file cabinet To Be Converted Below — VisualHub works with many different file cabinet type , include several that QuickTime can’t — and penetrate on Start .
If you ’re not happy with the results , you could move the Quality sliding board to High or Go Nuts . For more restraint , particularly with have high - definition source content — from an HD camcorder or TV capture box , for deterrent example — you’ll want to turn to the Advanced configurations window . snap on the Advanced button to open it , and you could pluck the frame size , bit charge per unit , and so on . think that HD single file on the Apple boob tube can only be 1,280 - by-720 pixels at 24 fps , or 960 - by-540 pixels at 30fps , so you may need to conform skeleton size and frame charge per unit to get a playable file .
[ Jonathan Seff isMacworld ’s aged news program editor program . ]
