Encrypting your Mac ’s total hard drive — making it unreadable to anyone who does n’t have the correct encryption samara ( a sort of software passcode)—is a perfectly marvelous idea to keep the secrecy of your data . However , Full Disk Encryption ( FDE ) should meet three criteria . First , you should n’t have to manage a single setting — the encryption processes should be invisible and unseamed while you use your reckoner . secondly , the encoding has to be unattackable to unauthorised admittance . Third , using encryption should not slow down the information processing system ’s normal function .
FileVault 2 , the FDE technology build into Lion ( Mac OS X 10.7 ) , meets those three criteria in the right destiny , but getting it up and running game is not as easy as 1 , 2 , 3 . ( talk of which , Apple apply the “ 2 ” recording label for FileVault only in its merchandising materials for Lion . In Lion itself , you ’ll see it referred to as simplyFileVault , as I do through the eternal rest of this article . )
The original FileVault , introduce in Mac OS X 10.3 , inscribe only a user ’s menage directory . In Lion , you flip a substitution ( discussed below ) and your entire startup ride is convert into an encrypted volume . A strong encoding key is create , approachable only through the specific user accounts you ’ve configured to let inauguration . With FileVault active , whenever your Mac is exclude down , the data point on your hard campaign is a mess of opaque bit . The data point has meaning only when the Mac is booted and an authorized account logs in , which decode the key that in turning deciphers the driving force ’s data .

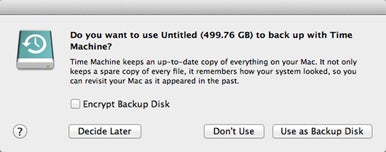
When setting up a drive for Time Machine, you have the option to encrypt the backups.
The “ whenever your Mac is shut down ” necessary is one of FileVault ’s usability pitfalls : While your Mac is booted , anyone with forcible access to the computer — someone who sits down in front of it , let on in remotely ( however unlikely that seems at the moment with a Mac ) , or run away with your laptop computer — could access your datum . So get used to shutting down your Mac when it ’s not in use , or when it ’s out of your ascendency , rather than putting it to sleep . ( There are a few alternatives and supporter , key out below . ) But if you do opt to keep out down frequently , Lion ’s Resume feature film is quite useful here , in that when you start up your Mac — startup is much quicker in Lion , too — your applications and window are all right where you left them when you shut down . Under former interlingual rendition of OS X , you might get lazy about close down because of dim startups and the bother of get your workspace set up again .
All that said , there ’s still a good case for FDE for anyone who routinely handles private or sensitive information . That let in effectual , financial , and wellness - care professionals , as well as a large swath of troupe and contractor working with government .
When setting up a private road for Time Machine , you have the choice to cypher the backups .
When setting up a drive for Time Machine, you have the option to encrypt the backups.
Note that if you use FileVault , you must go forth your auto booted — and , thus , your data accessible — during any backup , so you should n’t leave it unattended . Also , to ensure your data point is safe , do n’t back up over an unsecured wireless connection , and ensure your backups themselves are locked down . In Lion , Time Machine furnish an option to encrypt your support ; you trigger off this scope in the Select Disk screen of the Time Machine pane of System Preferences .
Warnings about the right drive configuration
FileVault is a manakin of simpleness for most Mac setups , but not all . For one matter , FileVault want a standard - configuration Lion drive , which mean one that has a unmarried visible volume along with Lion’shidden Recovery HD sectionalisation . This will be the case for any Mac purchased with Lion pre - installed that has n’t had its drive after modified , or any Snow Leopard Mac that maintained its original drive conformation before raise to Lion . If you ’ve partition the drive on which you installed or need to set up Lion , if you do n’t have the Recovery HD loudness , or if your inauguration drive is part of a RAID ( multiple thrust configure for data mirroring or increased carrying into action ) , you ’ll run for into problem with FileVault — for example , Mac OS X may permit you turn on the characteristic , but doing so may leave the drive unbootable .
To see if your campaign is gear up up right , boot into Lion Recovery mode(beforeenabling FileVault ) . If you ca n’t , followApple ’s instructions for ensure Recovery HD is decently set up . Sadly , this may take backing up your movement , delete it , and reinstall Lion .
FileVault also wo n’t shape if all FileVault - authorise users have their home directories residing on bulk other than the startup disk . Such a configuration is jolly technical , and uncommon for a typical Mac user , but it ’s deserving noting . One workaround is to give another , local chronicle — even one created only for this design — license to allow startup under FileVault . Once the Mac has booted , you may then exit of that report and into an report that has its habitation directory on another volume .
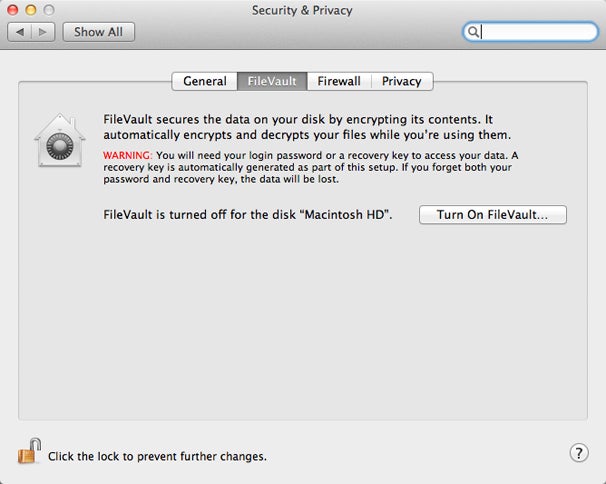
Click Turn On FileVault to start the process of encrypting your startup disk.
But even if you meet all the requirement , some users have found that after enabling FileVault with what is likely a properly configure campaign , they still run into trouble . So before plough on FileVault , make a full backup of your drive using Time Machine , Carbon Copy Cloner , Super Duper , or Disk Utility . ( mark that these backups arenotthemselves code by default , as they ’re made when your FileVault volume is mount . To encrypt the backups , you call for to singly enable encryption for your Time Machine mass , as name above , or habituate the didactics in “ Encrypting external drives , ” below , to cypher the backup volume . ) This will be useful if you end up take in to wipe the drive , do a clean Lion install , and then furbish up your system of rules — a mental process that , depending on your Mac example , can be quite time - exhaust . ( At this writing , any Mac that was unblock with Lion already installed must apply Lion Internet Recovery , which downloads an over-600 MB convalescence disc paradigm , and then downloads the 4 GB Lion Installer before the install proceeds . For Macs open of tend Lion but released before June 2011 , Dan Frakes offers instructions on making a bootable Lion installer . )
Activating FileVault on a Mac’s internal drive
chatter Turn On FileVault to begin the process of encrypting your inauguration disk .
Compared to the above provision about using FileVault , setting it up is rather unsubdivided . As stated earlier , be sure to back up your data before activating FileVault .
maltreat 1Open System Preferences , and then click the Security & Privacy pane . Click the FileVault tab , and then cluck the whorl ikon at the lower unexpended ; enter an administrative username and password when prompted .
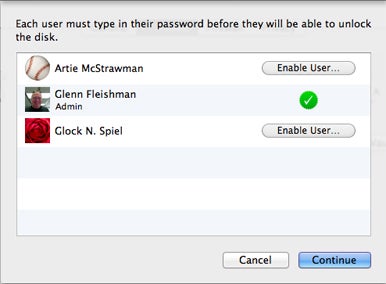
You can choose which standard and admin users, other than the current logged-in user, are allowed to start up a FileVault-protected Mac.
remark that if you first enabled FileVault in Snow Leopard or an earlier version of Mac OS X , you get aspecial dialogpointing out the conflict between the old and new FileVault approach . When you see this dialogue , you ’ll need to make a option : you’re able to keep using Snow Leopard ’s home - directory interpretation of FileVault on accounts for which it was already enabled ( though you wo n’t be able-bodied to become it on for other account ) , or you’re able to turn off the legacy version of FileVault for use FileVault 2 to inscribe your entire drive .
you may choose which received and admin users , other than the current logged - in exploiter , are allow to start up a FileVault - protect Mac .
Step 2Click Turn On FileVault . If you have multiple even or administrative accounts set up on your Mac , you ’re prompted to opt which accounts — in addition to the one you ’re currently logged in to — may unlock the loudness ’s encryption Florida key at inauguration . ( you could always go back later to add users to or take out user from this list , but , oddly , FileVault wo n’t let you take user after a restart . Once you restart , the only way of life to preclude a previously authorize user from logging in is to delete the write up or exchange the drug user ’s password . ) If your Mac has only a single user account configured , FileVault skips this step .
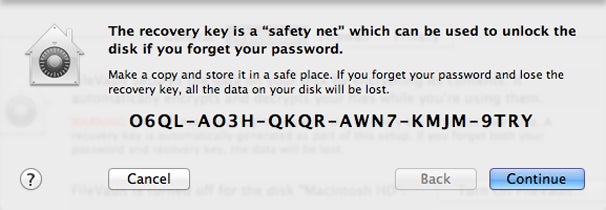
Forget your login, and this recovery key still lets you access your encrypted volume.
Step 3Mac OS X demo you with a 24 - character alphanumerical recovery key , which can be used to unlock a FileVault - code disk even if you forget the password for every account authorized to boot up the organisation . This sounds unlikely , I know , but because the disk is firmly shin — meaning if you do n’t have the good key , your datum is forever and a day inaccessible — bring home the bacon this special measure of help intend that you have a way to gain access .
leave your login , and this retrieval key still lets you get at your encrypted loudness .
You should drop a line down this recovery samara ; or copy , paste , and store it somewhere unassailable . Just be indisputable you save it in a locationother thanthis computer ’s private road , so you ’ll be able to retrieve it should you be engage out of the effort . ( Note that if you ever disable FileVault and then enable it again , a new recovery winder will be generated . )
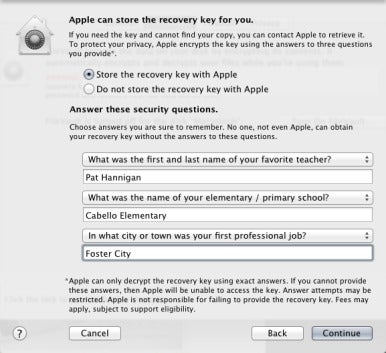
If you decide to let Apple keep a copy of your recovery key, you must answer a set of questions.
instead — or in addition to put in it somewhere yourself — you could opt to have Apple put in your convalescence key . If you choose to do so , you ’re motivate to enter the answers to three security questions from a tenacious list of possibilities . Many security expert suggest that you do n’t provide the right answers to these questions , because another company with admittance to your biography , or who pays a individual - finder service to create an online dossier , may be able to respond them . That means remembering a set of Trygve Lie , and that can be harder than the truth , as anyone conducting a doubled life can tell you . Whatever feeler you take , keep runway of your exact answers
If you decide to let Apple keep a transcript of your recuperation key , you must answer a exercise set of questions .
recollect , if you block the passwords to all authorized accountsandlose a book of the recovery key , your data is suffer forever . Seriously . It ’s gone .
Encryption is underway after a restart.
Step 4After noting the convalescence key , clack Continue , and you ’re prompted to provide the username and parole for one of the accounts authorized for FileVault booting . Before clicking Restart here , make indisputable no other accounts are enter under fast - user switching — the next step in this cognitive operation straight off lumber out any other account , neglect any unredeemed changes to spread out files .
penetrate restart , and your Mac restarts . You be prompted to lumber in to the FileVault boot covert , which look much like a unconstipated Mac OS X startup login screen except with a gray-headed background , and only FileVault - empower account are demonstrate .
encoding is underway after a restart .
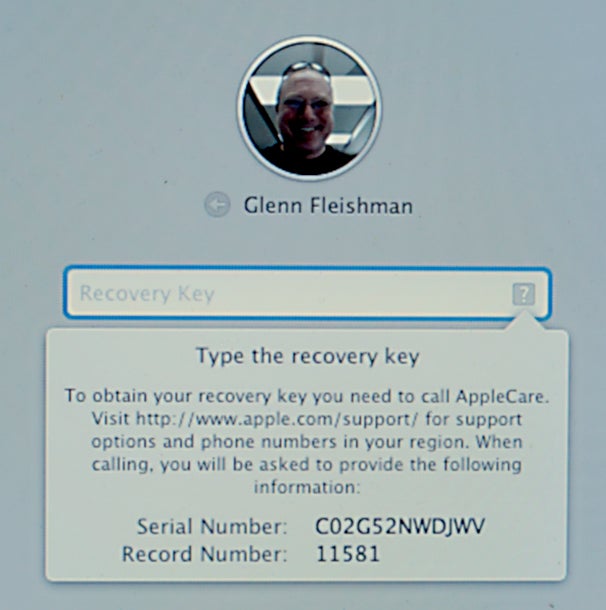
If you forget your account password, you can access your Mac using a FileVault recovery key. If you’ve forgotten that, you can give this info to AppleCare to retrieve the key you stored in escrow.
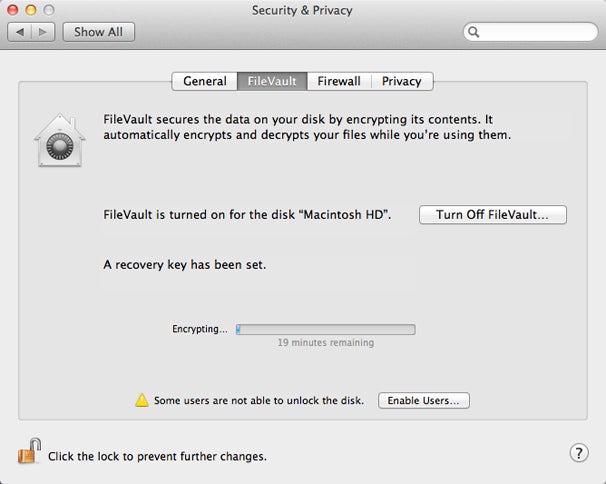
Once you access , if you render to the Security & Privacy pane of System Preferences , you ’ll see that the campaign is in the process of being encrypted . The process may take many hour , but you could use your computer even while the bits are being shin . Any body of work you do at this item may or may not be immediately encrypted , bet on whether or not it ’s on a circumstances of the volume that ’s been converted , but once the operation is finished , all data point will be secure . observe that if you shut down before the entire drive has been encrypted , startup is still confine , but the drive itself is not fully protect — if the cause were remove , it ’s possible information on the not - yet - encrypted portions could be retrieved by forensics experts or cracker bonbon . So it ’s a good idea to let the process finish .
Life with FileVault
Once FileVault is enable , you ’ll want to be mindful of a few dispute in how your Mac behaves . For example , turning on FileVault disables automatic login , as you might imagine — you do n’t need your electronic computer booting directly into a user account , as that would defeat the stage of encrypting the disk in the first place . rather , you must lumber in with any account coiffe up with FileVault access ; once you ’ve logged in to any authorised account , you may leave and then sign in to any other account , or enable flying - user switching to have multiple accounts in use at once .
likewise , most theft - recuperation software package , such as GadgetTrak and Undercover , social function only when your Mac is booted up . So the unfitness to lumber in automatically also prevents the use of goods and services of these products unless your calculator is stolen while you are logged in to a user report . That ’s a trade-off — you might not be able to cut through where your machine has gone , but at least its content are completely useless to whomever stole it .
Turning off FileVault is a dewy-eyed matter . In the FileVault tab of Security & Privacy preferences , get through Turn Off FileVault and then provide the username and password of a FileVault - authorized account . You directly see a progress saloon displaying the decryption position — the system does not even necessitate to restart . ( If you restart while decryption is in process , you ’ll need to use a FileVault - empower login to start up . ) Once FileVault is all disabled , a restart bring up the normal startup physical process and login screen .
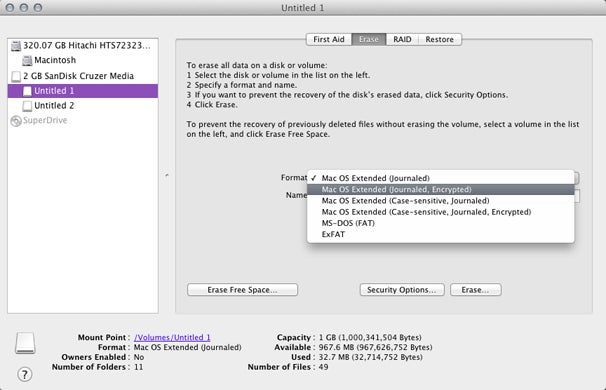
You can format a drive with encryption using Disk Utility.
Locking your Mac, locally or remotely
I note above that if you want real surety , you should get used to close down your computer when you ’re leaving it somewhere . As long as you ’re not worried about government - grade intrusion , you may use several of OS X ’s ignition lock features to get around this demand .
One choice is OS X ’s keychain - status menu , which permit you manually shut up your Mac ’s concealment , turning it altogether bleak and requiring your account password to regain access . To enable this menu , launch the Keychain Access utility ( in / Applications / Utilities ) , pick out Keychain Access - > Preferences , and then contain Show Keychain Status in Menu Bar . Now you may choose the menu ’s Lock Screen bidding whenever you walk away .
A standardized choice is to configure the Security & Privacy dose of System Preferences to require a password right away after eternal sleep or a silver screen recoverer begin . Combine this with a “ hot corner ” for your concealment saver in the Screen Saver tab of Desktop & Screen Saver preferences , and you may lock your CRT screen with a moving-picture show of the cursor .

You provide a strong password when formatting a drive with encryption.
If your computer is boot , and you ’ve forgotten it or had it kidnap , Lion pop the question two more - serious options via iCloud’sFind My Mac feature article , which requires a free iCloud bill . On your Mac , just enable Find My Mac in the iCloud acid of System Preferences ( you ’ll demand to enter to your iCloud accounting here if you have n’t already ) . you may now go to the iCloud.com site from another figurer and click Find My iPhone , or establish the regain My iPhone app on any iOS gimmick . ( Ignore the name : the armed service now observe Macs running Lion , as well . )
In Find My iPhone ( either the iOS app or on iCloud.com ) , take your lacking gimmick — it seem even if it ’s not presently connected to the Internet , and any bidding you pick out here is triggered the next clip the miss twist connects to a live world-wide web — in the cause of a Mac , to the Internet via Wi - Fi . If you ’re lucky , the thief ( or a helpful person ) will seek to connect to a Wi - Fi internet . ( This is one instance in which there ’s a moment of an upside to not preventing access . )
Your options for a Mac include Remote Lock and Remote Wipe . Remote Lock permit you set a six - digit curl code and , optionally , add a message to look on the Mac ’s covert ; when the Remote Lock command is received by the Mac , it immediately shuts down and reboots . But instead of reboot normally , it reboot from the Recovery HD loudness ; more specifically , it boot into a exceptional passcode port . Only if you enrol the correct lock code will the Mac reboot unremarkably — which , depending on how your Mac was previously configure , means either the FileVault startup projection screen , the standard login blind , or robotlike login .
Once you’ve created new partitions on your external drive, you can go back and activate encryption for each.
If you ’re sure the machine is unrecoverable , or you do n’t desire to take chance , go atomic with the Remote Wipe choice . ( remark that once you practice the Remote Lock pick , you ca n’t later use Remote Wipe . So choose wisely . ) You still require to embark a passcode , which interlock the machine to a restricted Recovery HD boot after the wipe occurs . If you have FileVault 2 enabled , the remote wipe encounter forthwith : Lion simply erases the encryption samara , which furnish all information on the parkway gone for safe . Without FileVault 2 enable , the wipe can take hours or foresighted . If you end up recover your Mac after a remote wipe , you ’ll need to get in the passcode you set antecedently ; then you ’ll be able to re - install OS X Lion from the Recovery HD partition and restore from a computer backup .
It ’s probably worth cite that someone who steal a FileVault - enable Mac can never shut down or resume the political machine without losing access to the booted machine ’s startup drive . ( Although they likely would n’t realize this until after shutting down or re-start . ) This also means they ca n’t install updates that require a restart , let the battery operate down to zero , or even wipe the hard drive clean and reinstall the OS to get a “ working ” computer .
The 10.7.2 update to Lion does , however , let someone enter to a FileVault - enabled Mac as a node , which actually reboot into a special Safari - only mood from Recovery HD . This musical mode does n’t reveal your boot hard drive ’s contents , or even have you regard anything other than a Safari windowpane . ( Stay tune up for a separate clause that explains how Find My Mac works when reboot in this style . )
proficiency exist that can distil a key from a running computer , admit your drive ’s encoding key . But they ’re usually curtail to issues of national surety or valuable corporate espionage . For most people , the keychain - based curl and Find My Mac will be security enough .
Using a Recovery Key
Apple makes it prosperous to punch in a recovery tonality if you ca n’t think the password to a FileVault - authorized account . In the initial white-haired iron heel screen , clack on an accounting and then click the question - mark ( ? ) ikon in the word field of force . This reveals a message recitation , “ If you forgot your countersign , you may … reset it using your recovery key . ” Click the right - pointing triangle , and you could get into the recovery Francis Scott Key I discuss above .
If you bury your account password , you could access your Mac using a FileVault recovery key . If you ’ve draw a blank that , you’re able to give this information to AppleCare to retrieve the Florida key you lay in in escrow .
What come about if you ca n’t find the recuperation keystone where you stash it ? If you ’re lucky , you opted to let Apple store a copy . To obtain the convalescence key from Apple , you surveil the same process above , clicking the ? mark and then the right - point pointer . This also uncover two art object of information : the nonparallel number of your Mac , and a special record number used to track requests . You then call AppleCare in your country — the armed service is n’t available in every res publica in which Apple operates — and allow this selective information , as well as the solvent to your security questions . cumbrous , but a bully last - resort option .
When you in the first place enter your security question , the textual matter noted that spelling counts . That ’s because Apple utilize the information you enter as the exact passphrase to encrypt the retrieval key . ( And the convalescence key is a passphrase for the intensity ’s actual encryption keystone , just to show how far this nests . ) Using your precisely typed entries as an encoding passphrase prevent Apple employees from seeing your recovery key fruit without knowing the answers . ( And even if they have the recovery key , they still must hit strong-arm admission to your data processor to enter the key . )
Next pageboy : write in code outside hard drives
Encrypting external drives
Although FileVault is contrive to encrypt your internal startup volume , OS X does ply way to encipher other volumes . Apple does n’t allow as much handholding for these lineament , but I discourse below two way to encrypt an external drive ; they use the same CoreStorage engineering as FileVault . The first , the easiest for encrypting a bare drive — or a crusade you could back up , erase , and then bushel — uses Disk Utility . The second , your only pick for drives with existing information that you do n’t want to erase and restore , postulate the command line ( Terminal ) .
thrust encrypt using either of these procedures are portable — you may connect one to a differentLionsystem , and the Finder will actuate you to enter parole to mount the disk . you could store that countersign in the Keychain to mechanically mount the driving force in the time to come , or you could opt to enter it for each mount . However , bulk or partition inscribe using Disk Utility will not be bootable . ( For that , you necessitate to use the control line to convert an exist bootable partition . )
I exhort you to use these options with cautiousness , because an errant key stroke could cause untold trouble . Where I see them as most utile is with straight attach arduous drives used for backup , where you would wish to splay through backup drives , or where you want to be certain that your backup are well - protect when the organisation is powered down .
Also note that disregarding of which method acting you use — Disk Utility or the command line — once you encrypt a drive , or any divider on a drive , Disk Utility can no longer be used to change the size of it of that drive ’s sectionalisation or execute other functioning ordinarily available . For those operations , you must twist to the command line ( more on that below ) .
Encrypting an empty, single-partition drive with Disk Utility
Using Disk Utility ( in / Applications / Utilities ) , you may either coiffe up an entire cause with a single partition , or you may inscribe single partitions , each with a unique countersign . recall , this rub out the drive , so if there ’s datum on it , be sure to back up that datum elsewhere first . To encrypt an entire single - segmentation drive :
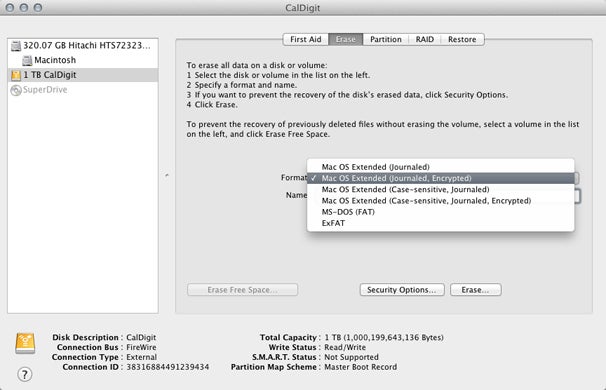
you may format a drive with encryption using Disk Utility .
whole step 1Select the driving in Disk Utility ’s left - hand list . Be indisputable to select the item named with the storage size—1 TB CalDigitin our screenshot here — and then get across the Erase tab . ChooseMac group O Extended ( Journaled , Encrypted)from the Format popup menu .
maltreat 2This step erase all your datum , in lawsuit you demand a admonisher . Click the Erase button , and you ’re prompt to enter a password and avow it ; you ’re also yield the option to get into a countersign hint .
In the password dialogue , you’re able to click the key icon to bring up OS X ’s Password Assistant , which helps you prefer a inviolable countersign . ( check that and write it down or otherwise read it — if you block it , the drive ’s data point is unretrievable ! ) snap Erase to land up the job .
Encrypt multiple empty partitions with Disk Utility
If you ’d like to encrypt a crusade with individual partition , follow these tone ; commend to back up any data on the drive first , as this subroutine erases it totally :
Step 1Select the driving — named with the store size — in Disk Utility ’s left - hand list . If the drive is n’t already formatted as Mac OS Extended ( Journaled ) , first erase it , choosing Mac OS X Extended ( Journaled ) format . Don’tchoose theEncryptedoption in the formatting pop - up carte du jour here — that comes later .
Step 2If partitions are n’t already place up , click the Partition tabloid . From the Partition Layout pop - up carte du jour , choose the bit of partitions ; then use the options on the blind to prefer the sizes of the partitions . Click Apply .
Step 3Select apartition — one of the volumes listed below the chief drive in Disk Utility ’s volume inclination — you want to write in code . fall into place the Erase tab , and then selectMac atomic number 76 Extended ( Journaled , Encrypted)from the Format pop - up carte du jour . snap the Erase push , provide a password for the volume , and then click Erase to encrypt the partitioning .
Once you ’ve created new partitions on your international drive , you may go back and activate encoding for each .
An significant security billet when using a zone drive : Once you ’ve entered the parole for a partition to mount it , that word is cached as long asanypartition on the drive remain mounted . This means anyone could access an unmounted partition without ask to go in its password . You must unmount all partition — eject the integral platter , as it were — to assure that OS X requires a password again for each partition .
Encrypt existing partitions using the command line
If you want to enable encoding on a drive or partition that presently contain datum , and you do n’t require to reformat the volume(s ) and repair that data from a backup , you ’ll need to use Terminal . You should , of line , still back up your data before you continue , just in case .
pace 1Launch Terminal ( in / Applications / Utilities ) . The command you ’ll be using to create or transfer encrypted international disc is calleddiskutil . Typediskutil listand press Return to see which disks are climb and how each is label by the organization . Lion ’s CoreStorage engineering , which handles phonograph recording encryption , figure out only with drives formatted as Mac OS Extended ( Journaled)—that ’s journaled HFS+ for the technically disposed — with the GUID Partition Table strategy . ( The sectionalisation is changed to another formatting after encoding . )
Step 2Locate the volume you want to cypher , and look at the Identifier bulk ; you ’ll utilize that identifier — I’m going to usedisk4 in my examples here — in your commands . To add encoding , you apply a CoreStorage bid that can be abbreviated afterdiskutilas simplycs . Be sure the volume has no files in manipulation ( it must be unmounted to discharge the operation ) , and type the following command , wherePASSWORDis your desired passphrase for the encrypt volume :
diskutil cs convert disk4 -passphrase PASSWORD
Alternatively , could type - stdinpassphraseinstead of - passphrasewithout a passphrase ; this would prompt you , after pressing Return , to go in the passphrase on a separate bank line . ( I recommend a strong word with only letters and numbers — I used1Passwordto generatejdeS6DG4kE8Zzfa — because the bidding strain has trouble with some punctuation . ) This passphrase is used to unlock the disk ’s much stronger encoding paint and thus gain ground access to the disk ’s cognitive content .
Step 3Terminal will show primitive animation as the drive ’s partition are alter and the drive is readied for remounting . On completion , you ’re actuate for your passphrase to mount the bulk in the Finder . you’re able to opt to check the boxwood to stack away the keystone in the Keychain , but you may desire to decline for security system ’s interest — that way , if both your computer and the unmounted drive are make off with , the parkway ’s contents stay safe even if the Mac is reboot up . The parkway stay mounted while it ’s inscribe .
To see the status of encryption ( noted as conversion ) enterdiskutil cs listand press Return . Look for the indented dividing line that start with your disc identifier : Below aDisk : label , you ’ll find a pipeline that saysSize ( Total ) , with the next readingSize ( Converted ) . when the Total and reborn numbers pool jibe , the whole disk has been encrypted .
If you later want to remove the encoding from a volume that you inscribe using the instruction line , you may decode the driving with a like dictation . Enter the following command followed by a Return ; type the intensity ’s passphrase when prompted :
diskutil cs revert disk4
After get in the passphrase , the volume is decrypted , but remains climb as the decryption operation happens in the desktop . you could typediskutil cs listfollowed by Return to view the position of decryption , observe as simplyconversion . ( notice that on a drive set up with multiple partitions , if you encrypted one or more of those partitions using Disk Utility , you ca n’t decrypt those segmentation using the program line line — you must use Disk Utility to take away encryption by delete the partition all . )
Conclusion
FileVault 2 can ply the necessary level of security to assure your data is n’t hijacked when a computing machine is lost or stolen , but it has to be used with other measures to assure that you are n’t still exposing yourself to risk .
Lion and iCloud ’s Find My Mac feature provide a bang-up backstop in the case of a thieving or loss , letting you easily lock or wipe a system to render it useless to the party in possession of the Mac — assuming the Mac connects to the Internet at some point after you issue the outback wipe or lock bid .
The only risk of infection in using FileVault is being too cagy for your own goodness and forgetting how to unlock the secrets you ’ve cached off .
Updated 10/21/2011 , 1:50pm , to take note that backups of encipher volumes are not themselves encrypt ; that Disk Utility can not produce bootable encrypted divider ; and that OS X 10.7.2 added a Edgar Guest - login choice to FileVault - enabled inauguration drives . update 11/7/2011 to notice that FileVault 2 does n’t currently allow you to hit an authorized substance abuser once supply .
[ Glenn Fleishman , a aged contributor to Macworld , study binary math at a new age . He writes weekly for the Economist magazine’sBabbage web log , and his most late book isTake Control of Your 802.11n AirPort web , update for Lion . ]
