The QuickTime Player app lives a unfrequented hushed life in the Applications folder of many Mac users . It ’s often ignored because folks assume it ’s simply a video playback app . This could n’t be further from the truth . Here are a few utile thing you’re able to do to your videos in QuickTime Player that youcan’tdo in iPhoto or the unexampled Photos app .
Record video and audio
Using the built - in camera on your Mac ( or even a USB webcam ) , you’re able to record your own TV . you may also read audio using your Mac ’s ramp up - in microphone , an international mic , or a melodious instrument connected with a USB cable’s length . Or perhaps you desire to enter what ’s happening on your screen — say , for a TV tutorial . QuickTime Player can do that , too .
To do it , take File > New Movie Recording , New Audio Recording , or New Screen Recording . The first two option require you to pick an input source and quality , then just fall into place the red-faced Record clit . The last alternative summons a pane with the record push and a couple of audio choice : get through once to record your integral screenland , or drag to specify a specific arena to record . When you ’re finish , click the record release again ( when record your concealment , a grim phonograph record push appears in your menu cake ) . Once you check the transcription , the file open in QuickTime Player , so be sure to take File > Save to save it .
Present or record your iPhone or iPad screen
QuickTime Player can show or record a live panorama of whatever is happening on your iOS gimmick . If you ’re using your Mac for a presentation , this trick lets you show your iOS equipment ’s screen centered within your Mac ’s screen .
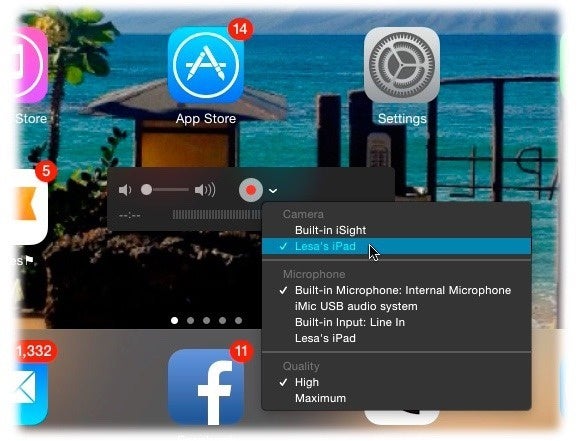
apply the card shown here to peck your iOS gimmick for display or recording .
To do it , attach your iOS twist to your Mac via USB cable , then in QuickTime Player take File > New Movie Recording . Point your cursor at the QuickTime window and the record button appears . From the menu next to it , beak your iPhone or iPad from the list of cameras . You ( and your hearing ) will then enjoy the biggest version of your iOS machine you ’ve ever seen ! To record the action , click Record .
Rotate or flip a clip
If your television needs to be flipped or rotate , touch into the Edit menu for the Rotate Left , Rotate Right , Flip Horizontal , and Flip Vertical commands . Many a Mac user has gone unreasoning trying to place the same commands in iPhoto or Photos , because while both syllabus can turn out pictures till the cows come home , they ca n’t twiddle a video recording .
Split and combine video clips
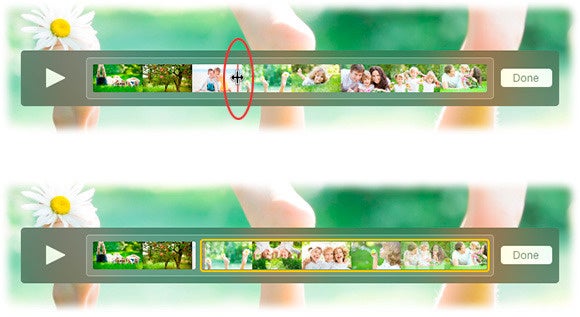
Tosplita video clipping into two ( or more ) pieces , open a file and choose View > Show Clips ( or entreat Command - E ) , and then drag the QuickTime Player playhead ( it ’s circled below ) to the spot where you want the telecasting to split . pick out Edit > Split Clip ( or adjure Command - Y ) , and you see both clip highlighted in scandalmongering .
At this point , you could enter another clip ( as report next ) or rearrange the clip by dragging them left or right . If you separate the clip intothreechunks , you could pick out the middle one ( a yellow lineation appears around it ) and zap it by pressing the Delete key on your keyboard .
This playhead marks the spot where the clip will split ( top ) . Now you have two clips ; come home one clip to deselect the other so you could scoot it around in your telecasting ( bottom )
Tocombineclips , spread out one clip and then prefer Edit > Add Clip to End . In the candid duologue box , double - click the clip you desire to tack together on . you may also drag television clips ’ icons from the Finder into a video windowpane . QuickTime Player adds them to the end of the existing video . ( you could then retell the summons to combine several clips . )
If you want the 2nd video to seem somewhere in themiddleof the first one ( as shown in this object lesson ) , split up the clip and then click the clip that appears just before the bit where the novel video will go . opt Edit > Insert Clip After Selection , and in the ensue dialog box , double - click the television file you need to bring in . you’re able to also drag a video recording Indian file from the Finder directly into the break between two video clip .
The new footage come out after the clip that ’s currently selected ( in this example , the first clip ) .

Export and share
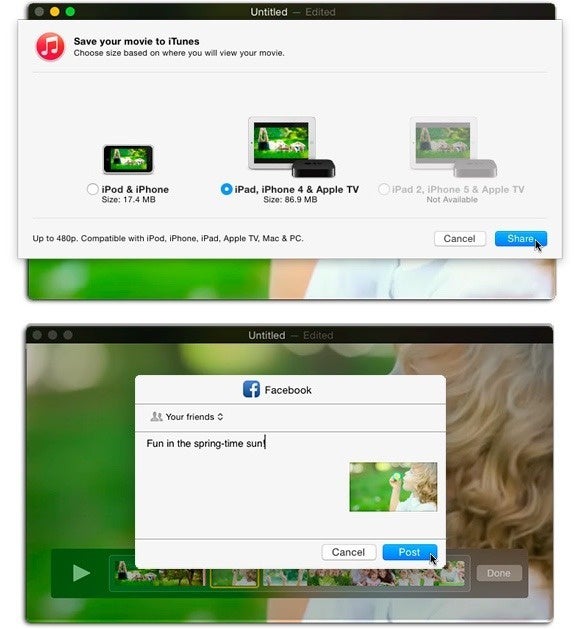
When you ’re terminate redact your video , choose File > Export and you get the common roundup of declaration option ( 480 , 720 , and 1080p ) , scope for iOS devices and Apple TV , and an selection to export sound recording only . The iTunes option gives you these same iOS and Apple TV optimized place setting , but sends the TV file instantly into your iTunes library .
For quick exporting and deal with others , choose File > Share . The resulting menu let in Mail , Messages , AirDrop , and the social medium sharing sites Vimeo , Facebook , Flickr , and YouTube . Pick your poison and QuickTime optimizes your video for that special program or servicing .
depend on the size of your motion-picture show , all iOS / Apple tv set export choice may not be usable ( top ) . When you blame Facebook , you may intend privateness and tote up a verbal description ( bottom ) .
To save the changes to your TV filing cabinet , choose File > close-fitting and in the leave dialog box seat , name your freshly edited television and get through Save . To see the emended telecasting over in iPhoto or Photos , just spell it . ( merrily , photo lets you admit television in saved slideshow project ! ) Until next metre , may the creative force be with you all !
