While it ’s true that Apple is phase out iPhoto in favour ofits new Photos app , iPhoto is still an incredibly powerful program and include many feature of speech you in all probability know nothing about . If you do n’t plan on go toYosemite 10.10.3 , or if you elect to keep using iPhoto when you do — yep , it ’ll still work!—here are four utilitarian thing that iPhoto can do that even the new Photos app currently can not .
Add captions to slideshows
If you do n’t relish the musical theme of narrating your slideshows , adjudicate tally captions instead . Select a photograph in an record album , or in Photos or event view , and then click the Info button in iPhoto ’s toolbar . In the panel that appears , enter a title and/or a verbal description for your photo ( titles appear in a slimly orotund decimal point size of it than verbal description ) .
Captions come along as white textual matter in the lower left box of your exposure . ( And no , you ca n’t tailor-make font size , color , or caption location . )
Next , take the record album or photos you desire in your show and choose File > New Slideshow ( this make a save slideshow in the Projects plane section of the reference list ) . get through the Themes clit in iPhoto ’s toolbar and opt Ken Burns or Classic , and then clack Choose . Click the preferences button in iPhoto ’s toolbar and click the All Slides chit .
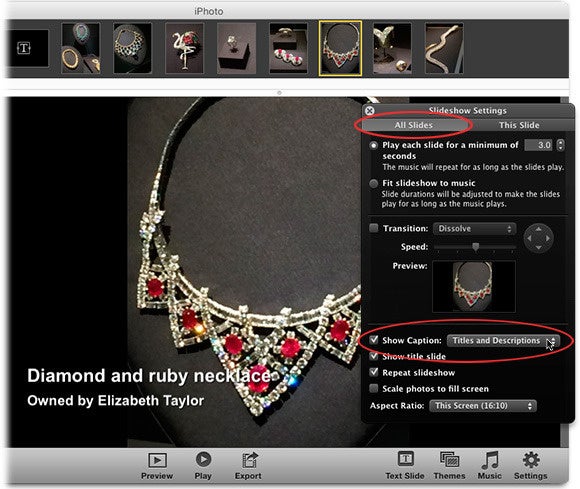
From the Show Captions menu , pluck the kind of caption you need — both titles and descriptions are call on on in this example . you’re able to also add subtitle to insistent slideshows — those generated by clicking the Play button in iPhoto ’s toolbar — by joggle your shiner to summon the floating menu and then cluck the gear ikon to open slideshow options . ( As of this penning , Photos ’ slideshow setting are limited and do n’t contain a Show Captions menu . )
Adjust Levels using a live histogram
A popular path to even up people of colour in advanced image editors such as Photoshop , Photoshop Elements , Lightroom , and Aperture is to do a Levels adjustment . you could do the same affair in iPhoto using the Adjust control panel ’s histogram .
Just pick out a photo and click the Edit button in iPhoto ’s toolbar , and then flick the Adjust tab at upper right . The histogram that appears is a ego - updating collection of lilliputian bar graphs represent the dark and light tones in your photo ; darker shade appear at unexpended and lightheaded 1 at right-hand . The taller the barroom , the more pixels you have at that layer of brightness . ( Another way to cogitate of a histogram is to opine your photo is a mosaic , and that the individual tiles have been separate into same - color heaps . The taller the sight , the more tile you have of that particular color . )
As you could see from this before ( top ) and after ( bottom ) exemplar , a Levels allowance can greatly ameliorate some photograph .
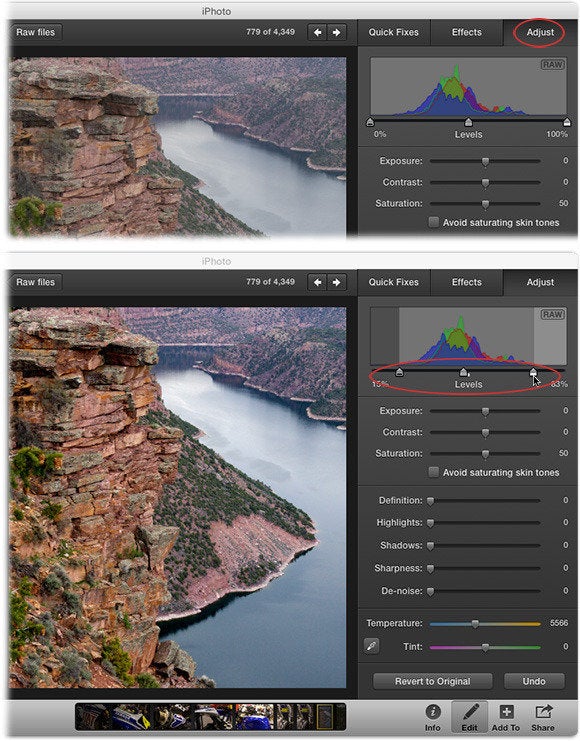
If the bar graphs in your histogram cover all the territory from left to right wing , you already have a roughly even distribution of drab and light smell in your characterization , so you ’re probably in good physical body . But if the graph come up short on either the left-hand ( black ) or right ( wakeful ) side , you need to make an adjustment to spread out the photo ’s information .
To do it , drag the left and right handles on the Levels slider inward to where the streak graph commence . Doing so resets your black ( shadow ) and livid ( highlights ) points . Next , align your photo ’s midtones by dragging the middle handle slenderly left or proper until the photo looks good to you . ( While you may choose to view a histogram in the Photos app ’s Adjust dialog box using the Add release , it does n’t have Levels slider . )
Recover details in the highlights
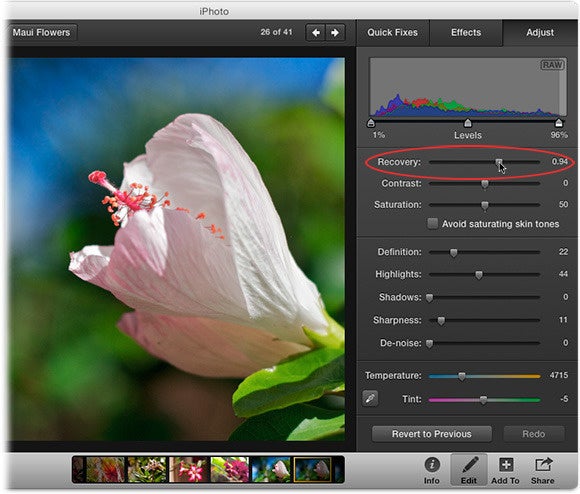
photo entrance in in the altogether format turn back more information than their JPEG brethren , so iPhoto have you do a picayune more with them . For instance , there ’s a hidden slider in the Adjust venire that you’re able to mobilise to go back lost point in the highlight .
The hidden Recovery slider can salvage the fine detail captured in this blank flower .
To use it , select a in the raw format photo and click the Edit button in iPhoto ’s toolbar , then flick the Adjust tab at upper - right . squeeze and guard the selection key on your keyboard and the Exposure slider becomes Recovery or else ; just hale the Pseudemys scripta to the rightfulness to convey back any detail that was turn a loss in the highlights . Release the choice key and the slider run short back to adjusting Exposure . ( As of this writing , the Photos app does n’t let in a Recovery slider . )
Find every photo without a keyword
Keywords are descriptive words — like solid food , sunsets , or Fido — that you’re able to use to pronounce and categorize your photos , regardless of which album or Event they ’re in . The beauty of iPhoto keywords is that they ’re searchable , which lets you quickly get specific photograph .
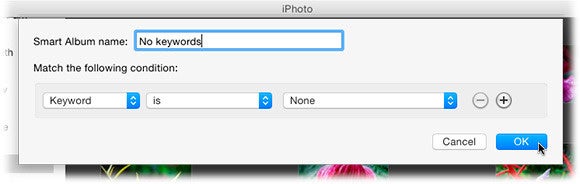
To find all the photos thatdon’thave keywords , choose File > New Smart Album and name it “ No keywords . ” In the result dialogue corner , set the menu to “ Keyword , ” “ is , ” and “ None , ” and then cluck OK . iPhoto scours your entire depository library for photos that do n’t have any keywords applied and plops them into your new fresh record album . The next time you ’ve got a hankerin ’ to go keywordin ’ , those picture will be hold back for you . ( As of this writing , the Photos app ’s impudent album variables are limited , and do n’t include the “ None ” value . )
As soon as you add a keyword , iPhoto removes them from the saucy album . Slick !
As you may see , iPhoto is full of surprise , and there may yet be grounds enough to keep using it even after the Photos app strike the scene . Until next clip , may the creative force be with you all !
