When you recall about all the variable star involved in bring about a well expose photo , it ’s a wonder any picture turns out midway decent . If you ’ve got a great field of study but terrible color , the follow shot - saving solutions can come to the rescue in a diversity of apps .
Black and white
Take the color out of the equation by converting the exposure to black and white . You do n’t even need image editing software — Automator , set up on every Mac , can convert whole batches of pic to black and white .
To convert to black and snowy in iPhoto , select an paradigm and click the Edit button in the toolbar . penetrate the Effects tab at upper right and then individual - tick Black & White or repeatedly sink in Fade . you could habituate iPhoto ’s Adjust jury to tweak contrast .
In Photos for iOS 8 , select a photograph and tap Edit , and then intercept the Smart Adjustments icon ( it expect like an mileometer ) . Tap B&W and then draw the resulting crimson bar up or down over the previews until you ’re happy with the contrast .
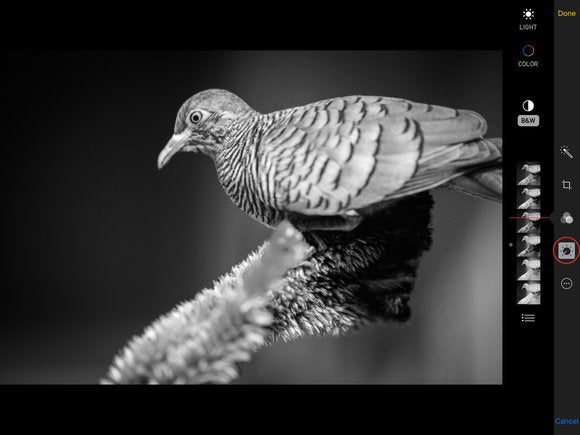
The revamp Photos app in iOS 8 lets you easily make a high contrast black and livid exposure .
InLightroom , pick out an trope and pressure D to get in the Develop module . In the panels that seem at the rightfulness , scroll to notice the HSL / Color / B&W jury , and then cluck B&W in the panel ’s header . Tweak the control panel ’s Pseudemys scripta until the dividing line looks salutary to you .
In Pixelmator , choose Layer > Duplicate Layer and in the Effects web browser , double - cluck the Black & White thumbnail . And to convert to disgraceful and white in Photoshop Elements or Photoshop , see the next incision .
Partial color
For a more creative ignominious and white approach , attempt leaving one expanse in coloring . This technique is beyond iPhoto ’s capabilities , but inPhotoshop Elements 13 . However , you could do it manually in earliest edition of Elements , as well as about any version of Photoshop .
First open an image ( with Elements , you should expend Expert or Full Edit manner ) and then bid D to set up the color microchip at the bottom of the Tools control panel to the default of black and whitened , and press X until black-market is on top . come home the half black-market / half white Mexican valium at the bottom of the Layers panel in Photoshop — it ’s at the top of the gore in element — and choose Gradient Map . Your image is instantly transformed into abeautifulblack and white , which makes the Gradient Map my changeover method acting of option in both computer programme !
With the mask active in your Layers panel ( it ’ll have a light - colored outline ) , crush B to take hold of the Brush putz , and then paint across the area of your image that you want to keep in colouration . If you reveal too much color , press X to flip - flop your coloration chips so blanched is on top and brushwood back across that area . For more on masking , and to see this proficiency in action , seemy previous column on master mask .
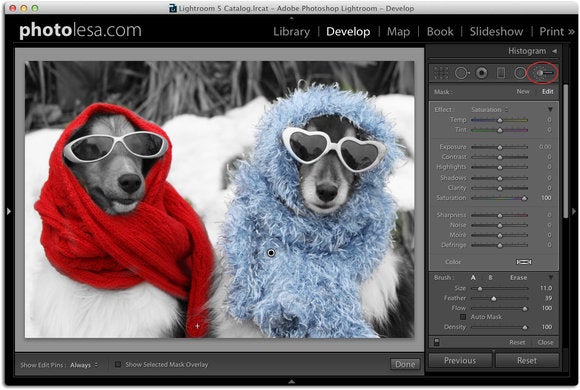
In Lightroom , press D to move into the Develop mental faculty and in the HSL / Color / B&W panel , click Saturation and then drag each resulting skidder all the way left to desaturate the range of a function . touch off the Adjustments Brush ( circled ) and next to the word Mask , click New . tangle the chroma slider all the way of life right , increase the Flow slider to 100 % , and then brushing across the domain you want to stay in colour . If you unveil too much color , selection - drag across those areas to desaturate them again .
A partial color effect emphasize your focal point in an telling way .
In Pixelmator , choose Layer > Duplicate Layer and in the Effects internet browser , threefold - fall into place the Black & White thumbnail . bestow a layer mask to the black and white level by clack the geartrain icon in the Layers panel and opt Add Layer Mask . Next , press B to activate the Brush tool , click the people of colour swatch in the Tool Options at the top of your screen and choose pitch-dark .
Paint atop the surface area that you require to remain in color , while using your left / right angle bracket keys to verify brush size . If you let out too much colour , set the Tool Options ’ coloration swatch to white and paint back across that area . you could also perform this effect inPixelmator for iPad .
Color tint
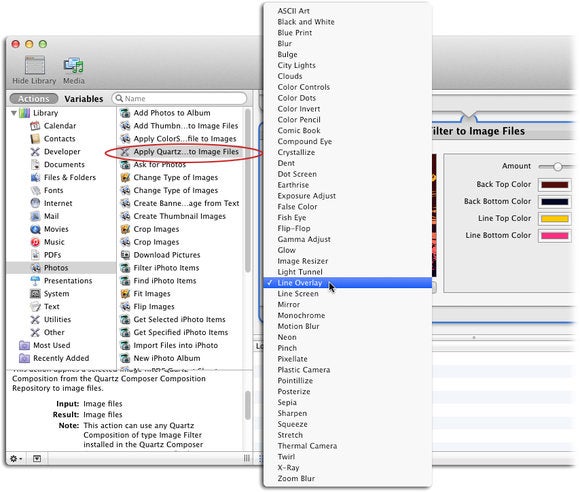
colour tincture are posh , plus they ’re useful for usher in consistency acrossmultiple shots that you combine into a picture project . Automator has myriad options for tinting and peculiar consequence via its “ Apply Quartz Composition Filter ” action ( explicate in the television connect above ) , but iPhoto ’s options are confine : once you ’re in Edit style , you’re able to bring a chocolate-brown or vintage tint by clicking the Effects tab at the upper rightfield and then clicking Sepia ( a brownish tint ) or Antique ( which contribute a pernicious vintage feel to your exposure , a nice choice ) . Your clicks are cumulative — just keep clicking to strengthen the event .
you could make slick effects using Automator ’s Apply Quartz Composition Filter natural action .
In Pixelmator , choose Image > Color Adjustments and from the resulting panel , embroil the Colorize effect onto the image . In the Colorize control board that appears , puff the small circular button that appears outside the color steering wheel to pick a semblance , and then use the Saturation and Lightness sliders to fine - tune the shade .
In Photoshop Elements ’ Expert modal value , click the Effects “ fx ” clitoris at lower decently or choose Window > Effects . pick out Show All from the resulting menu and near the bottom of the resulting preview thumbnail , you ’ll spot spicy , gullible , purple , Battle of Magenta , or browned tincture ; just double - click one to apply it to aduplicateof your image level , give you the power to lessen the force by lowering that level ’s opaqueness lay out .
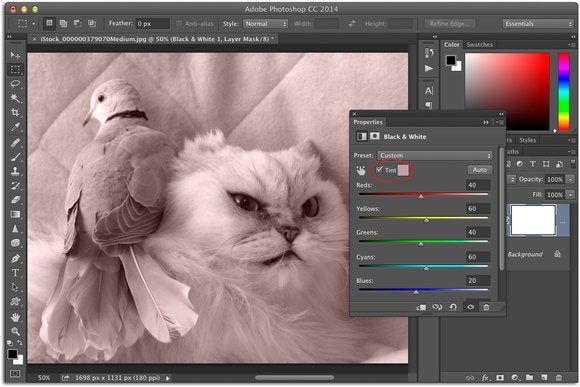
In Photoshop , click the half opprobrious / half ashen roach at the bottom of the Layers panel and choose Black & White . In the resulting Properties panel , turn on Tint and click the hearty ( circulate ) next to it . In the resulting Color Picker , expend the vertical bar to beak a range of colors and click inside the large square to tell Photoshop how light or how dark you want the coloring material to be . Back in the Layers panel , you’re able to tweak the Black & White layer ’s opacity to fine - melodic phrase the burden .
Using a Black & White adjustment layer is one of many ways to give a color tincture in Photoshop .
As you may see , it ’s not impossible to save a subpar photo — it just requires a piddling know - how . Until next time , may the originative force be with you all !
PhotoLesa.comfounder Lesa Snider teaches the world to make good computer graphic . She ’s the writer of the best - sellingPhotoshop : The Missing Manualbooks , coauthor ofiPhoto : The Missing Manual , author ofThe Skinny Bookebook series , a foundingcreativeLIVEinstructor , and even editorialist for Photoshop User and Photo Elements Techniques magazine .
